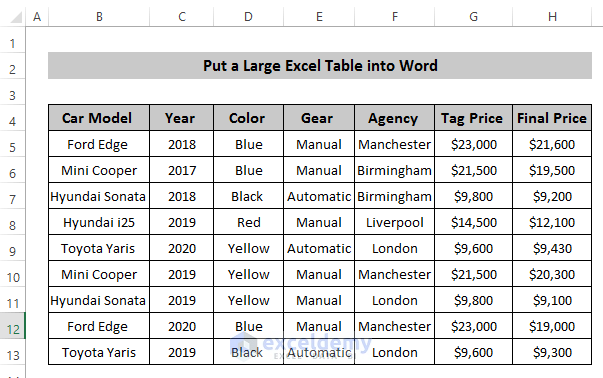
To show how to put an Excel table in Word, we’ll use a dataset that includes some car models with their tag price and final price.
Method 1 – Put a Large Excel Table into a Pre-Made Table in Word
Steps
- Open the Excel file from where you want to take the Excel table.
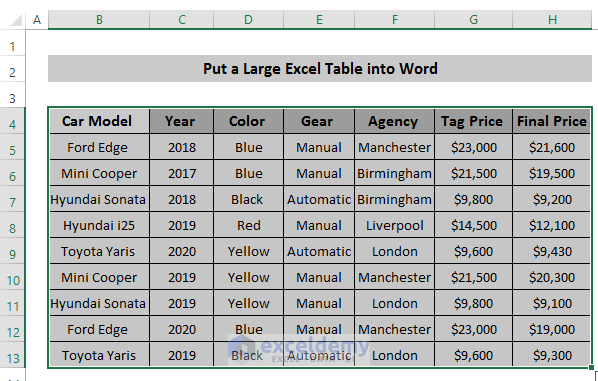
- Select the data table from your Excel.
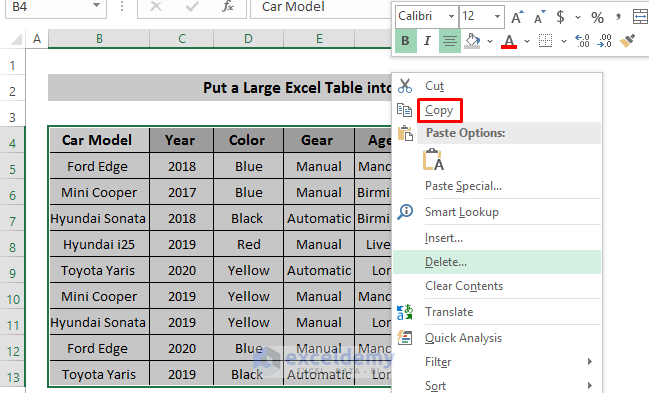
- Right-click on it and an options dialog box will pop up.
- Select the Copy option.
- Open a new Microsoft Word document.
- Select the Insert tab in the ribbon. Select Table from Tables group.

- In the Table option, select Insert Table.

- An Insert Table dialog box will pop up.
- In the Table size section, change the Number of columns and Number of rows to align with your dataset.
- Set the Fixed column width as Auto.
- Click on OK.
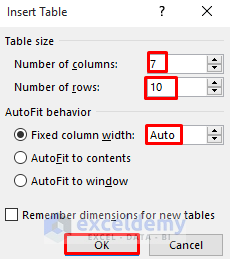
- For our example, we need a table with 7 columns and 10 rows.
- Select the whole table.

- Go to the Home tab in the ribbon and select Paste from the Clipboard group.

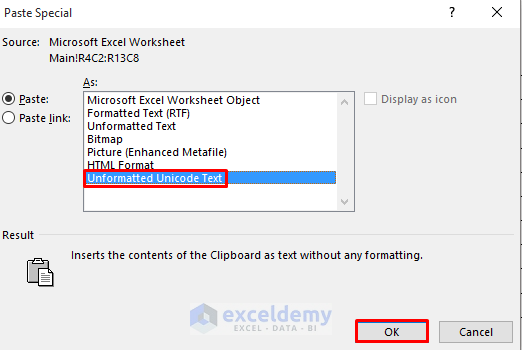
- From the Paste options, select Paste Special.

- A Paste Special dialog box will appear. Select Unformatted Unicode Text and click on OK.
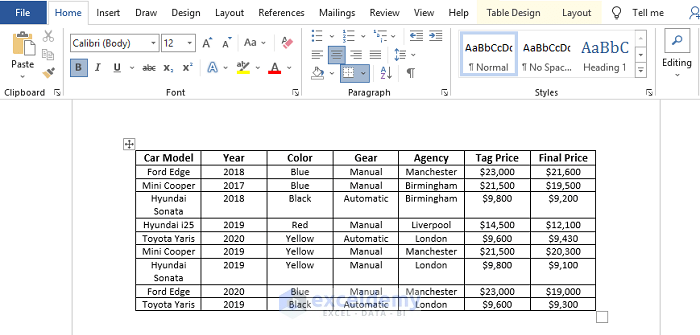
- You can see all the copied data.
Read More: How to Copy Excel Table to Word with Gridlines
Method 2 – Paste an Excel Table as Plain Text into Word
- Open the Excel dataset.
- Select the data.

- Right-click on the selection and select the Copy option or press Ctrl + C.

- Open a Microsoft Word document.
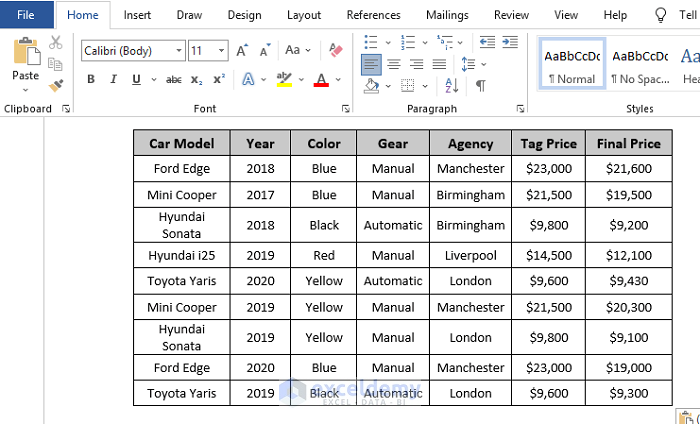
- Go to the Home tab in the ribbon and select Paste or use Ctrl + V as a keyboard shortcut.

- If you want to change any data, you need to do it manually.
Read More: How to Insert Excel Table into Word
Method 3 – Using a Large Excel Table as a Linked Object
In the previous methods, we got a static solution. If you change the dataset in Excel, the Word table won’t change. Using the table as a linked object solves that, automatically adjusting the table in Word based on changes in Excel. You need to have both files in the same folder for them to remain linked.
Steps
- Select the Excel dataset.

- Copy the table with Ctrl + C or choose the Copy option from the right-click context menu.

- Open a new Microsoft Word document.
- Go to the Home tab in the ribbon and select Paste from the Clipboard group.

- From the Paste Options list, select Paste Special.

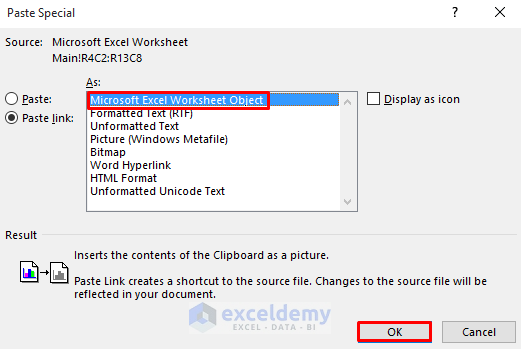
- A Paste Special dialog box will appear. Select Paste link.
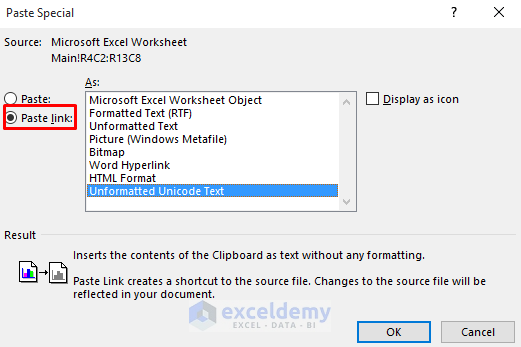
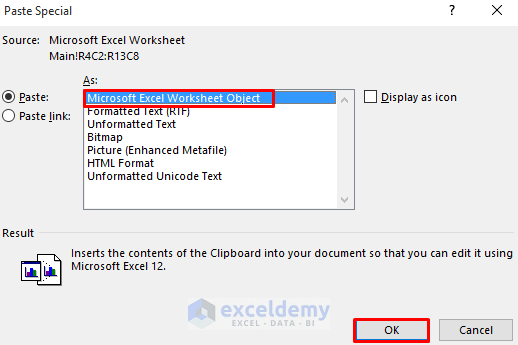
- Select Microsoft Excel Worksheet Object from the options.
- Click on OK.
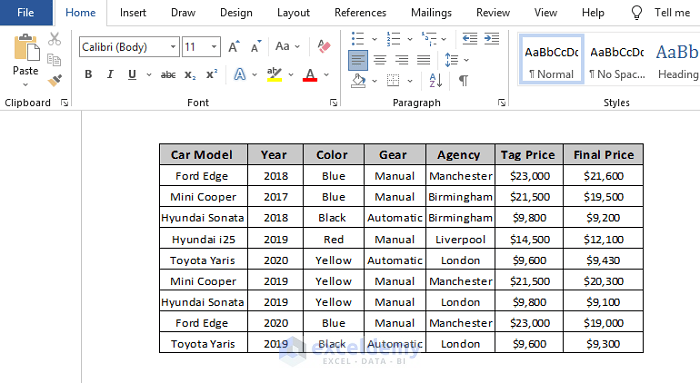
- There we have the desired result.
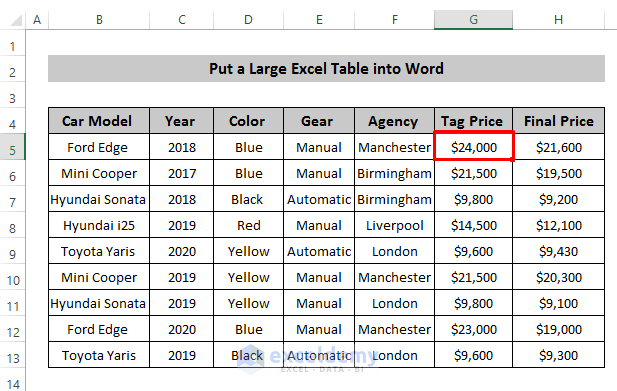
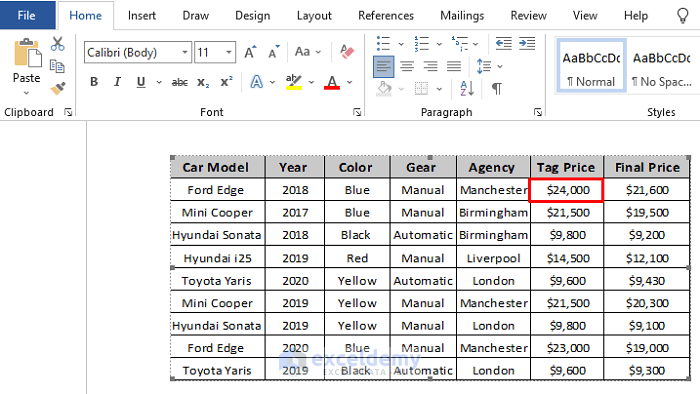
- If you double-click on the table, it will open the original Excel file. We changed cell G5 from $23,000 to $24,000 and saved the file.
- Go to the Word document.
- Right-click on the table and select Update Link.
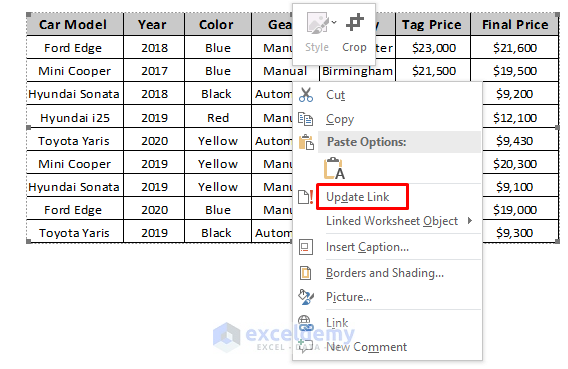
- This will update the dataset based on the Excel file.
Read More: How to Copy Table from Excel to Word
Method 4 – Enabling the Excel Interface
In the previous method, you need to have both Excel and Word files to keep the datasets linked. This method will eliminate this problem.
Steps
- Select the Excel dataset.

- Right-click on it and select the Copy option.

- Open a new Microsoft Word document.
- Go to the Home tab in the ribbon and select Paste from the Clipboard group.

- From Paste Options, select Paste Special.

- A Paste Special dialog box will appear. Select the Paste option.
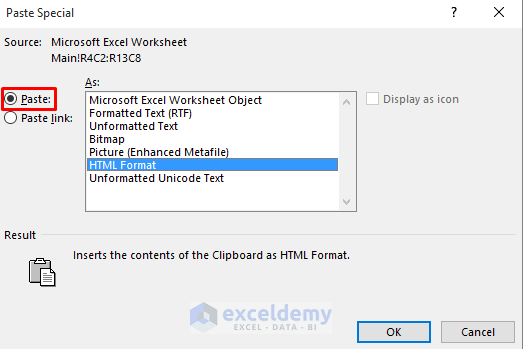
- Select Microsoft Excel Worksheet Object from the options.
- Click on OK.
- There we have our desired result.
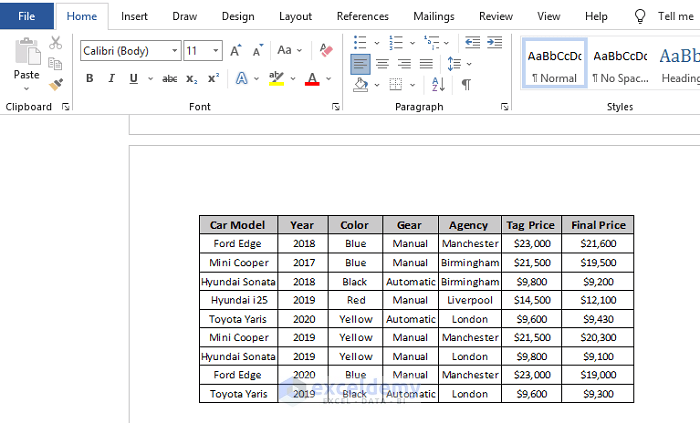
- If you double-click on the table, it will open it with Excel’s interface for editing.
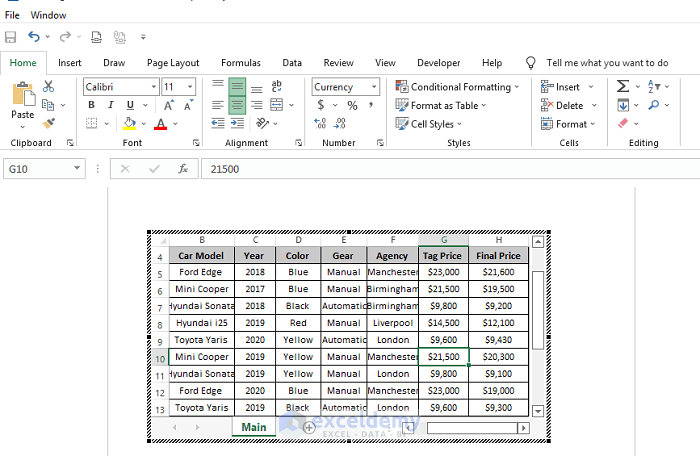
Note
The biggest advantage of using this method is that there is no need to track two separate Excel and Word files.
Method 5 – Put a Large Excel Table into Word as a Static Image
- Select the Excel dataset.

- Right-click on it select the Copy option.

- Open a new Microsoft Word document.
- Go to the Home tab in the ribbon and select Paste from the Clipboard group.

- Select Paste Special.

- A Paste Special dialog box will appear. Select the Paste option.

- Select Picture(Enhanced Metafile) from the options.
- Click on OK.
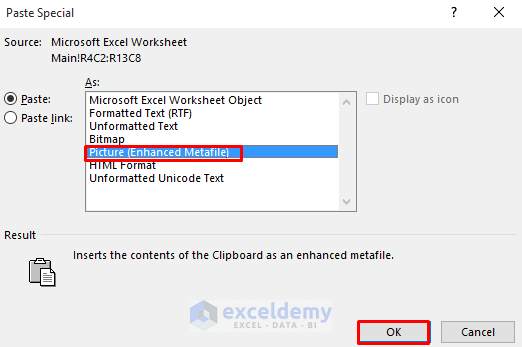
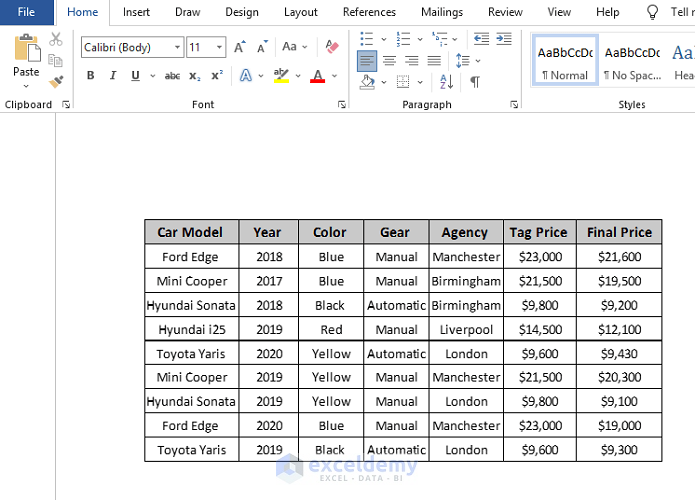
- This will give a static image of the dataset.
Read More: How to Paste Excel Table into Word in Landscape
Method 6 – Using a Linked Image
Steps
- Select the Excel dataset table.

- Right-click on it and select the Copy option.

- Open a new Microsoft Word document.
- Go to the Home tab in the ribbon and select Paste from the Clipboard group.

- Select Paste Special.

- A Paste Special dialog box will appear. Select Paste link.

- Select Picture(Enhanced Metafile) from the options.
- Click on OK.
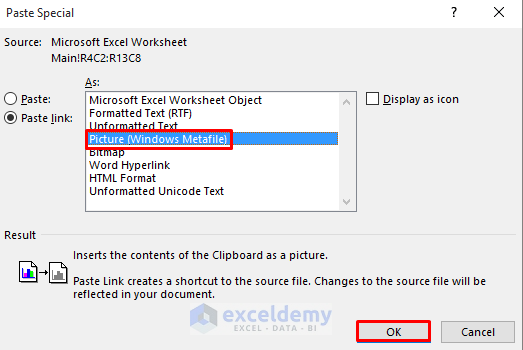
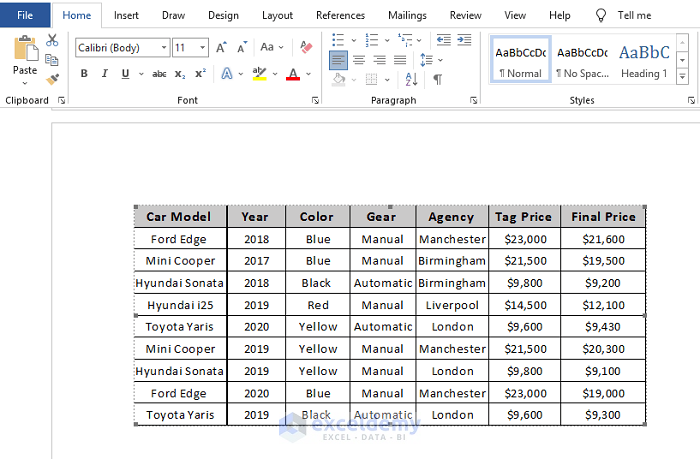
- This will provide an image that is linked with the original Excel file.
Note
If you share the Word file with someone, then make sure you share the linked Excel file as well. Otherwise, it will act as a regular image.
Method 7 – Utilizing the Object Command
Steps
- In Microsoft Word, go to the Insert tab in the ribbon and select the Text group.

- From the Text group, select the Object command.

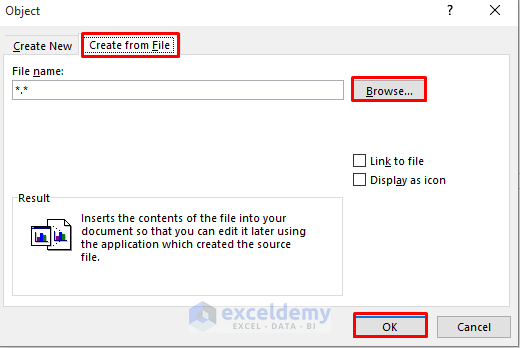
- An Object dialog box will appear. Select Create from File, Browse the Excel file from your computer, and click on OK.
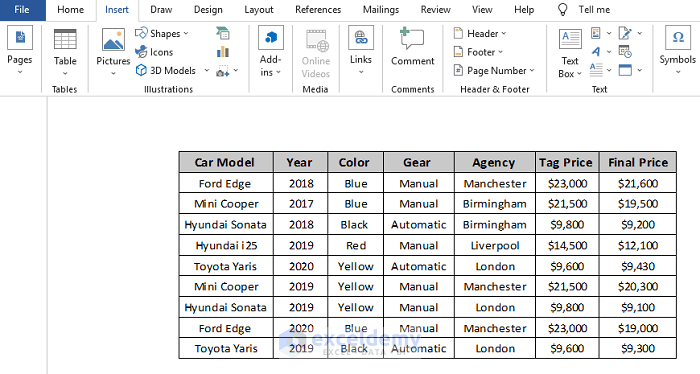
- This will open the Excel table in Word.
Read More: How to Insert Excel Table into Word with Formulas
Download Practice Workbook
Download this practice workbook and the Word file from below.
Related Articles
- How to Paste Excel Table into Word Fit to Page
- How to Add Drop-Down List in Word from Excel
- How to Create Multiple Word Documents from Excel
<< Go Back to Export Excel to Word | Export Data from Excel | Learn Excel
Get FREE Advanced Excel Exercises with Solutions!

