Method 1 – Using Fill Color to Change the Background Color in Excel
Steps:
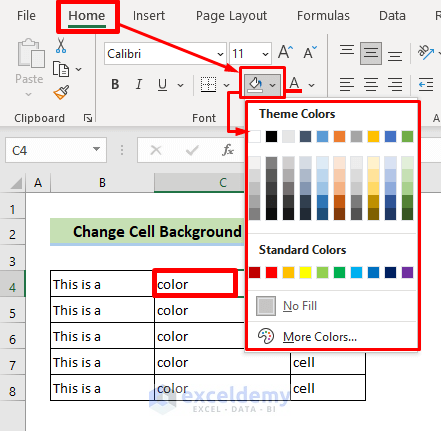
- Select the cell in which you want to change the background color.
- Go to the Home tab, click on the Fill Color icon, and choose the color you want from the dropdown list.
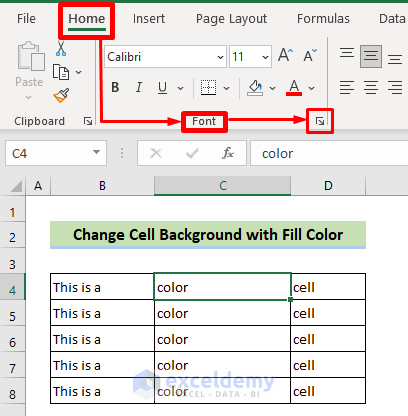
- Alternatively, select the cell, go to the Home tab and choose the Font Settings icon from the Font group.
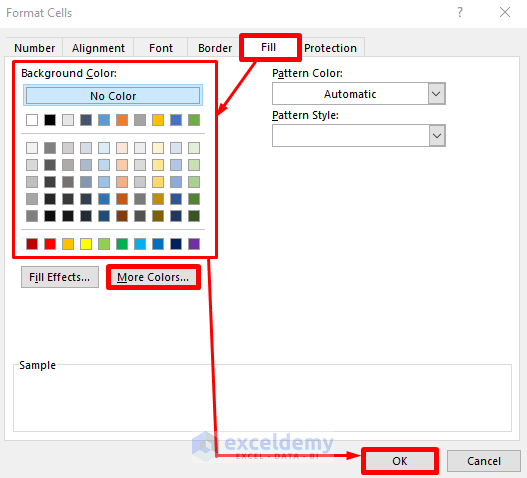
- The Format Cells window will appear. Go to the Fill tab. Choose the color that you want as the background from the color palette.
- If you want more colors or customized colors, click on the More Colors… button and choose from there.
- The Colors window will appear. Choose the standard or Custom color from here and click on the OK button.
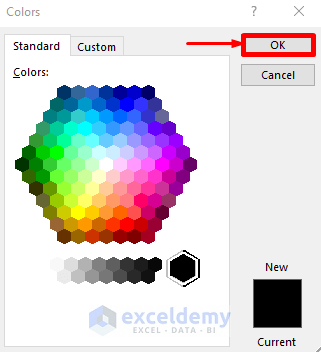
- Click on the OK button.
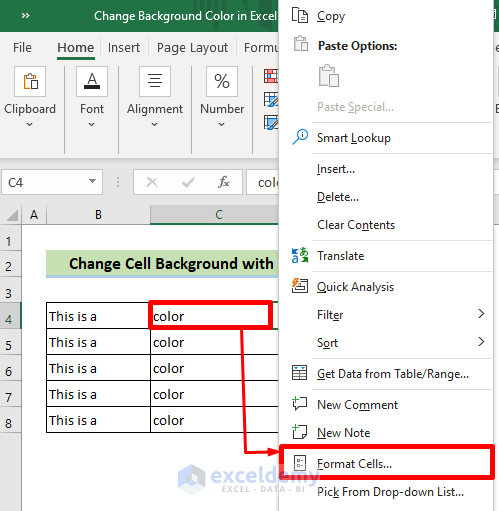
You can also right-click on your desired cell and choose Format Cells… from the context menu. Then, choose the fill color.
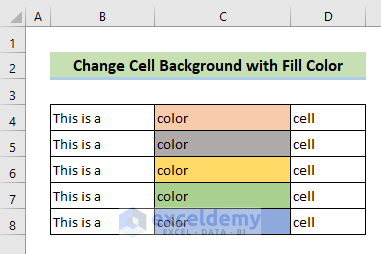
Thus, you can change any cell’s background following this method.
Method 2 – Applying Patterns or Fill Effects to Change the Background Color
Steps:
- Choose the cell in which you want to change the background.
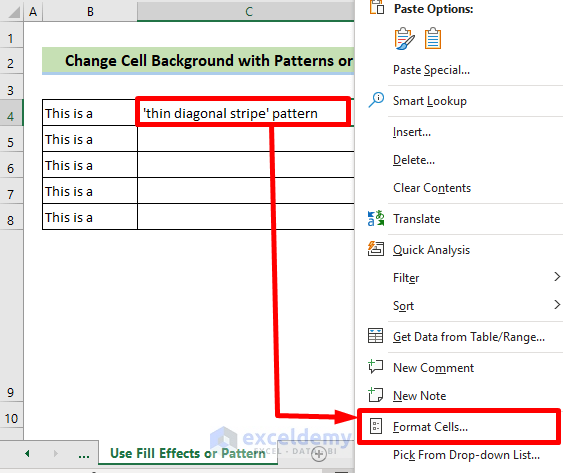
- Right-click in the cell and choose the Format Cells… option from the context menu.
- The Format Cells window will appear. Go to the Fill tab.
- For the pattern background, choose your desired pattern color from the Pattern Color dropdown list. Choose the pattern style from the Pattern Style dropdown list.
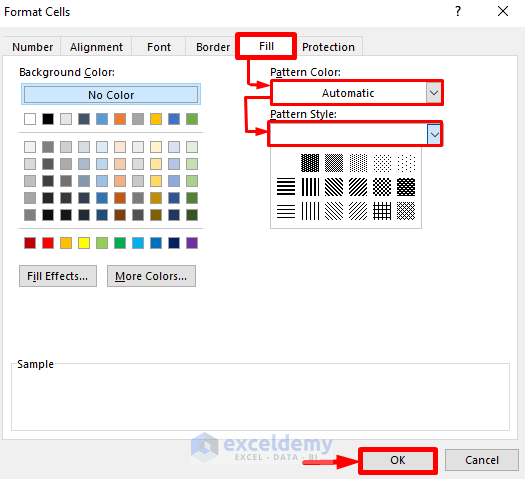
- You will see a sample preview in the Sample box.
- Click on the OK button.
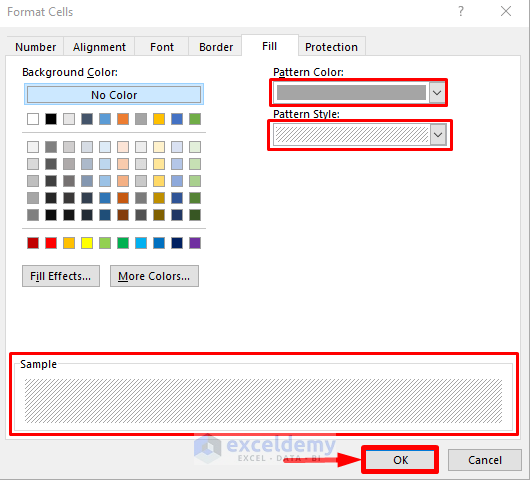
- For the fill effect background, choose the Fill Effects… option from the Fill tab.
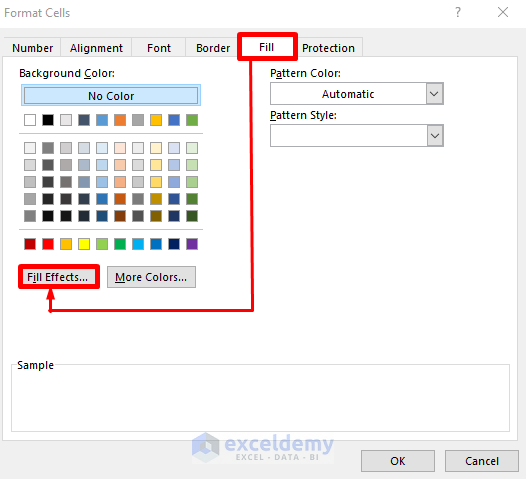
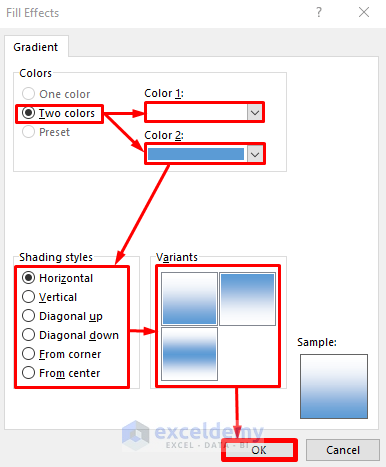
- The Fill Effects window will appear. Choose the Two colors option from the Colors list.
- Choose your shading style from the Shading styles options and choose a variant from the Variants samples.
- Click on OK.
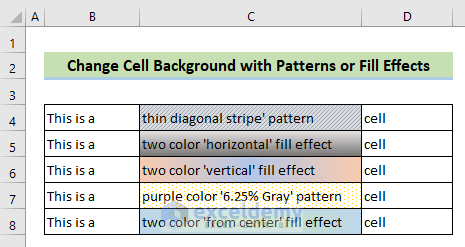
- Here is a quick look at our result worksheet.
Read More: How to Change Background from Black to White in Excel
Method 3 – Changing the Background Color with Excel Conditional Formatting
Steps:
- Select the cells where you want your conditional formatting applied.
- Go to the Home tab, choose Conditional Formatting, and pick New Rule…
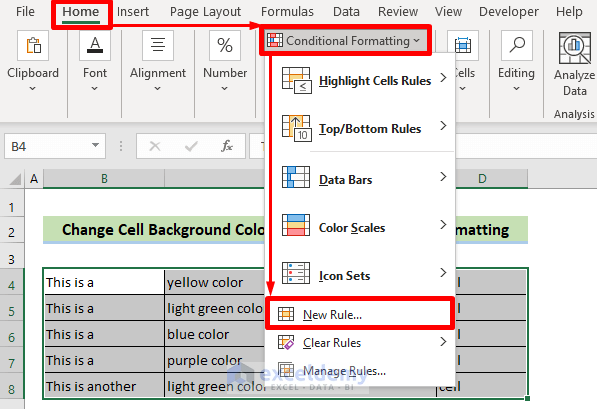
- The New Formatting Rule window will open.
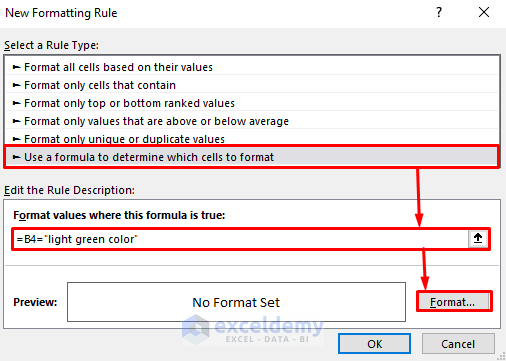
- Choose the rule type Use a formula to determine which cells to format from the listed rules.
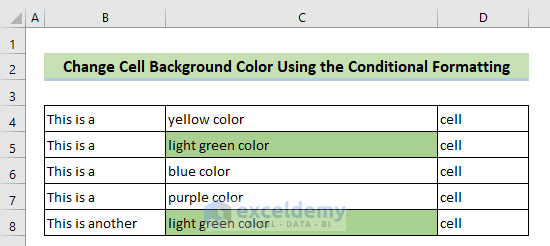
- In the rule description text box, write the formula: =B4=“light green color”. This formula means the condition will be applied to the cells where the light green color is written.
- Click on the Format button.
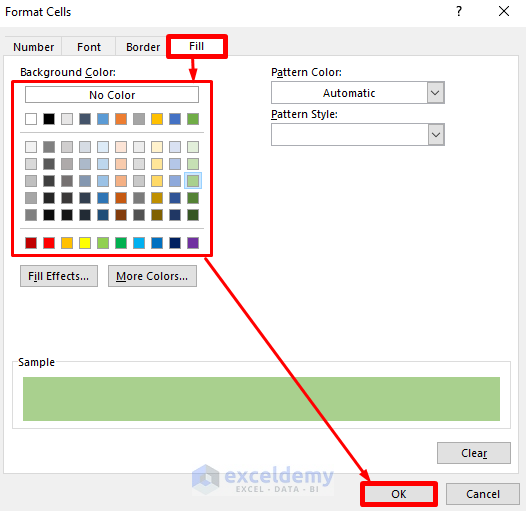
- The Format Cells window will appear afterward. Choose the color from here. You can also apply the fill effect or pattern format.
- Click on the OK button.
- You can see the preview in the Preview box. Click on the OK button.
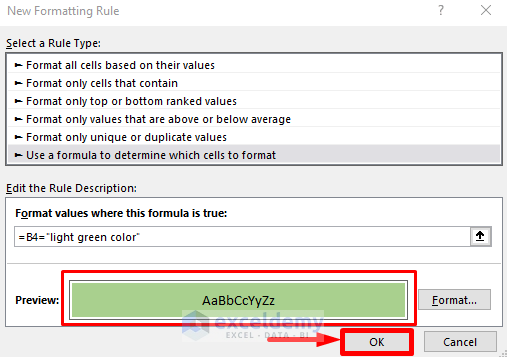
- You can change the background color of specific cells using conditional formatting.
Method 4 – Using the Excel Paint Bucket to Color the Background
Steps:
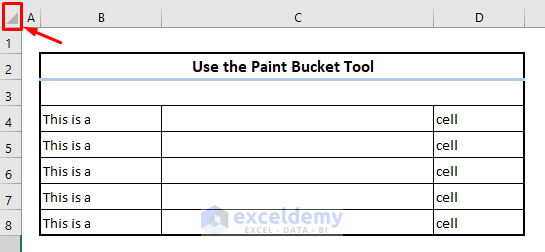
- Click on the shaded right-angle triangle at the intersection of row and column headings. This will select all the cells of the sheet.
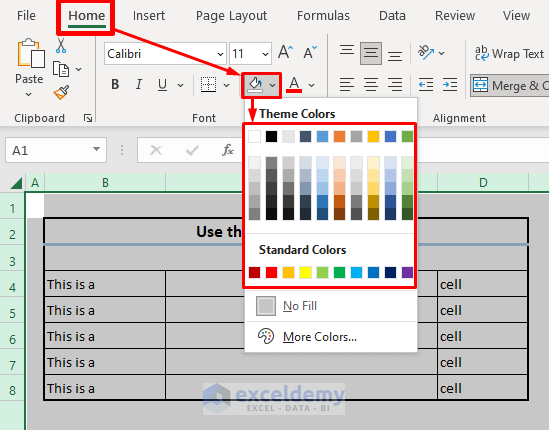
- Go to the Home tab and click on the Fill Color icon, then select the color you want for the background.
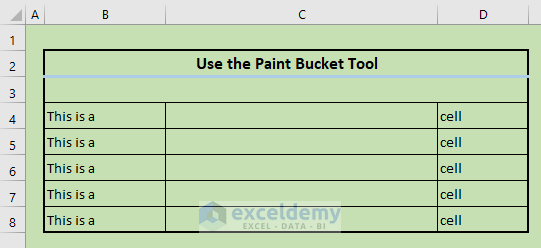
- This changes the whole worksheet’s background color.
Method 6 – Using the Excel Find Tool for Changing the Background Color
Steps:
- Select the cells where you want your background changed to specific conditions.
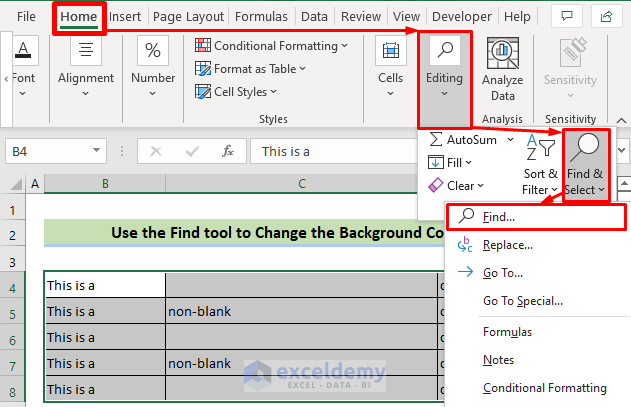
- Go to the Home tab, then go to the Editing group, click on Find & Select tool, and click on the Find… option from the dropdown list.
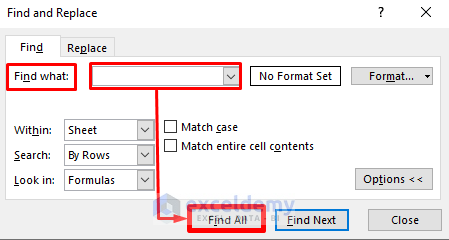
- The Find and Replace window will appear. On the Find tab, write what you want to find in the Find what text box. We want to find the blank cells, so we left it empty.
- Click on the Find All button.
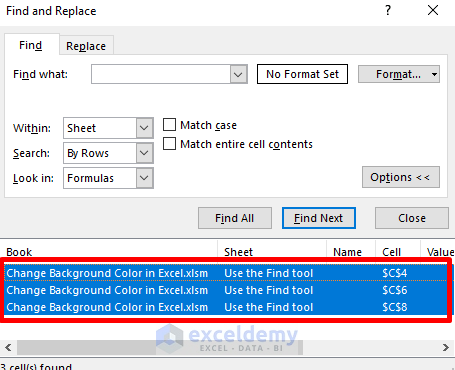
- The cell references will be shown in an added portion of the Find and Replace window. Drag and select all the cell references.
- Go to the Home tab and click on the Fill Color icon, then select the color you want.
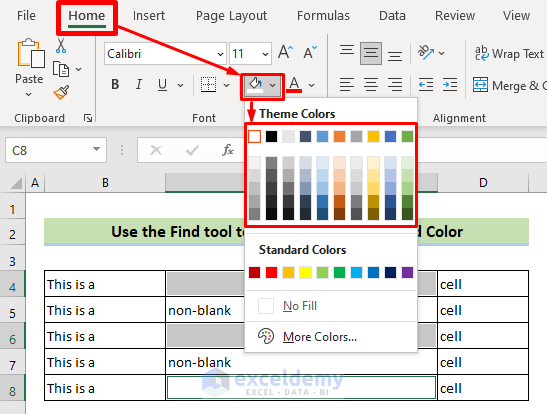
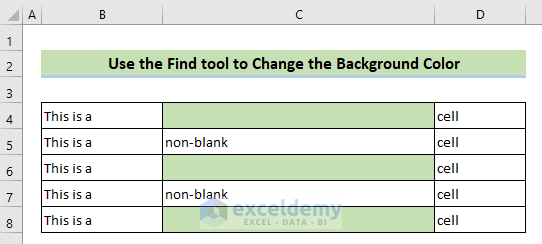
- Here’s how we filled in blank cells.
Read More: How to Change Background in Excel Sheet
Method 6 – Changing the Background Color Using Excel VBA
Steps:
- Go to the Developer tab and click on the Visual Basic tool.
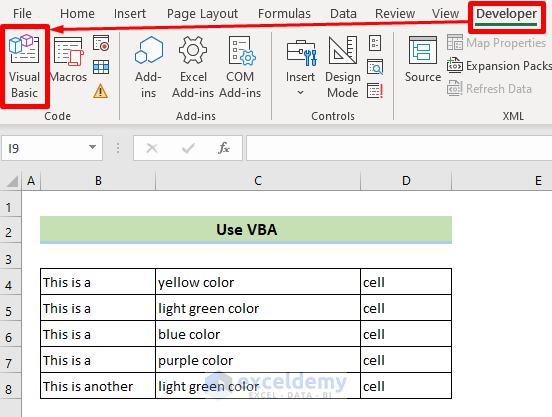
- The Microsoft Visual Basic for Applications window will appear.
- Celect Sheet 4 and copy the following code in the code window.
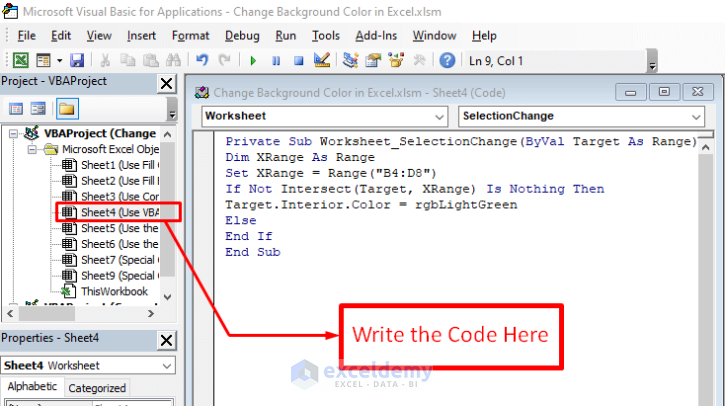
Private Sub Worksheet_SelectionChange(ByVal Target As Range)
Dim XRange As Range
Set XRange = Range("B4:D8")
If Not Intersect(Target, XRange) Is Nothing Then
Target.Interior.Color = rgbLightGreen
Else
End If
End Sub- Exit the Microsoft Visual Basic for Applications window and go to the File tab.
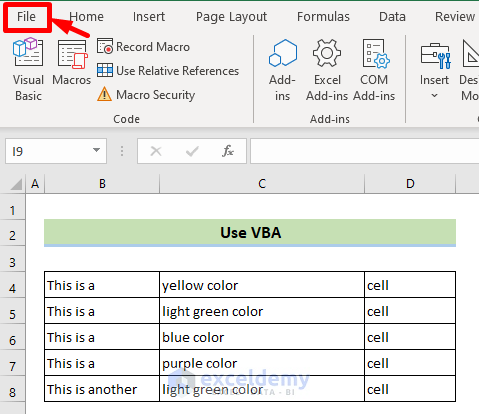
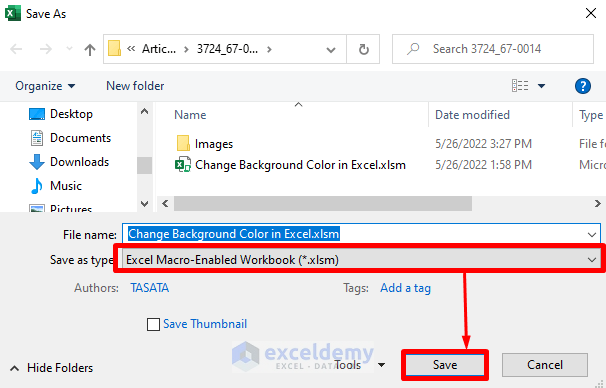
- Choose the Save As option from the expanded File tab.

- Choose the Save as type as .xlsm file to enable the macro.
- Click on the Save button.
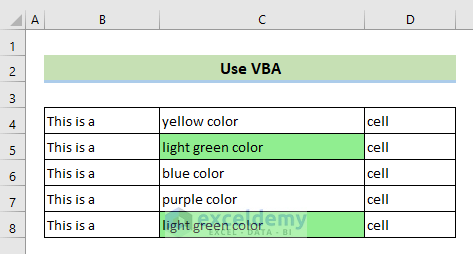
- Whenever you click on a cell between the declared range, the cell background will turn into a light green color.
- Our result worksheet will look like this if we click on the C5 and C8 cells.
Things to Remember
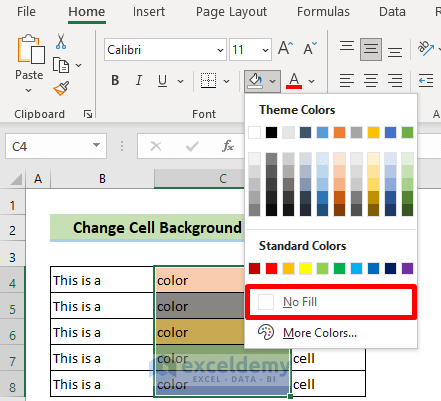
- To remove a fill color, you can go to the Home tab, click on the Fill Color icon, then click on the No Fill option from the dropdown list.
- When using conditional formatting to a range of data, use relative references for checking the condition dynamically.
Download the Practice Workbook
Related Articles
- How to Change Background Color to Grey in Excel
- [Fixed!] Background Color Not Changing in Excel
- How to Remove Background in Excel
- How to Remove Background Color in Excel
<< Go Back to Excel Background | Learn Excel
Get FREE Advanced Excel Exercises with Solutions!

