Method 1 – Modifying the Excel Options
Steps:
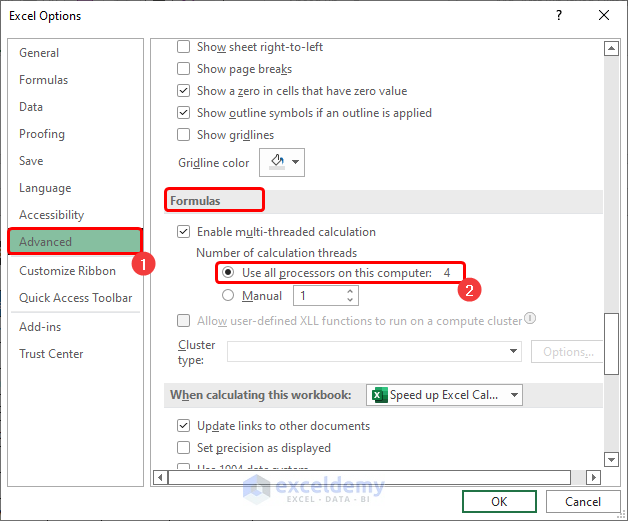
- Go to File and choose Options.

- The Excel Options dialog box will appear.
- Click on the Advanced option.
- Scroll down to get the Formula section.
- Choose the Use all processors on this computer: 4 option. If your PC has a different number of cores in the CPU, it will display that number instead.
- Click OK.
Method 2 – Modifying the Calculation Options
Steps:
- Go to the Formulas tab.
- Click on the drop-down arrow under Calculation Options.
- Switch the calculation mode from Automatic to Manual.

Method 3 – Disabling Excel Add-ins
Steps:
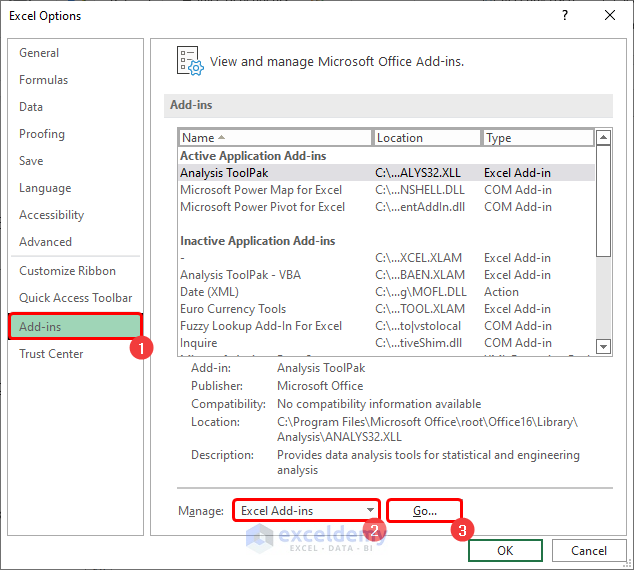
- Select File and go to Options.

- The Excel Options dialog box will appear.
- Click on the Add-ins option.
- Choose Excel Add-ins in the Manage option and click Go.
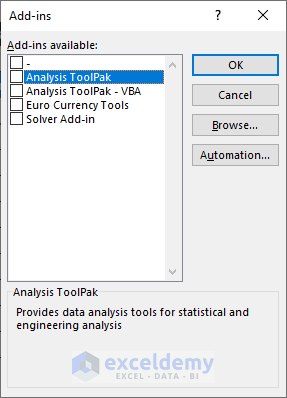
- Another small dialog box called Add-ins will appear.
- Uncheck all the Add-ins and click OK.
Read More: How to Open Large Excel Files Without Crashing
Method 4 – Removing Unnecessary Conditional Formatting
Try to avoid irrelevant Conditional Formatting. It may save lots of your computation time.
Method 5 – Use Simple Formulas
Using nested formulas increases the computation time of your dataset. In a nested formula, Excel requires additional time to trace the primary functions and use their value in further computation of that formula.
Using multiple simple formulas instead of one complex formula can increase the speed of calculation in a large dataset.
Method 6 – Replace Complex Formulas with VBA Code
The VBA code of any complex formula requires much less time to run than the main formula.
Read More: How to Make VBA Code Run Faster
Method 7 – Saving Excel Files in the Binary Format
Steps:
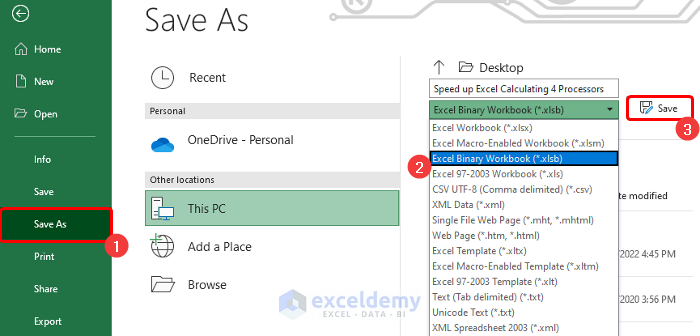
- Select File and go to Save As. The Save As window will appear.
- Change the file format from Excel Workbook (*.xlsx) to Excel Binary Workbook (*.xlsb).
- Choose your desired location and click on Save to save it in binary format.
Method 8 – Avoiding Volatile Functions
Excel has 8 built-in volatile functions:
- NOW()
- TODAY()
- RANDBETWEEN()
- RAND()
- INDIRECT()
- OFFSET()
- CELL()
- INFO()
Try to avoid these functions if you want to get faster computational times.
Read More: How to Improve Excel Performance with Large Files
Method 9 – Delete All Unnecessary Data and Sheets
Steps:
- Select the column you want to use as a cut-off point.
- Press Ctrl + Shift + Right arrow to select the rest of the columns.
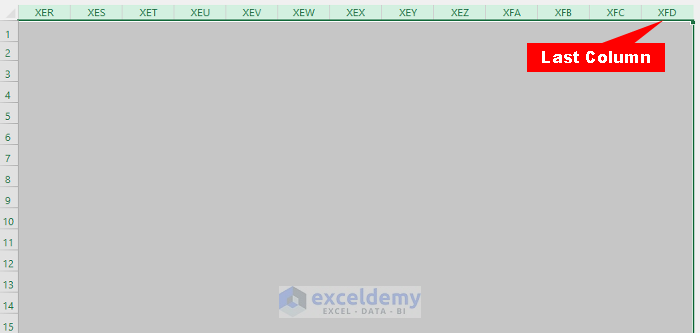
- Press Delete.
- Similarly, select an entire row and press Ctrl + Shift + Down arrow to select all rows below it.
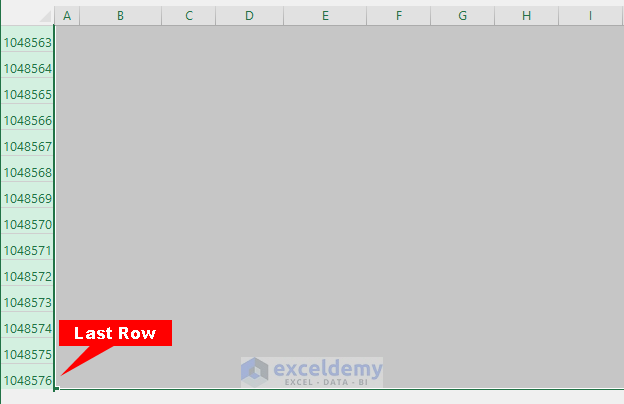
- Press Delete to delete all data.
- You can delete a sheet by right-clicking on the sheet name in the Sheet Name Bar with your mouse, then selecting Delete.
Method 10 – Avoid Using Entire Rows or Columns as References
Setting up an entire row in the cell reference will use 16,384 cells of that row in that reference, while most of the cells will be blank. This severely slows down the computational time, especially if the formula is more complex.
Similarly, if we set an entire column in the cell reference, 1,048,576 cells of that column will be inserted as the cell reference.
Method 11 – Split a Single Workbook into Multiple Workbooks
Steps:
- Select cell E5 and press the Equal (=) sign.

- Go to your desired workbook and select the cell range you want to extract from that file. In our case, we want to get the marks from the Examination Marks. When you click on the cell it will show the cell reference on both files’ Formula Bar.
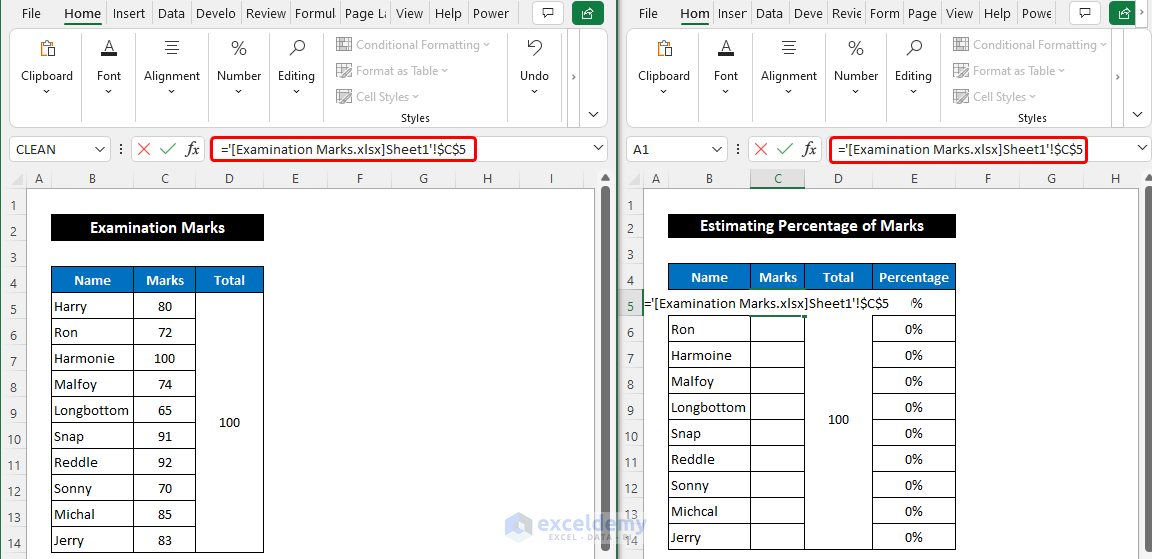
- Delete the Absolute Cell Reference sign before the row number.
- Press Enter.
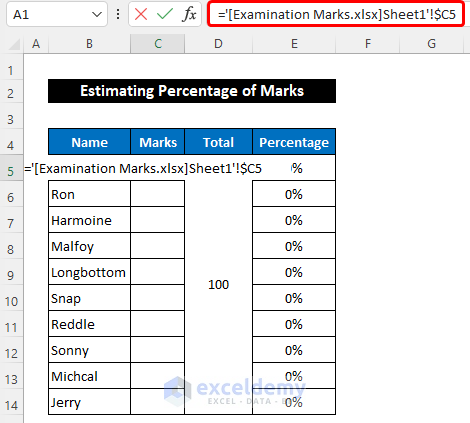
- Double-click on the Fill Handle icon to copy the formula down to cell E14.

- You will get the values from another file.
Method 12 – Inserting a Table
Steps:
- Select the range of cells B4:E14.

- Press Ctrl + T to convert the dataset into a table.
- A small dialog box called Create Table will appear.
- Check the option My table has headers and click OK.

- Use the following formula in cell E5 to get the percentage value.
=[@Marks]/[@Total]
- Press Enter.
- All the values for percentages will appear.

Things You Should Know
Propagating the formula through the column of the table can backfire. If your dataset contains thousands of rows, the table will automatically calculate all the rows every time a value is changed. It may cause Excel to lag.
Method 13 – Applying Formulas That Work Fast
Some functions can calculate quicker than others when trying to get the same result:
- The combined INDEX–MATCH formula or the VLOOKUP function can process information quicker than the SUMIF function. In some cases, those functions work 53% faster than SUMIF.
- The MAX function is 6% faster than the IF function.
Method 14 – Using the 64-bit Version of Excel
The 64-bit version of Excel can reference a greater value range and works faster than the 32-bit version. However, your PC must be using a 64-bit system as well and have a strong-enough CPU to manage it.
Method 15 – Close Other Programs on Your Device
If your PC is running a lot of tasks, Excel doesn’t get enough allocated memory to process its calculations smoothly. For example, internet browser can hog RAM while installers or other graphics-demanding apps can use a lot of CPU time.
Method 16 – Reinstalling the Operating System
If none of the methods work, a clean reinstall of your OS can solve most issues related to your PC caches and memory usage. This will remove viruses or other background files that have started to take up precious CPU time. However, a reinstall will also remove all data from the OS partition (typically C:), so make sure to use it a final resort only.
Read More: How to Make Excel Faster on Windows 10
Download the Practice Workbook
Related Articles
- How to Make Excel Run Faster with Lots of Data
- How to Make Excel Calculate Faster
- How to Make Excel Open Faster
- How to Stop Calculating Threads in Excel
- How to Stop Calculating 8 Threads in Excel
<< Go Back to Excel Files | Learn Excel
Get FREE Advanced Excel Exercises with Solutions!

