Overview
In the following sections, I’ll explain various methods for converting numbers to dates using Excel. Whether you’re dealing with raw data or need to clean up existing entries, these techniques will help you transform numeric values into more user-friendly date formats.
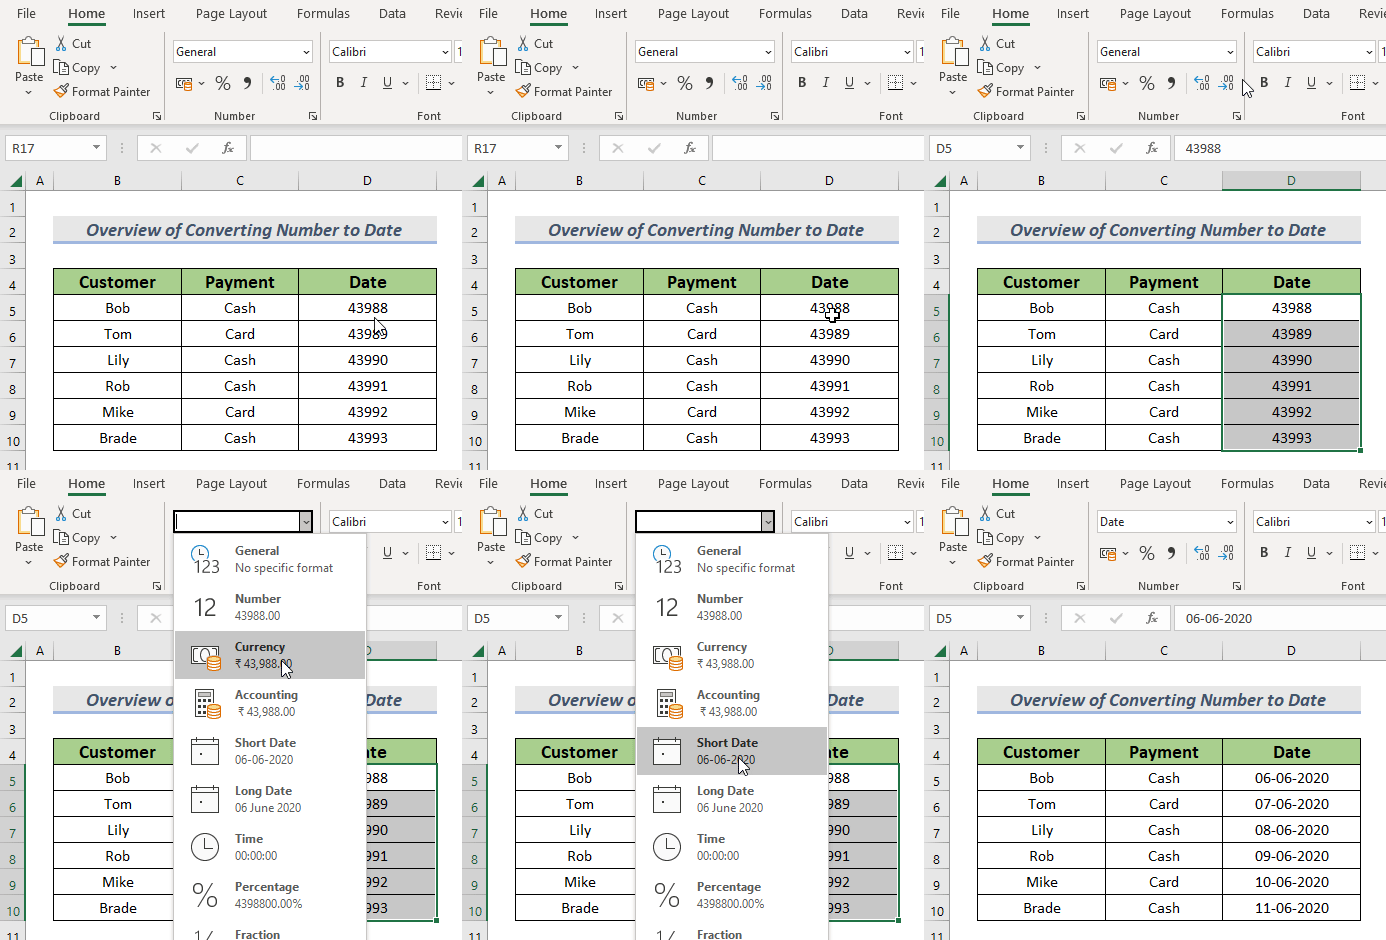
Method 1 – Use Number Format Drop-Down
Let’s walk through the steps to convert those numeric dates into a more readable date format in Excel. Here’s how you can do it:
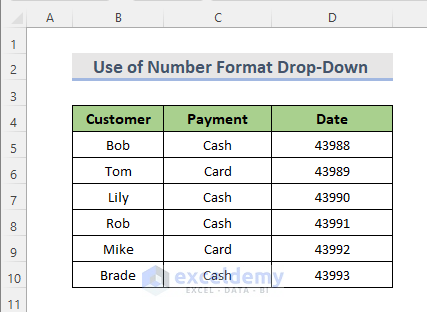
- Select the cell range containing the numeric dates (in your case, D5:D10).
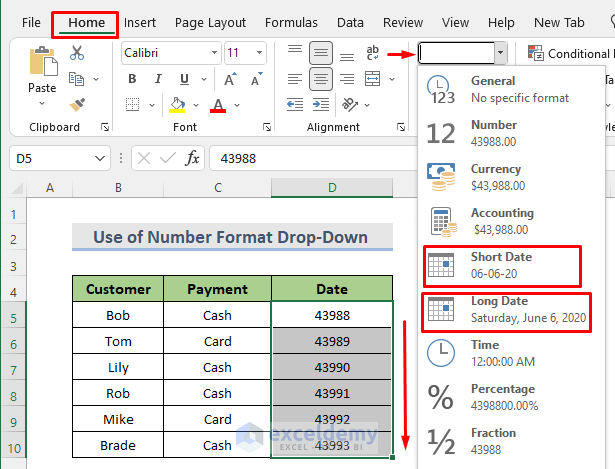
- Navigate to the Home tab in the Excel ribbon.
- Look for the Number section in the ribbon.
- Click on the drop-down arrow next to the number format options.
- From the drop-down menu, select either Short Date or Long Date based on your preference.
- The Short Date format will display dates like MM/DD/YYYY, while the Long Date format will show the full month name (e.g., January 1, 2024).
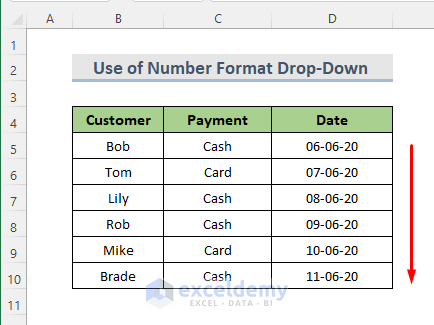
- Once you’ve made the selection, Excel will automatically convert the numeric values in the selected cell range into the chosen date format.
Read More: How to Convert General Format to Date in Excel
Method 2 – Apply Built-In Date Format Option for Converting Numbers to Dates
Let’s walk through the steps to convert those numeric dates into a more readable date format in Excel. Here’s how you can do it:
- Select the cell range containing the numeric dates (in your case, D5:D10).
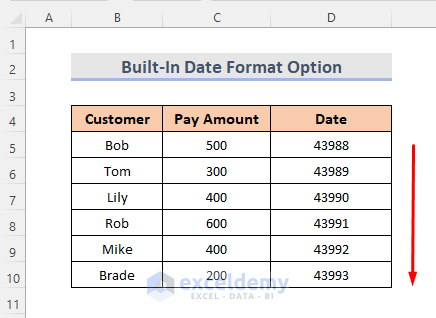
- Navigate to the Home tab in the Excel ribbon.
- Look for the Number section in the ribbon.
- Click on the drop-down arrow next to the number format options.
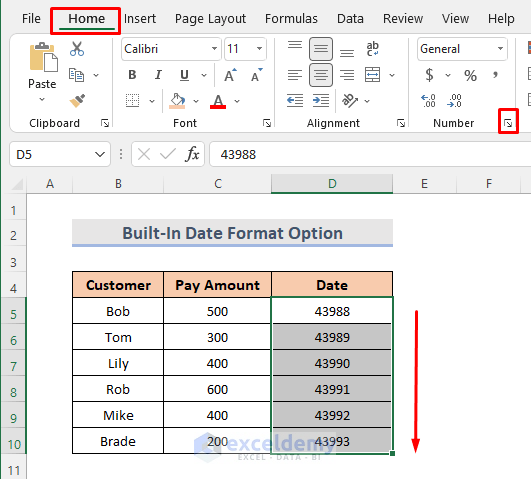
- From the drop-down menu, select either Short Date or Long Date based on your preference.
- The Short Date format will display dates like MM/DD/YYYY, while the Long Date format will show the full month name (e.g., January 1, 2024).
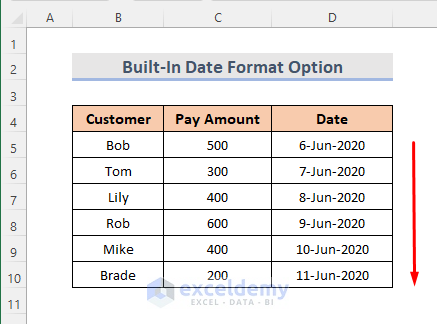
- Once you’ve made the selection, Excel will automatically convert the numeric values in the selected cell range into the chosen date format.
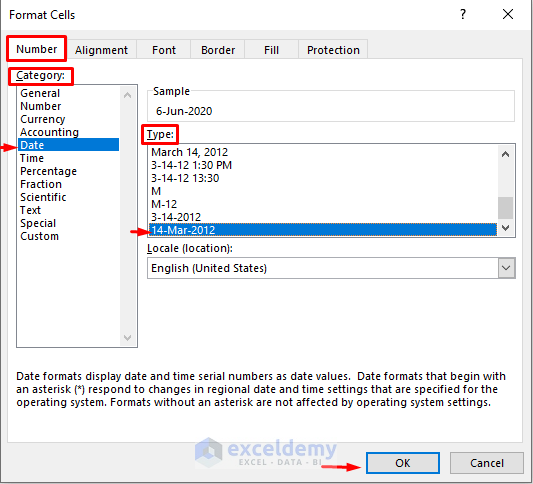
- Your numeric dates should now be displayed in a more human-readable format.
Method 3 – Create Custom Date Formatting
We can create customized date formatting in Excel to make our dataset more user-friendly. Here are the steps to apply a customized date format to the cell range D5:D10 from the dataset (B4:D10):
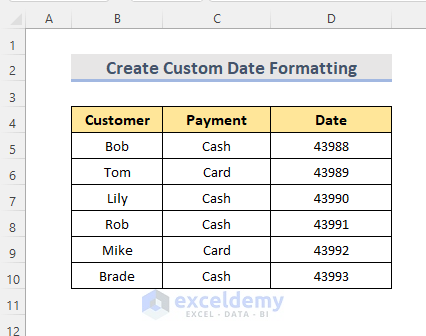
- Select the cell range D5:D10.
- Go to the Home tab.
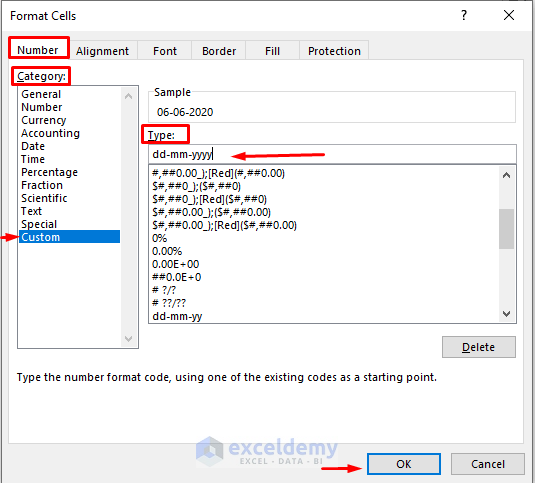
- In the Number section, click on the Dialog Launcher icon (the small arrow in the bottom-right corner).
- The Format Cells window will open.
- In the Category box, select Custom.
- In the Type box, enter the desired date format. For example, type dd-mm-yyyy to display dates in day-month-year format.
- Click on the OK
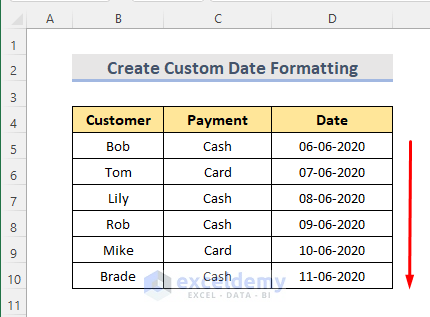
- The customized date format will be applied to the selected cell range (D5:D10).
- You should now see the dates in the specified format.
Method 4 – Use the TEXT Function
To display a number as text with a specific format, you can utilize the TEXT function. This function is particularly useful for converting numeric values into date formats. Let’s say we have a payment dataset in cells B4:D10, and we want to convert the numbers in the range C5:C10 into dates in the range D5:D10. Follow these steps:
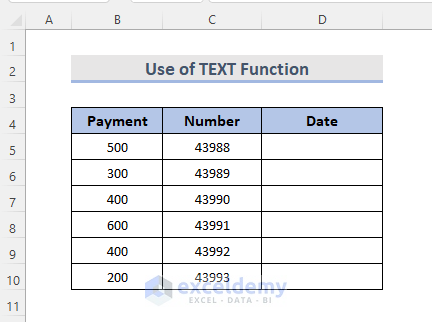
- Select Cell D5
- Enter the following formula:
=TEXT(C5,"dd-mm-yyyy")
- Press Enter.
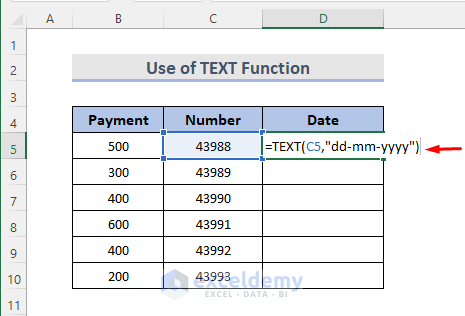
- Use the Fill Handle tool to autofill the formula down to the other cells in the range D5:D10.
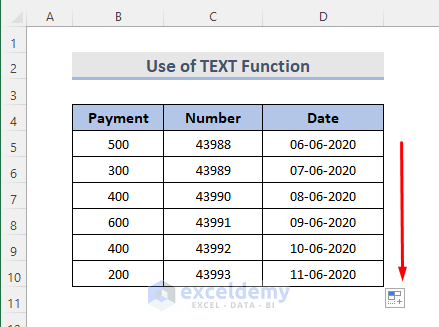
Read More: How to Convert Serial Number to Date in Excel
Method 5 – Using DATE, RIGHT, MID, and LEFT Functions
When dealing with 8-digit numbers, you can employ a combination of Excel functions to convert them into dates. The values you want to convert must follow a consistent pattern. Let’s break down the process:
- Excel DATE function:
- The DATE function helps calculate Excel dates.
- RIGHT Function:
- Extracts characters from the right side of a text string.
- MID Function:
- Extracts characters from the middle of a text string.
- LEFT Function:
- Extracts characters from the left side of a text string.
Suppose we have a dataset in cells B4:D10, and the cell range C5:C10 contains 8-digit values. We want to convert these numbers into dates in the range D5:D10. Follow these steps:
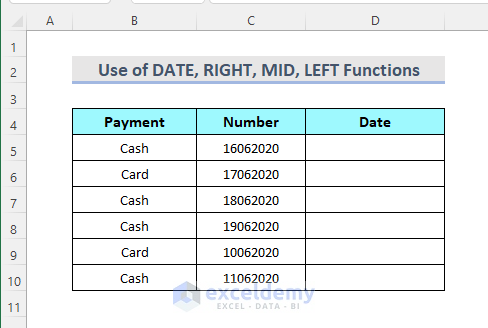
- Select Cell D5.
- Enter the following formula:
=DATE(RIGHT(C5,4),MID(C5,3,2),LEFT(C5,2))
- Explanation:
- RIGHT(C5, 4): Extracts the last four digits as the year value.
- MID(C5, 3, 2): Extracts the middle two digits as the month value.
- LEFT(C5, 2): Extracts the first two digits as the day value.
- The entire formula returns the full date in “dd-mm-yy” format.
- Explanation:
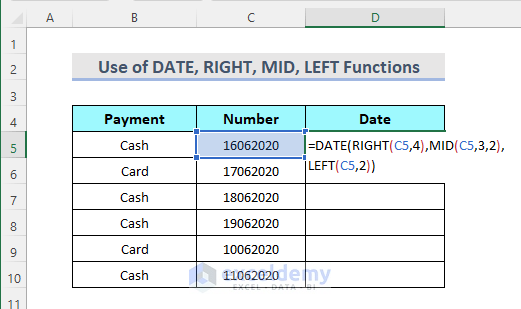
- Press Enter.
- Use the Fill Handle tool to autofill the formula down to other cells in the range D5:D10.
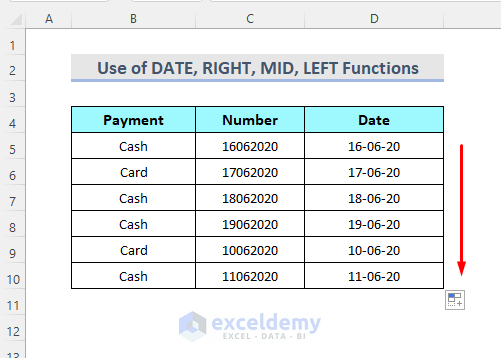
This approach will convert the 8-digit numbers in column C to corresponding dates in column D. Remember to adjust the date format in the formula according to your preference.
Read More: How to Convert 8 Digit Number to Date in Excel
Method 6 – Using VBA to Convert Numbers to Dates in Excel
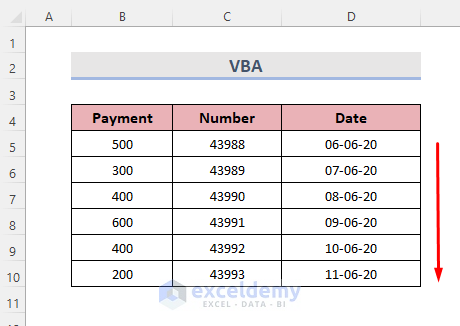
Microsoft Visual Basic for Applications (VBA) can help us quickly convert numbers to dates. Let’s assume we have a dataset in cells B4:D10 containing payment amounts represented as date numbers.
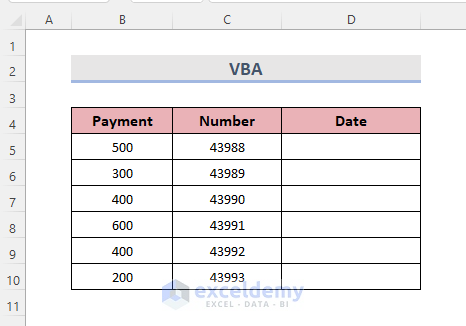
Follow these steps:
- Select all the numbers in the range that you want to convert.
- Navigate to the sheet where your data is located.
- Right-click on the sheet tab and choose View Code.
- This will open the VBA module.
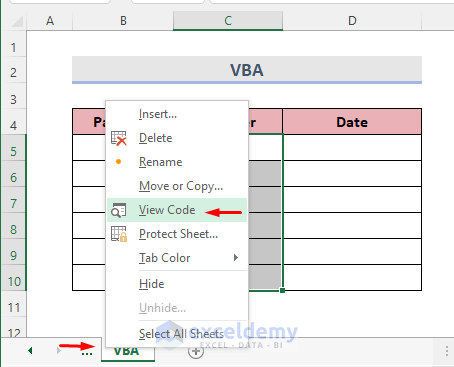
- In the VBA module, enter the following code:
Sub VBAconvertNumberToDate() Dim x As Range Dim i As Range Set x = Application.Selection For Each i In x i.Offset(0, 1).Value = CDate(i.Value) Next i End Sub - Click on the Run option (usually a green arrow icon) in the VBA editor.
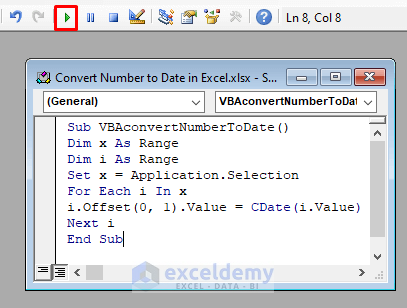
- Check the cell range D5:D10 to see the converted dates.
Read More: How to Convert Text to Date in Excel
Download Practice Workbook
You can download the practice workbook from here:
Related Articles
- How to Convert Number (YYYYMMDD) to Date Format in Excel
- How to Convert Text to Date and Time in Excel
- How to Convert Text Date and Time to Date Format in Excel
- Text Won’t Convert to Date in Excel
<< Go Back to Convert to Date | Date-Time in Excel | Learn Excel
Get FREE Advanced Excel Exercises with Solutions!


Here is a simpler method to convert an 8-digit number to date (dd/mm/yyyy)
In cell A1 we have this number: 16062020
Instead of: =DATE(RIGHT(A1,4),MID(A1,3,2),LEFT(A1,2))
Use this formula:
=TEXT(A1,”00/00/0000″)+0
Hello Meni Porat,
Thanks for your kind suggestions.
Your formula may show a #VALUE error for an 8-digit number.
However, removing +0 from the formula will return the correct result.
If you have any other suggestions or face any problems, please share them with us in the comment section.
Regards
Arin Islam,
Exceldemy.