Method 1- Format Cell Dialog Box Launcher
- Go to the Home tab.
- In the Font, Alignment, and Number group, you’ll find a small square icon with an arrow. Clicking on this launcher icon opens the Format Cells dialog box.
Or you can use the keyboard shortcut ALT+H+FN.
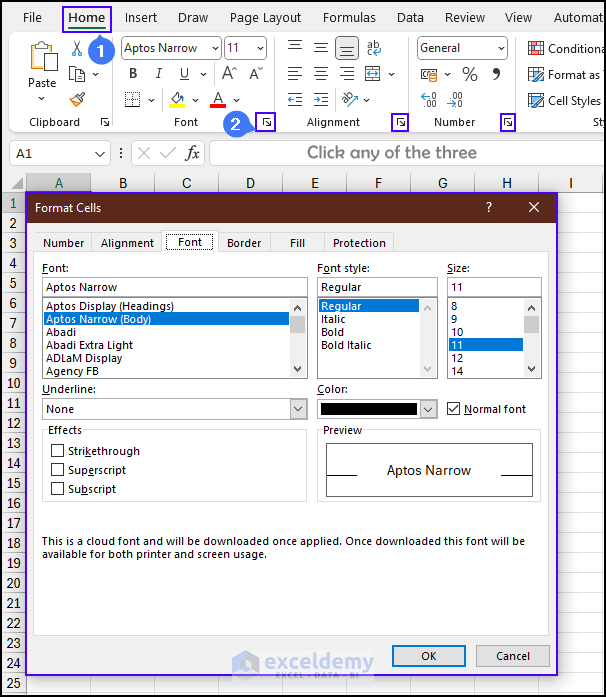
In the format cell dialog box, you will find the following features for customization options:
- Number Tab: Change how numbers look, like money or dates.
- Alignment Tab: Move text around and change its direction in cells.
- Font Tab: Make text aesthetic or formal by picking its style, size, and color.
- Border Tab: Draw lines around cells to create borders.
- Fill Tab: Paint cell backgrounds with colors or patterns.
- Protection Tab: Lock cells for security to control who can edit them.
Method 2 – Clipboard Dialog Box Launcher
- Go to the Home tab.
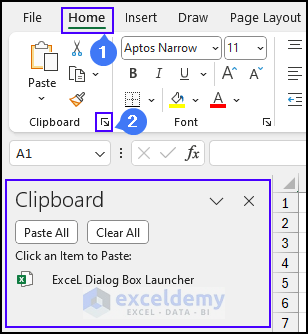
- Click on the small arrow from the Clipboard group.
Or you can use ALT+H+FO as the keyboard shortcut.
Get the Clipboard Dialog Box.
Method 3 – Insert Chart Dialog Box Launcher
- Select your data.
- Go to the Insert tab > click on the small square icon with an arrow under the Charts group.
Or you can use the keyboard shortcut ALT+N+K.
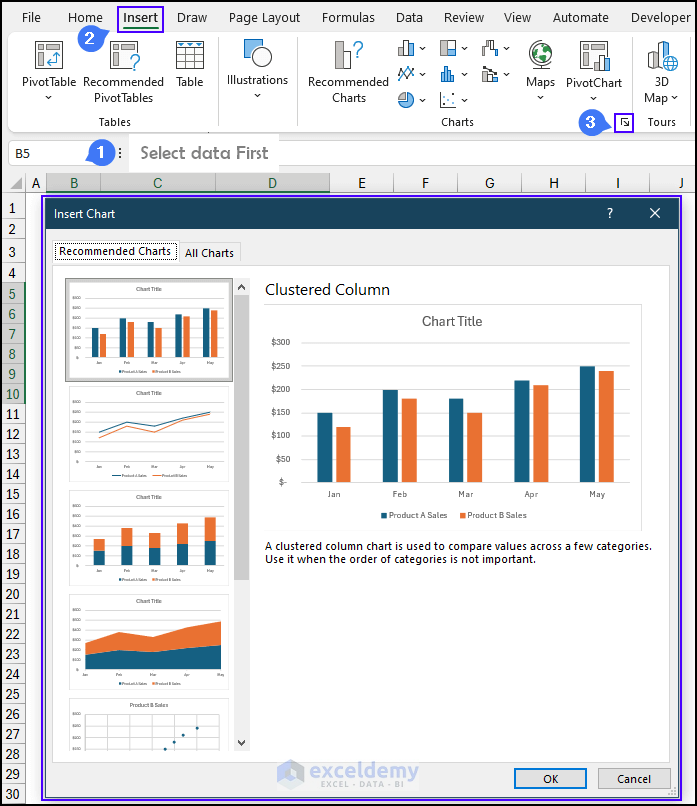
In the Insert Chart dialog box, you will find the following features for customization options:
- Recommended Chart Tab: Suggest the most suitable chart types based on the selected data.
- All Charts Tab: Provides a full array of chart options for manual customization based on user preferences.
Method 4 – Page Setup Dialog Box Launcher
- Find a small dialog box launcher icon in the Page Setup, Scale to Fit, and Sheet Options group under the Page Layout tab.
- Click on any of these launchers to open the Page Setup Dialog Box.
You can press ALT+P+SP as a keyboard shortcut.
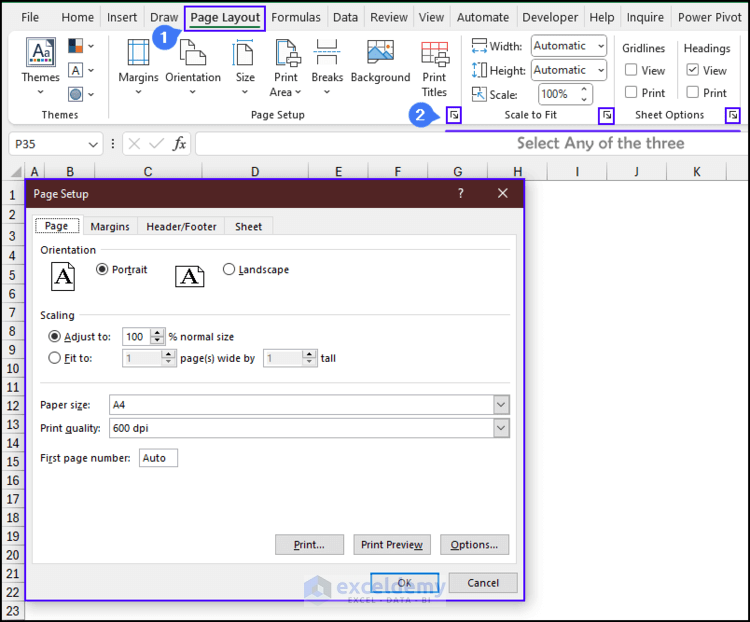
The Page Setup Dialog Box offers the following range of customization options.
- Page Tab: Set page orientation (portrait or landscape) and size.
- Margins Tab: Adjust top, bottom, left, and right margins for precise layout control.
- Header/Footer Tab: Add headers and footers to printed pages.
- Sheet Tab: Configure print settings specific to the current sheet.
Method 5 – Group Dialog Box Launcher
- Select the range you want to group.
- Go to Data tab > Outline group > Click the dialog box launcher icon.
Press ALT+A+L to access the Group dialog box launcher.
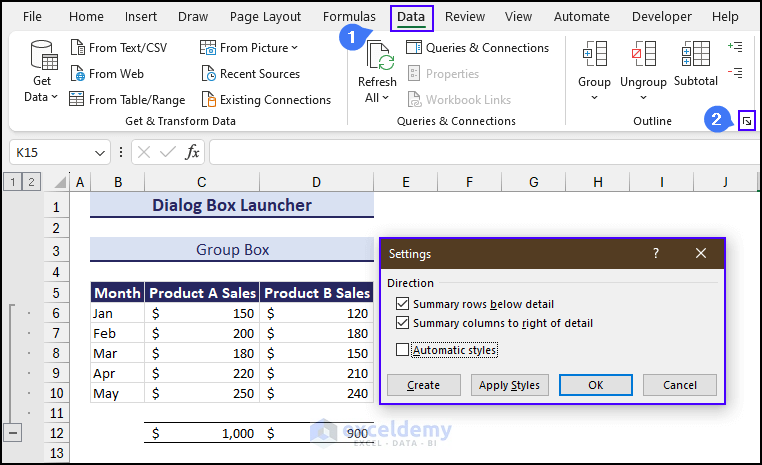
The Group Dialog Box offers a quick way to organize and collapse/expand grouped elements in a worksheet. This can be useful for simplifying complex data structures or hiding details to focus on specific sections.
Frequently Asked Questions
How to customize the dialog box launcher?
Microsoft Excel does not provide direct options for users to customize the appearance or functionality of the Dialog Box Launcher itself. The Dialog Box Launcher is a built-in feature designed to open specific dialog boxes with advanced settings related to various tasks.
How to resize the dialog box opened by the dialog box launcher?
Excel does not provide a direct option to resize the dialog box opened by the Dialog Box Launcher. The size of the dialog box is typically fixed based on the content and layout designed by the developers of Microsoft.
How to interact with the main interface while the dialog box is open?
The main interface remains inaccessible or frozen while a dialog box is open. The purpose is to ensure that users focus on the specific task at hand within the dialog box.
Can I open multiple dialog boxes simultaneously?
Excel is designed to do one thing at a time. When you open a dialog box (like the Format cell dialog box), it takes over the screen, and you can’t do other stuff in Excel until you finish or close that box.
Related Articles
- How to Close Dialog Box in Excel
- [Solved!] Excel Dialog Box Hidden
- How to Stop Name Conflict Dialog Box in Excel
<< Go Back to Excel Parts | Learn Excel
Get FREE Advanced Excel Exercises with Solutions!

