Smooth Scrolling is a new feature that allows you to scroll one line vertically or a single character horizontally at a time using the mouse wheel in Excel.
Before this, scrolling had a snap-to-grid behavior that would jump to the beginning of a column or row. The snap-to-grid feature automatically aligns objects to the gridlines for an organized layout. With Smooth Scrolling, you can now scroll to any part of a column or row, and the screen moves along with your scrolling.
In this Excel tutorial, we will discuss Smooth Scrolling with the mouse wheel. Additionally, we will present some tips for scrolling through rows and columns in older versions of Excel.
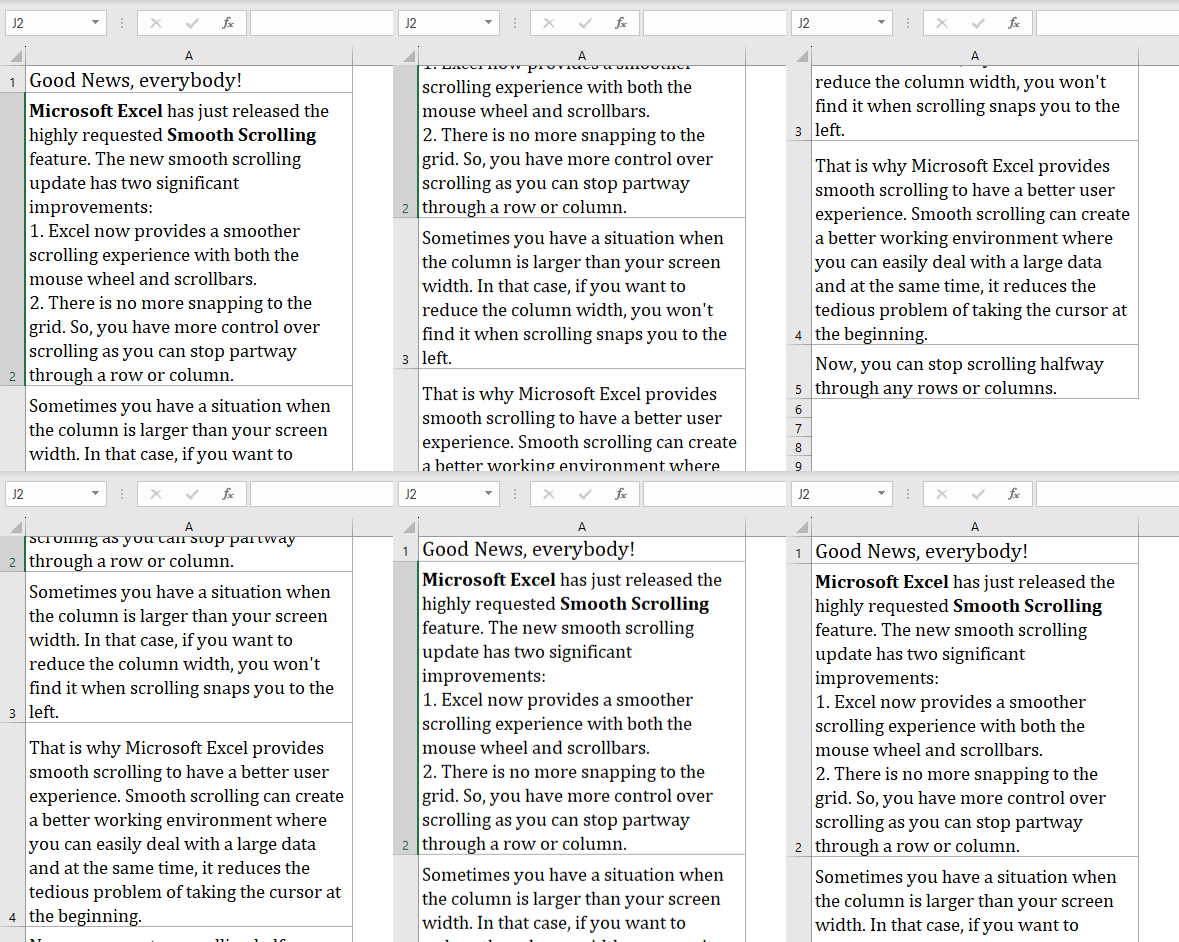
The GIF below shows how to scroll vertically and stop partway through a row using smooth scrolling. In the worksheet we used some large rows, but can stop scrolling in any part of the row without snapping to the grid.
What Is Smooth Scrolling with the Mouse Wheel in Excel? What Does It Resolve?
In August 2021, Microsoft Excel released a new feature update called Smooth Scrolling. Users of Microsoft 365 Production Channel (Version 2207) or later versions already have this feature.
The new smooth scrolling update introduces two significant improvements:
- Excel now provides a smoother scrolling experience with both the mouse wheel and scrollbars.
- There is no more snapping to the grid. So, you have more control as you can easily pause scrolling in the middle of a row or column.
Before, users found it frustrating to scroll through a worksheet with large cells and see all the data because Excel automatically snapped to the grid while scrolling with the mouse wheel.
In the below GIF, the screen snaps grid to grid on every row while scrolling vertically.
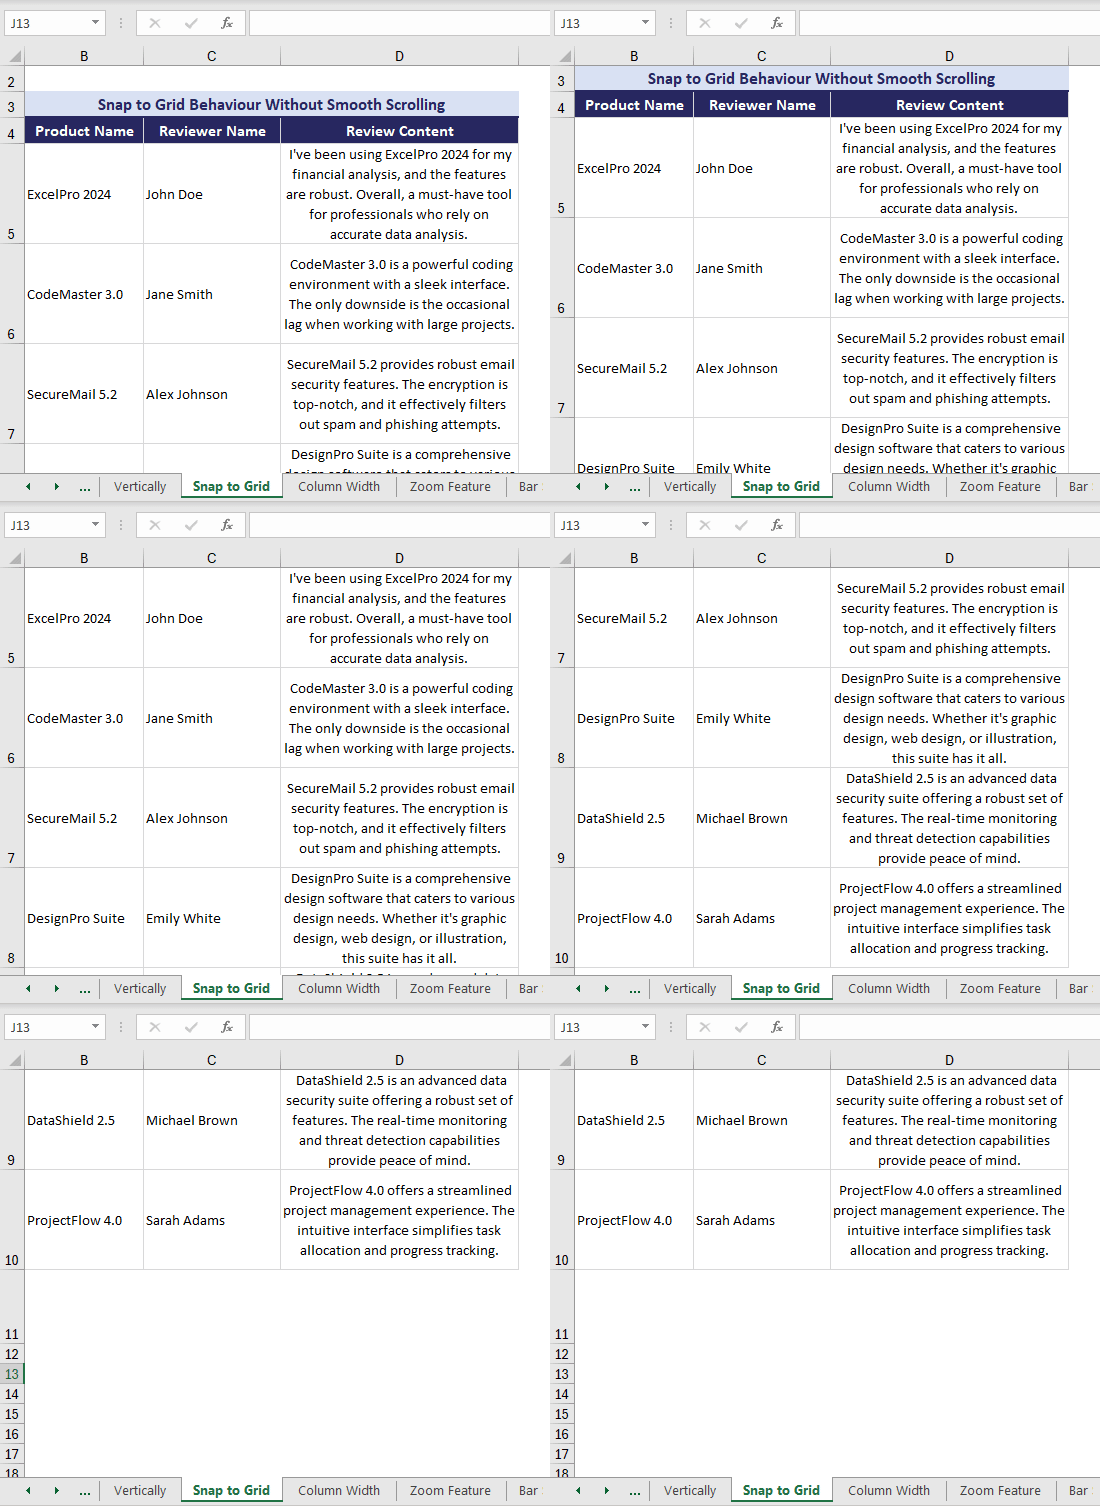
The smooth scrolling feature fixes these issues and improves the scrolling experience in every way.
More Benefits of Using Smooth Scrolling in Excel:
- Reduced Eye Strain: Scrolling traditionally can be jumpy, causing eye strain and making it hard to focus. Smooth scrolling makes the movement smooth and easy on the eyes.
- Improved Presentation: During presentations, smooth scrolling maintains the audience’s focus by avoiding sudden jumps, ensuring attention stays on relevant information.
How to Use Smooth Scrolling with the Mouse Wheel in Excel
Smooth scrolling with the mouse wheel might be the easiest feature to use: you just need to scroll. Here are 3 cases where the smooth scrolling feature with the mouse wheel in Excel can be used:
Case 1 – Smooth Scrolling Vertically
You can use Excel’s vertical scroll bar or mouse scroll wheel to scroll one line vertically at a time with the smooth scrolling feature. A smooth screen is useful if you have a smaller screen in which to fit your data.
Consider the following product reviews, where the review contents contain a large paragraph of text.
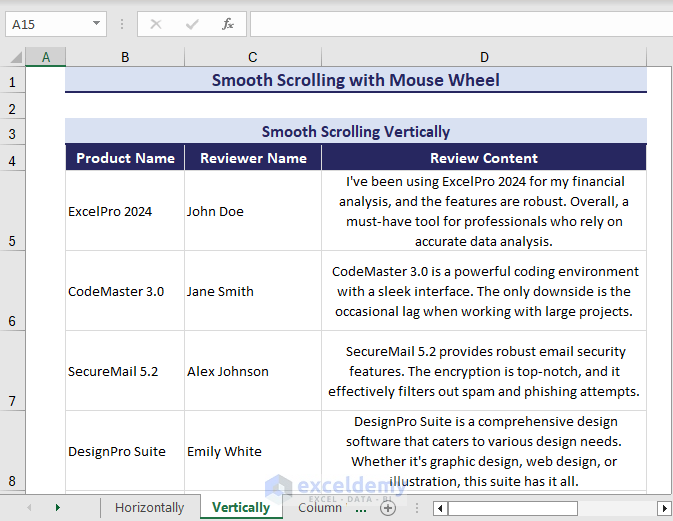
- To scroll vertically using smooth scrolling, use the mouse scroll wheel to move to the last row. Or, left-click and hold the Vertical scroll bar and drag it up/down.
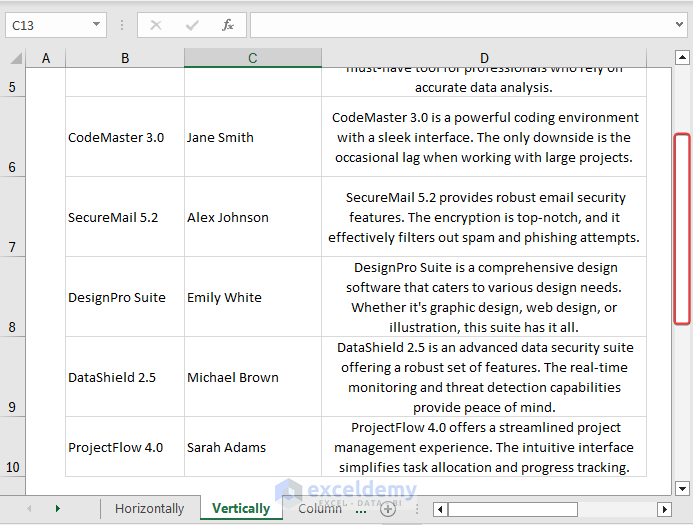
As in the following image, you can stop in the middle of row 5 to see the last rows without grid jumping.
Tips:
- To adjust the number of lines per scroll with a mouse wheel:
- Click Control Panel > Hardware and Sound > Mouse > Wheel.
- Enter the number of lines to scroll at a time.
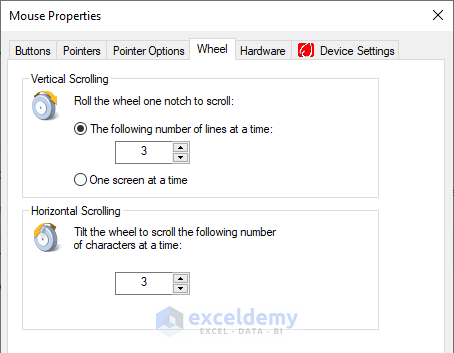
- To jump quickly to a specific row, temporarily disable smooth scrolling by holding down the Ctrl key while scrolling.
Read More: How to Move Up and Down in Excel
Case 2 – Smooth Scrolling Horizontally
While working with collapsed or restored windows in Excel, your data may not be fully visible. In that case, use smooth scrolling to scroll horizontally and view your collapsed data.
Consider the below product reviews where the contents in column D are not fully visible due to collapsed windows.
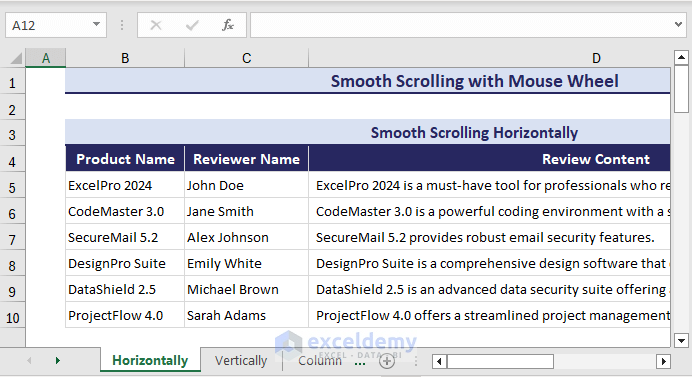
To view column contents using smooth scrolling with the mouse wheel:
- Press and hold down Ctrl + Shift on your keyboard.
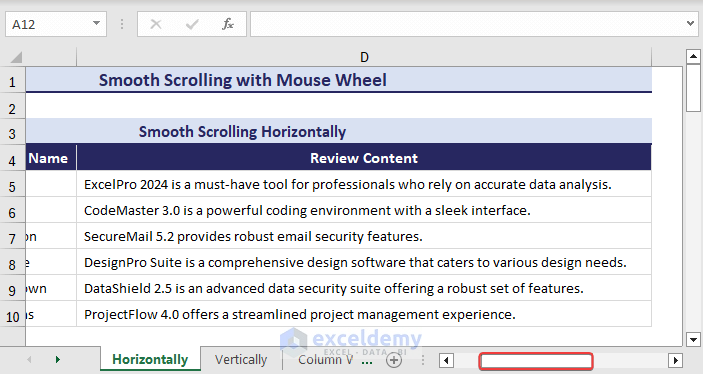
- Now use the mouse scroll wheel to scroll horizontally, or drag the Horizontal scroll bar right or left to view the collapsed data.
As illustrated below, you can stop in the middle of column C without breaking into the grid.
Case 3 – Resizing Columns or Rows Height
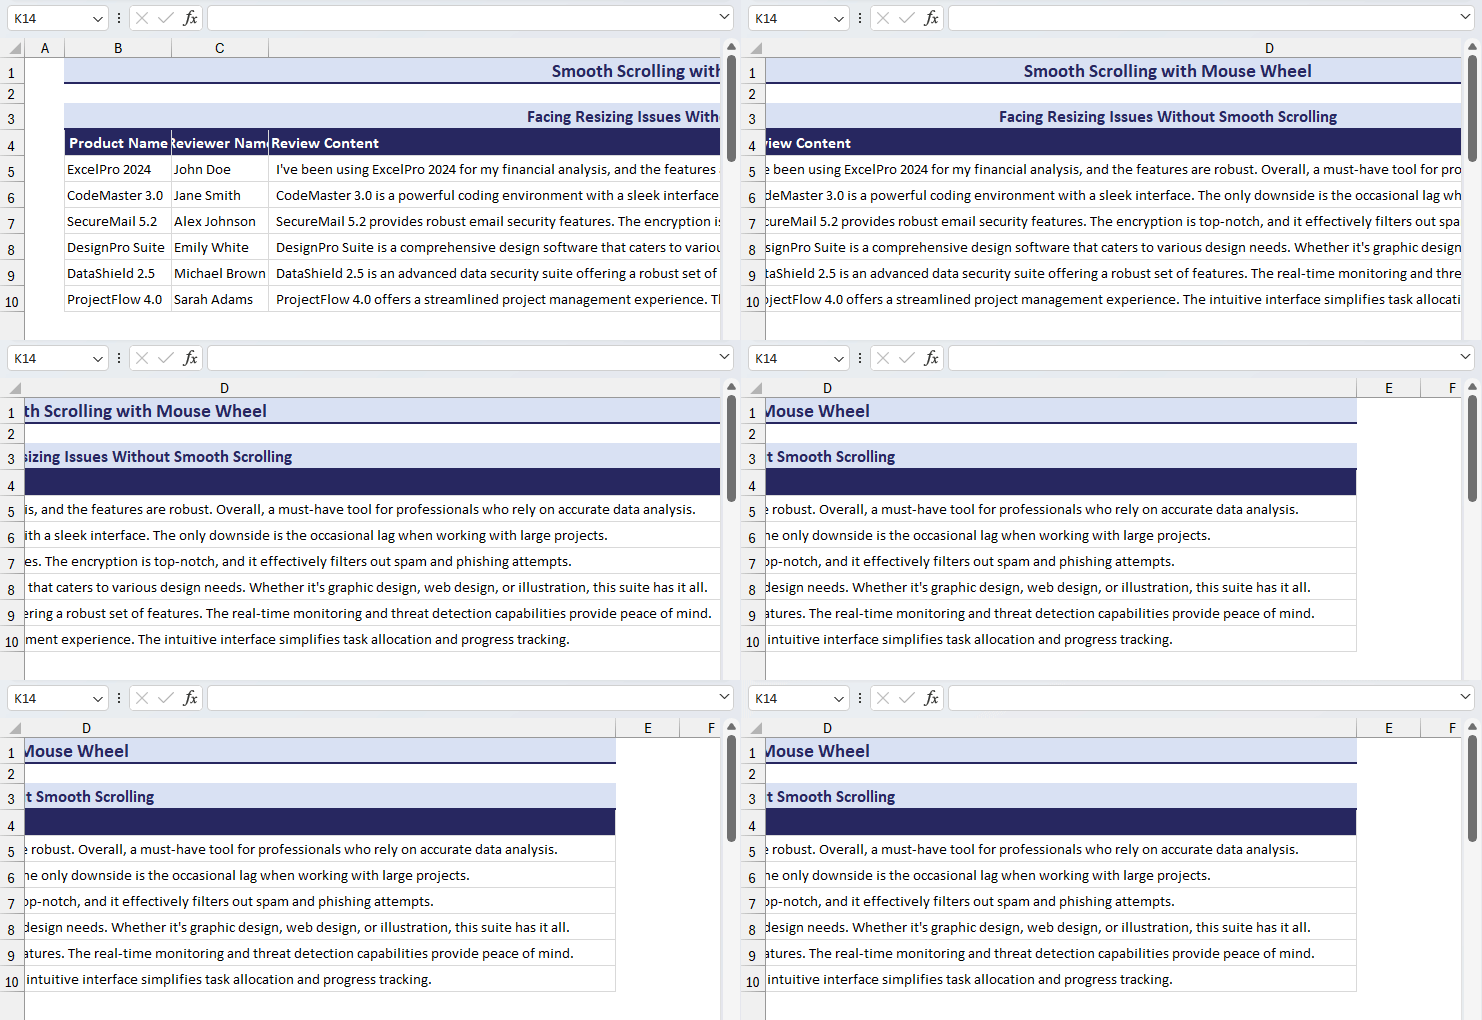
Another big issue that Smooth Scrolling fixes is with respect to resizing rows or columns. When comparing the data of two adjacent columns, if the columns are wider than than the screen you might need to decrease the width by dragging the right hand grid of that column.
In the GIF below, the right side of column D is not even visible to drag because the scrolling snaps to the left without this feature.
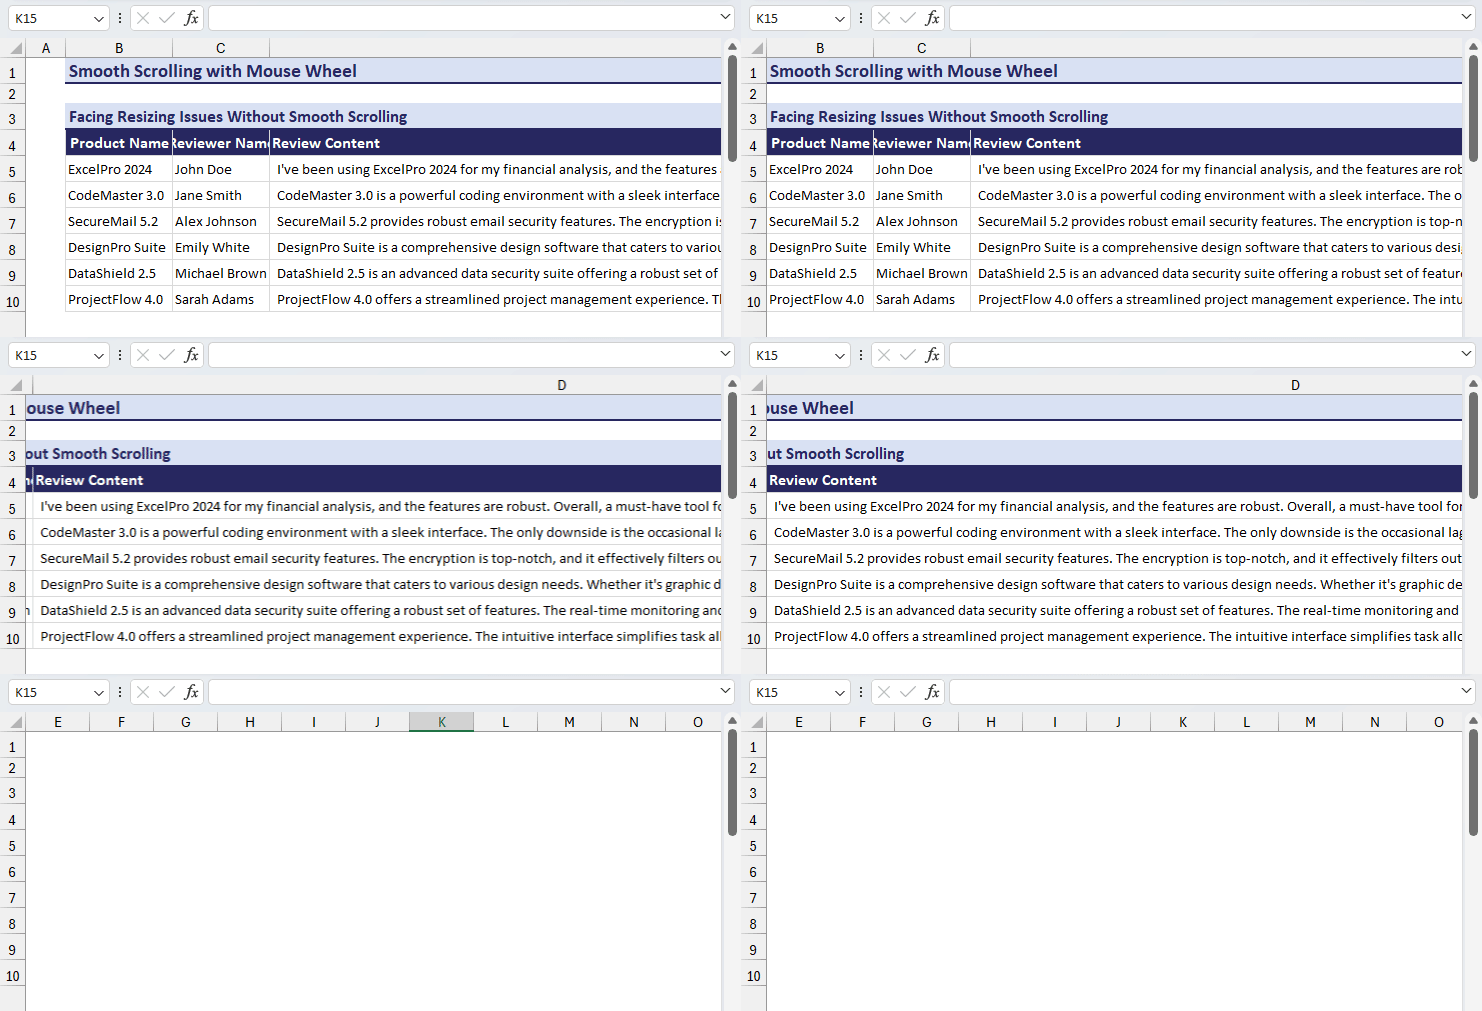
With smooth scrolling, you can get rid of the resizing issues of both rows and columns in Excel.
- Just press Ctrl + Shift on your keyboard, then scroll the mouse horizontally and stop when you see the right grid of column D.
The scroll stops scrolling where you stop, and the right grid of column D is visible for resizing.
Smooth Scrolling Alternatives for Older Versions of Excel
In older versions of Excel without smooth scrolling, a few alternatives are available to enjoy the smooth scrolling experience, because it can be frustrating not to be able to view the column portion you want to see.
Method 1 – Using the Right Click Menu
Use the right-click context menu to adjust the column width and row height in your worksheet.
Adjust Column Width
If your columns extend beyond the screen, you can’t resize them traditionally. But, you can use the right click menu to adjust the column width even without using smooth scrolling.
Suppose we have column B that extends beyond the screen in our worksheet.
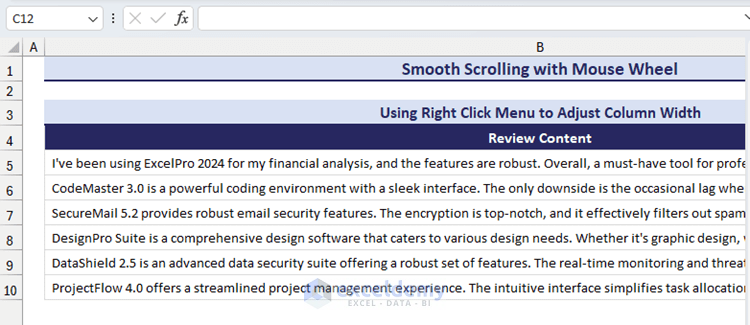
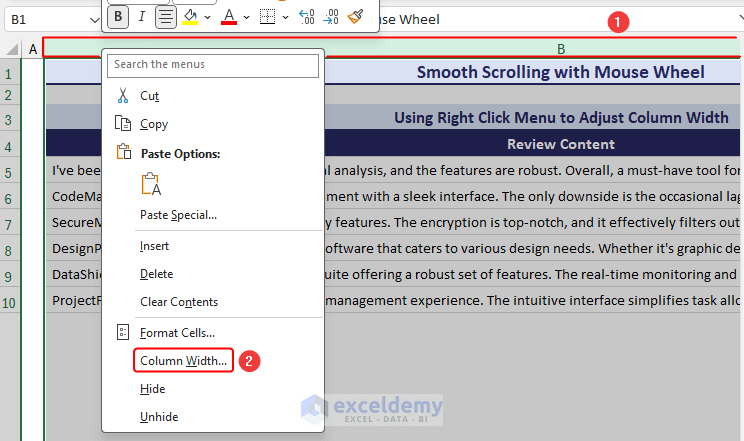
To adjust the column width using right click menu:
Right click on the column header and click Column Width.
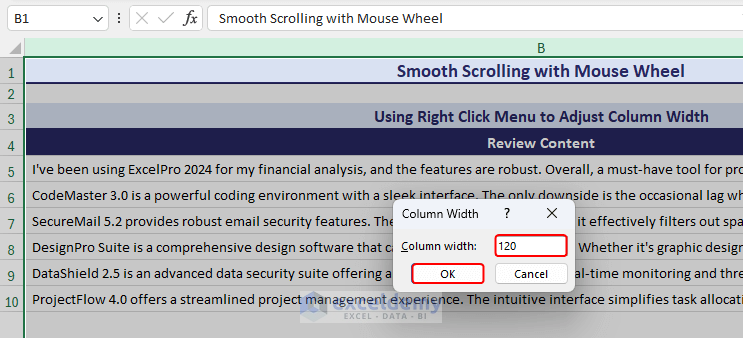
 As a result, the Column Width dialog with the current size of the column appears.
- Adjust the number to something smaller and click OK.
Now, the right edge of column B is visible to resize and adjust the column width.
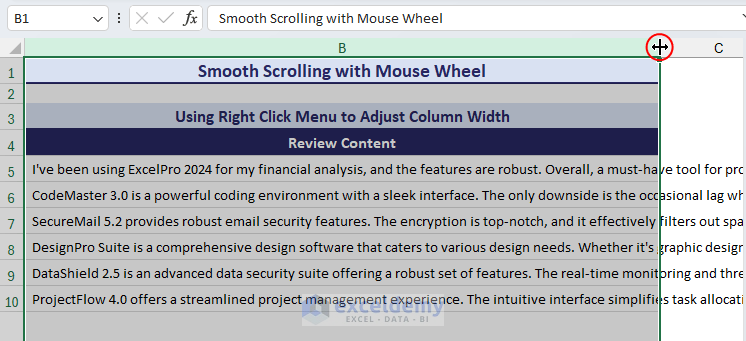
Note: The maximum cell width in Excel is 255.
Adjust Row Height
Similarly, consider the below image where the data in row 9 are not fully visible due to a smaller screen or restored window. The bottom edge of the row to resize the row height is not even visible.
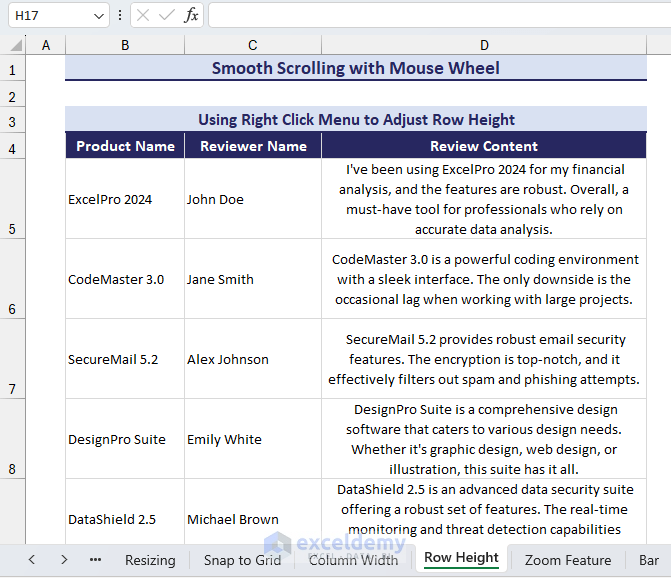
In this case, use the right click menu to adjust the row height as follows:
- Right click on the row header and click Row Height.
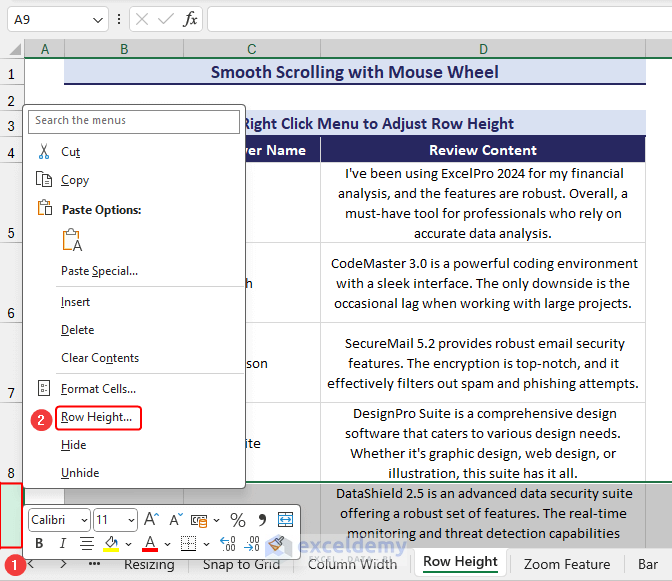
- Enter a smaller number than the current height for Row height and click OK.

As a result, the bottom edge of the row appears to be resized or adjusted.
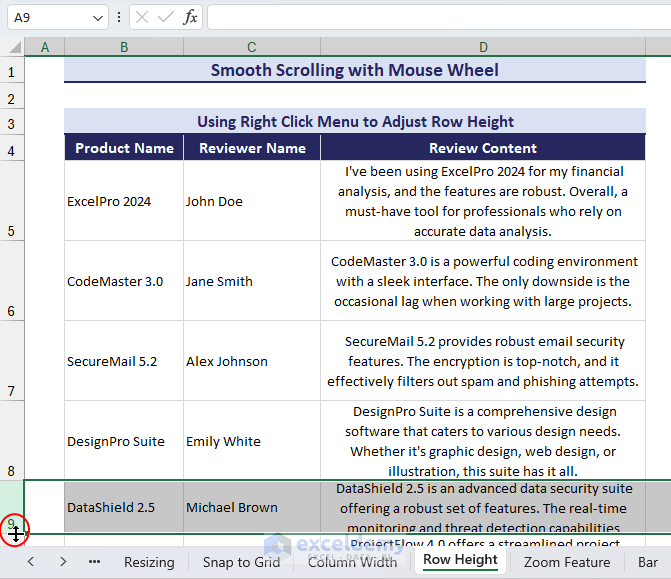
Method 2 – Using Zoom Features
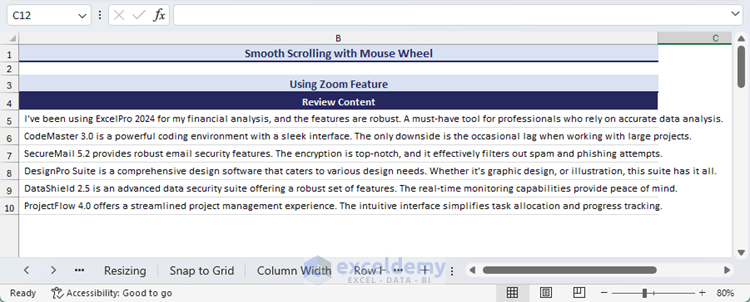
If resizing columns doesn’t work for certain situations, like when the column’s right edge is hidden, an alternative options is the Zoom feature.
- Simply click the Zoom out button or drag the Zoom slider to the left in your worksheet.
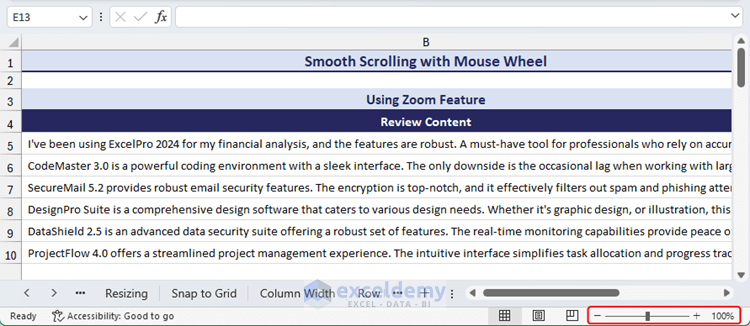
This will expand your view, and allow you to hold the hidden edge of the column and adjust its width as needed.
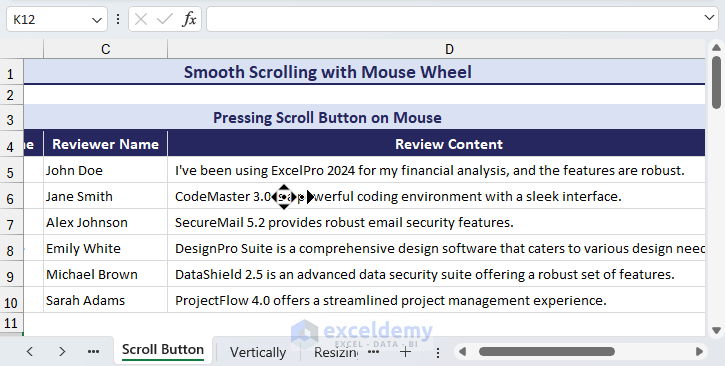
Method 3 – Pressing the Scroll Button on the Mouse
For a smooth scrolling experience in Excel, simply press and release the scroll button on your mouse. This allows you to glide seamlessly right and left, making it useful for quick data viewing without the need for any clicks. Once you’ve finished scrolling, a single click snaps the screen back to its original grid position.
Download Practice Workbook
Frequently Asked Questions
How to enable smooth scrolling in Windows Excel?
Smooth scrolling with the mouse wheel has arrived in most of the Excel versions, but not for every version just yet. To enable smooth scrolling on Windows Excel, install any pending updates from File > Account > Update Options.
How do I turn off smooth scrolling in Excel?
There’s no way to disable the smooth scrolling once it has been set up in your Excel. However, if someone needs to avoid scrolling due to carpal tunnel or for other reasons, use the Page-Up or Page-Down keys to see data instead.
Can I still snap to grid with smooth scrolling installed?
In the new Excel version, you can still experience the snap-to-grid behavior by using the arrow buttons instead of dragging the scroll bar.
What are the known issues of smooth scrolling in Excel?
Smooth scrolling in Excel depends on your mouse or touchpad. Precision devices allow scrolling one pixel at a time, ensuring precise navigation. However, non-precision devices move based on the height of one text line. If your Windows setting is to scroll one line per click, this will cause Excel to move one line of text instead of one row in your worksheet.
Related Articles
- [Fixed!] Excel Scrolling Too Many Rows
- How to Limit Scroll Area in Excel
- How to Scroll One Row at a Time in Excel
- Viewing Multiple Workbooks: Synchronous Scrolling in Excel
<< Go Back to Scrolling in Excel | Navigation in Excel | Learn Excel
Get FREE Advanced Excel Exercises with Solutions!

