Method 1 – Export Folder Structure Using Power Query
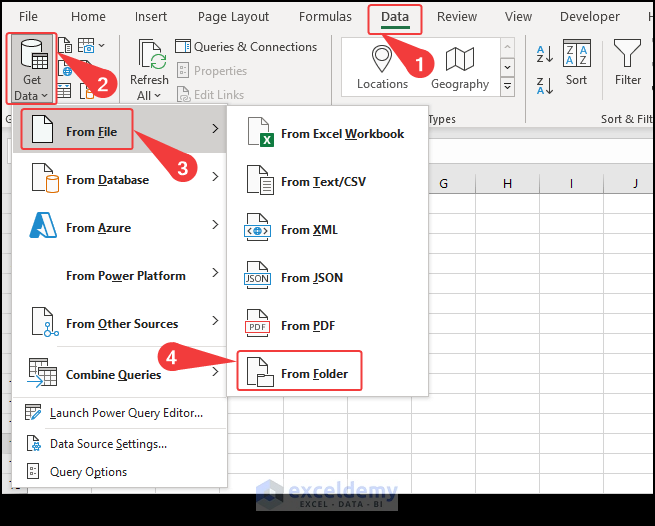
- Select the Data tab > Get Data > From File > From Folder.
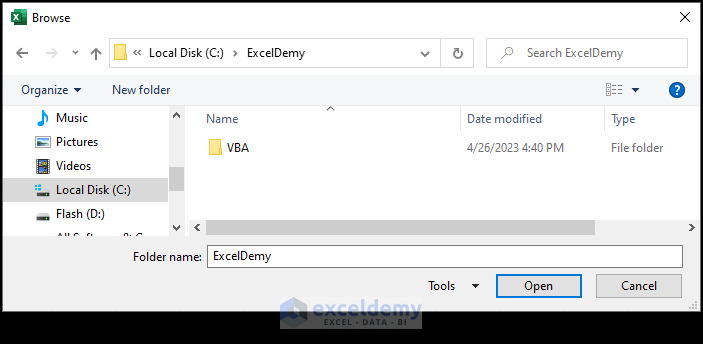
- Locate and open the folder to enlist.
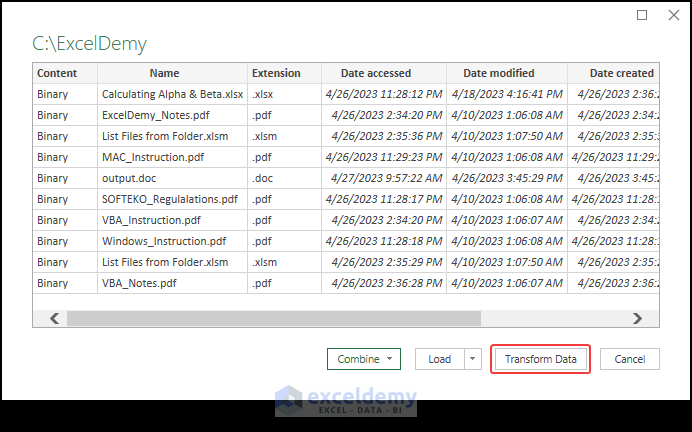
- Click on Transform Data.
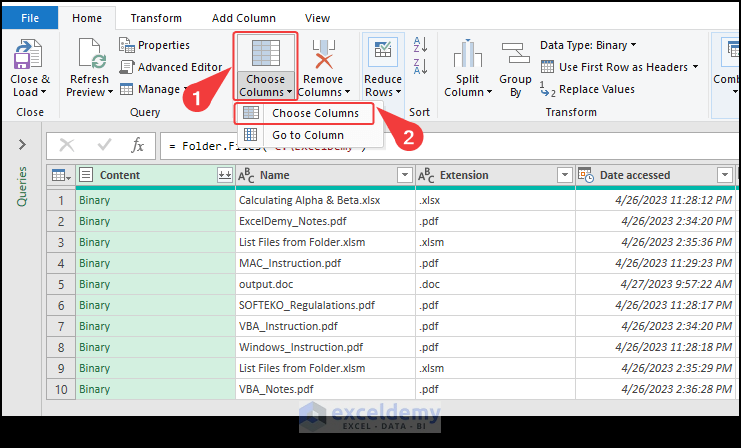
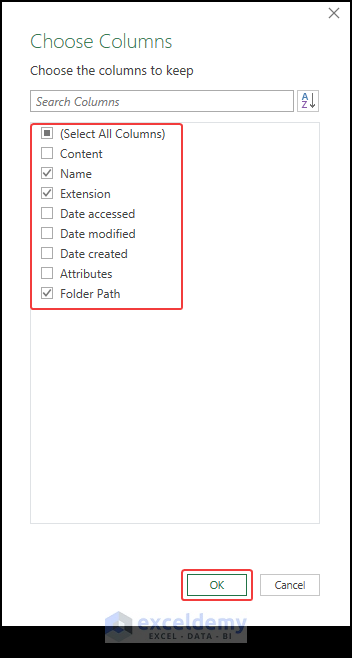
- Select Choose Columns > Choose Columns to enlist the desired data.
- Select the desired columns. Press OK.
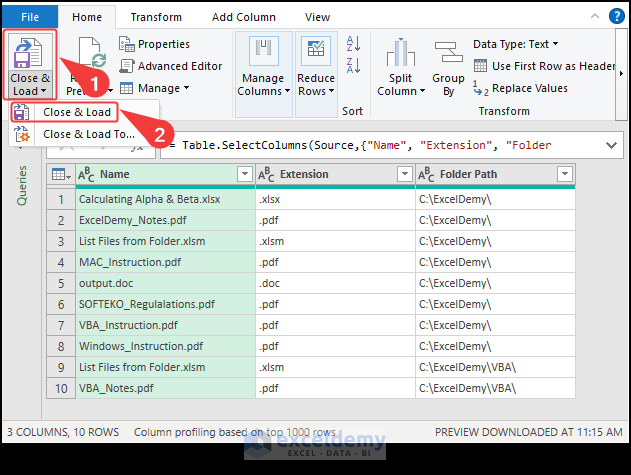
- Select Close & Load > Close & Load.
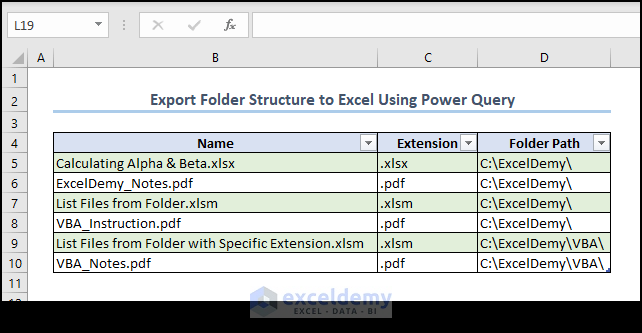
- See the file name from the folder structure listed in the worksheet.
Method 2 – Export Folder Structure from Doc File to Excel
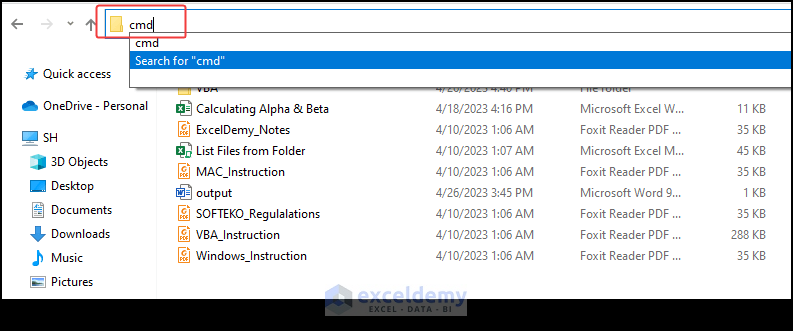
- Go to the desired folder location. On the address bar, type “cmd” and press Enter.
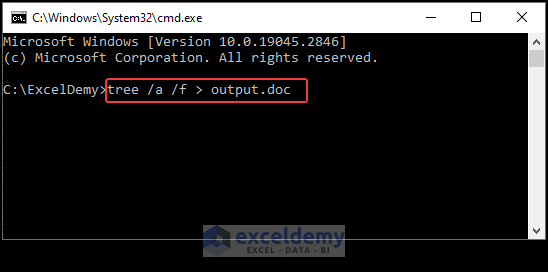
- Type “tree /a /f > output.doc” in the next command prompt. Press Enter.
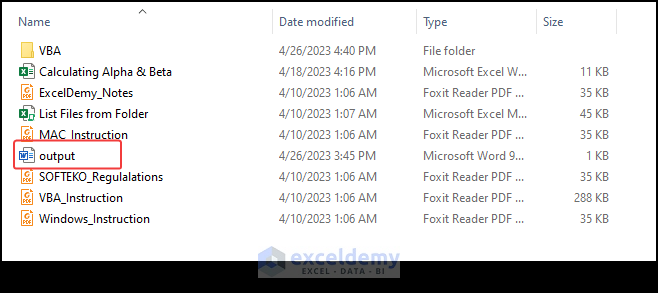
- See a doc file named doc in the folder.
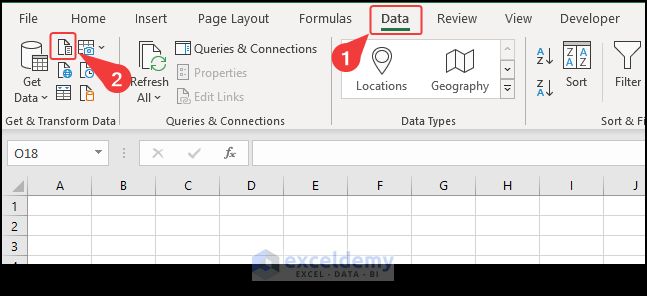
- Go to the Data tab > From Text.
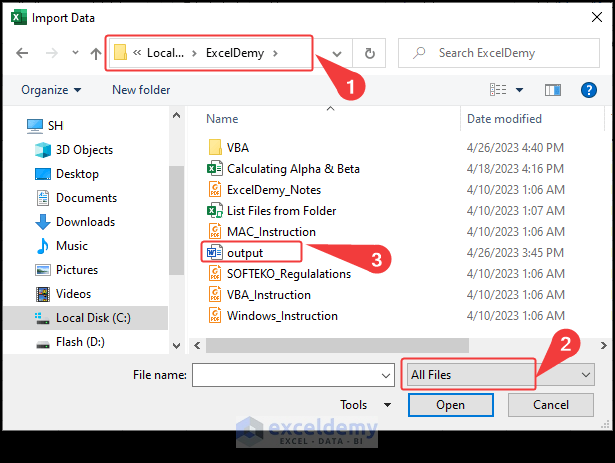
- Select the doc file from the All Files section. Open it.
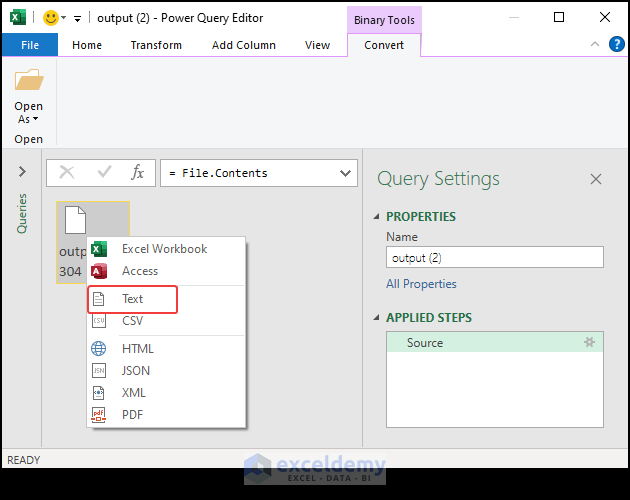
- Right-click on the file and select Text.
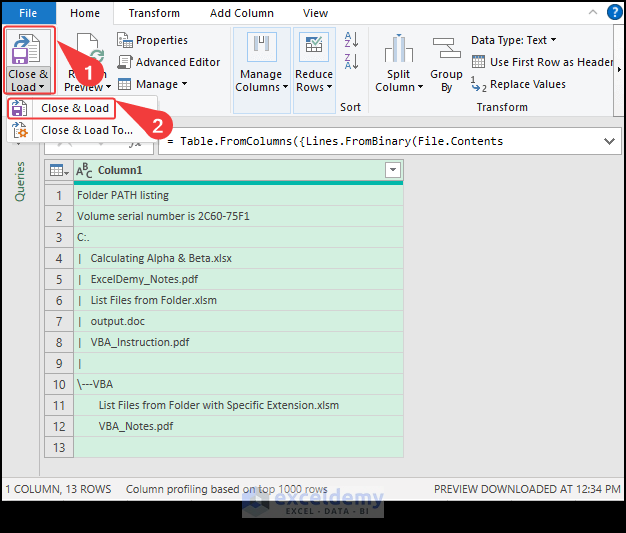
- Select Close & Load > Close & Load.
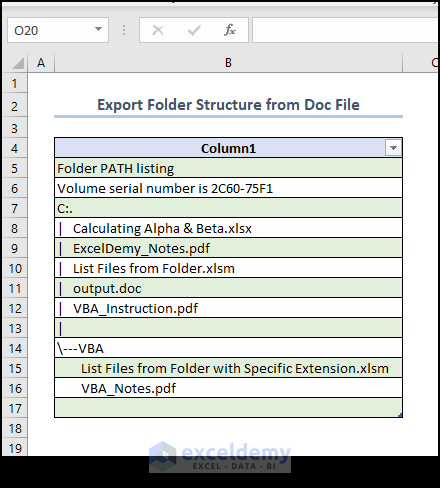
- See the folder structure exported in the worksheet.
Method 3 – Applying VBA to Export Folder Structure
- Open the VBA window by pressing Alt + F11.
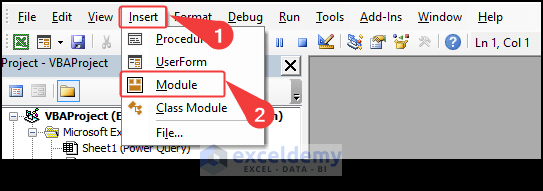
- Insert a new module by selecting Insert > Module.
- Write the following code in the module and run it by pressing F5.
Code:
Option Explicit
Sub Folder_Structure_VBA()
Dim PathSpec As String
PathSpec = "C:\ExcelDemy\"   'Specify a folder
If (PathSpec = "") Then PathSpec = SelectSingleFolder 'Browse Folder to select a folder
Dim fso As Object
Set fso = CreateObject("Scripting.FileSystemObject")    'Late Binding
If (fso.FolderExists(PathSpec) = False) Then Exit Sub   'folder exist or not?
Application.ScreenUpdating = False 'Disable Screen Updating to speed up macro
Dim MySheetName As String
MySheetName = "Folder_Structure_VBA"   'Add a Sheet with name "Files"
AddSheet (MySheetName)
Dim FileType As String
FileType = "*"   '*:all, or pdf, PDF, XLSX...
FileType = UCase(FileType)
Dim queue As Collection, oFolder As Object, oSubfolder As Object, oFile As Object
Dim LastBlankCell As Long, FileExtension As String
Set queue = New Collection
queue.Add fso.GetFolder(PathSpec) 'enqueue
Do While queue.Count > 0
Set oFolder = queue(1)
queue.Remove 1 'dequeue
For Each oSubfolder In oFolder.SubFolders   'loop all sub-folders
queue.Add oSubfolder 'enqueue
'...insert any folder processing code here...
Next oSubfolder
LastBlankCell = ThisWorkbook.Sheets(MySheetName).Cells(Rows.Count, 1).End(xlUp).Row + 1 'get the last blank cell of column A
For Each oFile In oFolder.Files 'loop all files
FileExtension = UCase(Split(oFile.Name, ".")(UBound(Split(oFile.Name, ".")))) 'get file extension, eg: TXT
If (FileType = "*" Or FileExtension = FileType) Then
With ThisWorkbook.Sheets(MySheetName)
.Cells(LastBlankCell, 1) = oFile 'Path
.Cells(LastBlankCell, 2) = oFolder 'Folder
.Cells(LastBlankCell, 3) = oFile.Name 'File Name
End With
LastBlankCell = LastBlankCell + 1
End If
Next oFile
Loop
'Cells.EntireColumn.AutoFit  'Autofit columns width
Application.ScreenUpdating = True
End Sub
Function SelectSingleFolder()
'Select a Folder Path
Dim FolderPicker As FileDialog
Dim myFolder As String
'Select Folder with Dialog Box
Set FolderPicker = Application.FileDialog(msoFileDialogFolderPicker)
With FolderPicker
.Title = "Select A Single Folder"
.AllowMultiSelect = False
If .Show <> -1 Then Exit Function 'Check if user clicked cancel button
SelectSingleFolder = .SelectedItems(1)
End With
End Function
Function AddSheet(MySheetName As String)
'Add a worksheet with custom name
Dim Mysheet As Worksheet, F As Boolean
For Each Mysheet In ThisWorkbook.Worksheets
If Mysheet.Name = MySheetName Then
Sheets(MySheetName).Cells.Delete
F = True
Exit For
Else
F = False
End If
Next
If Not F Then Sheets.Add.Name = MySheetName
'Add table header
With Sheets(MySheetName)
.Cells(4, 1) = "Path"
.Cells(4, 2) = "Folder"
.Cells(4, 3) = "File Name"
End With
End Function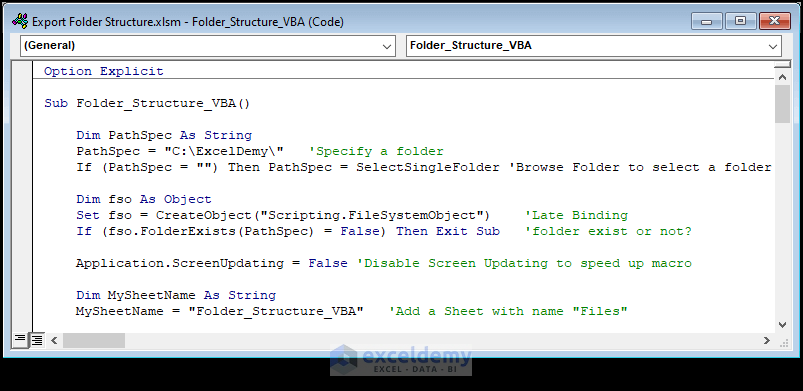
Code Explanation:
- We created a sub-procedure that used ObjectFileSystem to open the file directory.
- We applied the For Loop and Do While Loop to get the subfolder names and respective file names.
- We used a custom VBA function to open the folder and get its file names.
- We used another custom function to add a new worksheet and paste the file names on it.
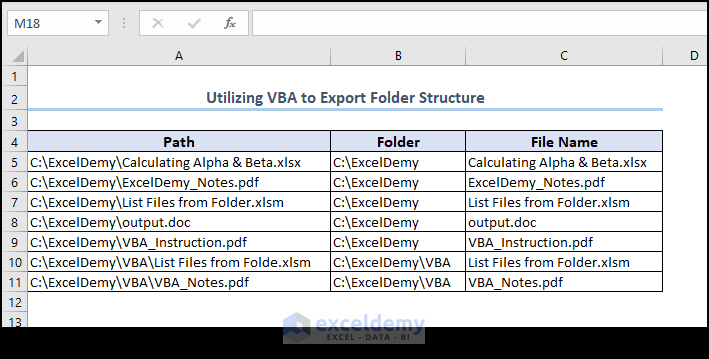
- See the file names from the folder enlisted in a new worksheet, like in the image.
How to Export Specific Files (e.g. PDF) from Folder Using Excel VBA
- Open the VBA window by pressing Alt + F11.
- Open a new module.
- Use the following code in the module and run it by pressing F5.
Code:
Sub Folder_PDF()
Application.ScreenUpdating = False
'ActiveSheet.Cells.Clear
Call GetFiles("C:\ExcelDemy\")      'end string with path separator ( \ )
End Sub
Private Sub GetFiles(ByVal path As String)
Dim fso As Object, Fldr As Object, subF As Object, file As Object
Set fso = CreateObject("Scripting.FileSystemObject")
Set Fldr = fso.GetFolder(path)
Dim i As Variant
i = 4
'Getting files from folder
For Each subF In Fldr.SubFolders
GetFiles (subF.path)
Next subF
'Checking file extension and putting them on worksheet
For Each file In Fldr.Files
If LCase(Right(file.path, 4)) = ".pdf" Then
ActiveSheet.Range("A" & Rows.Count).End(xlUp).Offset(i, 1).Resize(, 2) = Array(file.Name, Replace(file.path, file.Name, ""))
End If
i = i + 0.5
Next file
Set fso = Nothing
Set Fldr = Nothing
Set subF = Nothing
Set file = Nothing
End Sub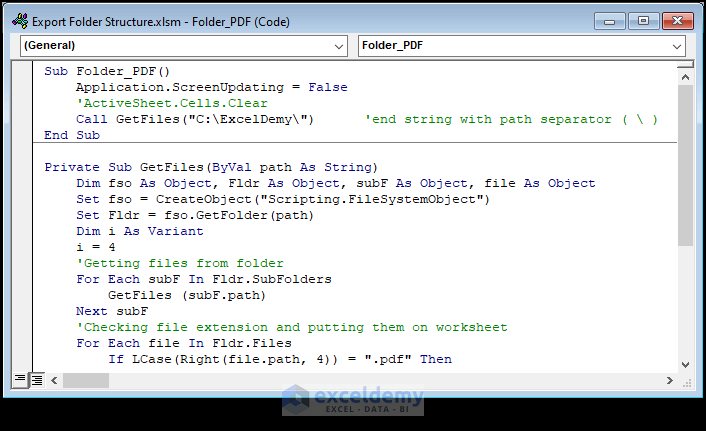
We used ObjectFileSystem to access the file from the folder. We checked if the file extension was PDF; if that was true, we listed the file names in the worksheet.
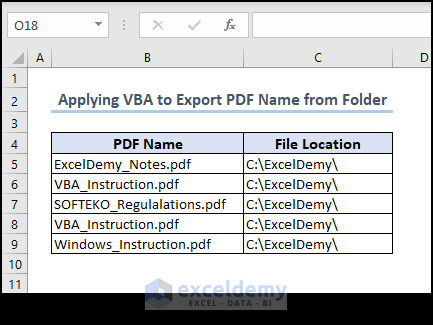
See the PDF file names from the selected folder listed in the worksheet.
Frequently Asked Questions
1. What is the purpose of exporting folder structures to Excel?
Ans: Exporting folder structures to Excel can help you better organize and manage your digital files. It allows you to view and analyze the hierarchy of your folders and subfolders, as well as their properties and attributes, in a more structured and customizable format. This can be useful for various purposes, such as inventory management, project planning, and data analysis.
2. How to export folder structures to Excel?
Ans: The process of exporting folder structures to Excel may vary depending on your operating system and file management software. However, the basic steps usually involve selecting the folder you want to export, choosing the export format and options, and specifying the destination file and location. The article provides a detailed guide on how to do this for Windows and macOS systems using various tools and methods.
3. Can we customize the exported folder structure in Excel?
Ans: Yes, once you have exported the folder structure to Excel, you can modify and format it as you wish. You can use Excel’s built-in tools and features, such as filters, sorting, and formulas, to manipulate the data and create different views and analyses. You can also add or remove columns, rows, and cells, and apply styles, colors, and formatting to make the structure more readable and visually appealing.
Things to Remember
- Don’t forget to save the file as an xlsm file before running the code.
- Be careful about the folder name. Change it in the code according to your needs.
- We did a little editing on the worksheet. So after execution, your result will look a bit different.
Download Practice Workbook
You can download the practice workbook from here.
<< Go Back to Power Query Excel | Learn Excel
Get FREE Advanced Excel Exercises with Solutions!

