If you want to create a GST purchase order format, then Excel can come handy. In this article, I will explain how to create a GST purchase order format in Excel with simple and efficient steps.
What Is GST?
GST means the goods and services tax. It is the tax that is included in the final price of a product. This tax is paid by the consumer who is buying the product and then passed to the government by the seller who is selling it.
What Is a GST Purchase Order?
A GST purchase order generally refers to a formal document that is issued by the buyer to the seller. It authorizes the purchase transaction.
A GST purchase order contains information about the company. It also contains vendor information, shipping information, product details, and GST. It also contains terms and conditions. And most importantly, it has a signature section to agree.
How to Create GST Purchase Order Format in Excel: 7 Simple Steps
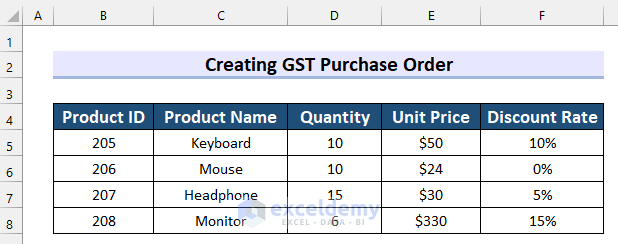
Here, I have the following dataset. This dataset contains information about some products that are needed to be purchased. This dataset contains Product ID, Product Name, Quantity, Unit Price, and Discount Rate. I will use this dataset to explain how to create a GST purchase order format in Excel.
Step-01: Adding Company Information in GST Purchase Order Format in Excel
In this first step, I will add information about the company.
- Firstly, write your company name on the top right side of your Excel sheet. Here, I wrote it as “Your Company Name” but you can write the name of your company.
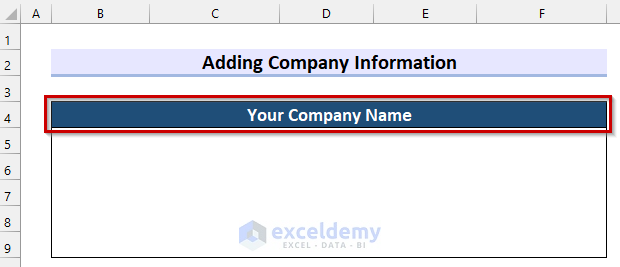
- Secondly, in the company information section write the Address, Contact No, Email, Website, and GSTIN.
You can also write additional information if you want.

Step-02: Inserting Purchase Order Details
In this step, I will show you how you can add purchase order details in your GST purchase order format.
- Firstly, create another section and name it Order Details to insert information about the order.

- Secondly, write Order Date, Delivery Date, and PO Number which means purchase order number.
Generally, these 3 pieces of information are seen in this section.

Now, define the Order Date.
- Firstly, select the cell where you want to show your Order Date. Here, I selected cell H5.
- Secondly, in cell H5 write the following formula.
=TODAY()
Here, the TODAY function will return the date of the day this GST purchase order format is used.
- Thirdly, press ENTER and you will get the Order Date.

Now, I will insert the Delivery Date.
- Firstly, select the cell where you want the Delivery Date. Here, I selected cell H6.
- Secondly, in cell H6 write the following formula.
=H5+10
Here, I added 10 with the value in cell H5 which is the Order Date. Now, this formula will return the date after 10 days of the Order Date as the Delivery Date. In this case, I want the delivery after 10 days that’s why I added 10 with the Order Date but you should add the days according to your preference.
- Thirdly, press ENTER to get the Delivery Date.

In the following picture, you can see how my GST purchase order format looks after these first 2 steps.

Step-03: Adding Vendor & Shipping Information
In this step, I will add Vendor and Shipping Info in the GST purchase order format in Excel.
- Firstly, create a new section for adding information and name it Vendor.
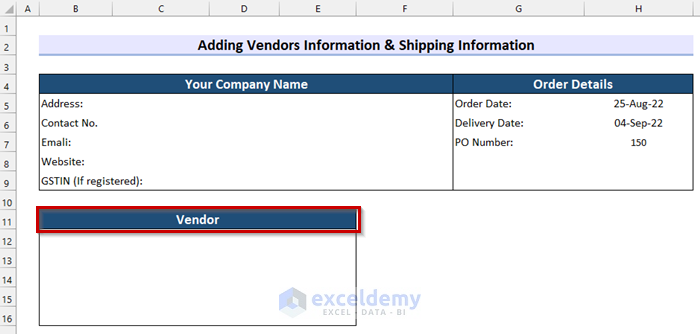
- Secondly, write Name, Company Name, Address, Contact No, and Email in this section. This section must contain all of these fields.
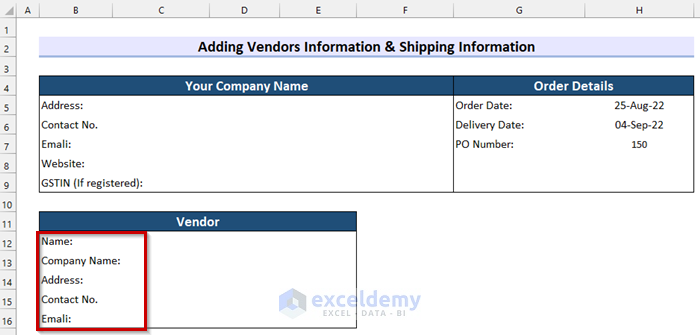
- After, that create another section named Shipping Info on the right side of the Vendor information section.
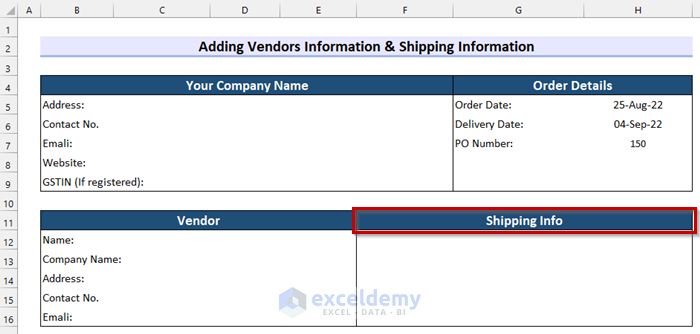
- Now, in the Shipping Info section write the contact person’s Name, Company Name, Address, Contact No, and Email.
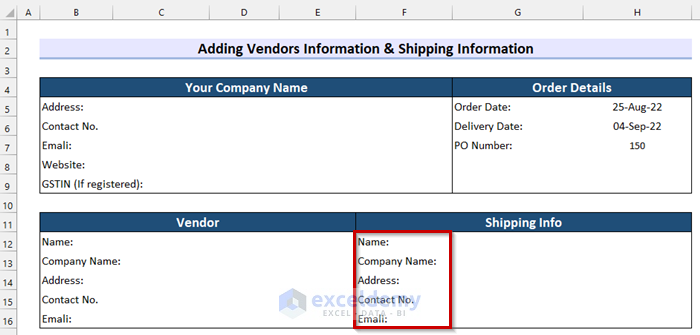
Here, in the following picture, you can see my GST purchase order format in Excel after these 3 steps.
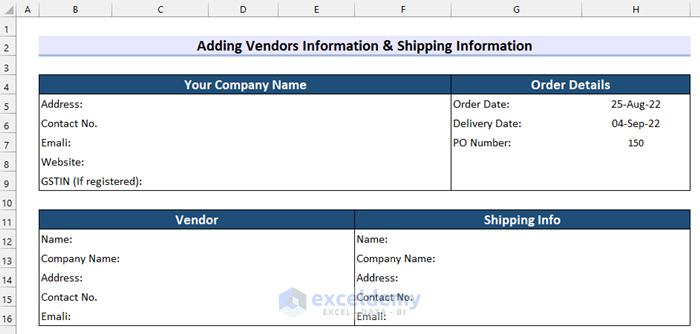
Step-04: Creating Description Box for GST Purchase Order Format in Excel
Here, I will create the description box for a GST purchase order format in Excel.
- Firstly, create a table that contains information about the products you want to purchase.
Here, my table contains the Product ID, Product Name, Quantity, Unit Price, Discount Rate, Discount, and Total. In this table, I will calculate the Discount and Total. The rest of the data will be given.
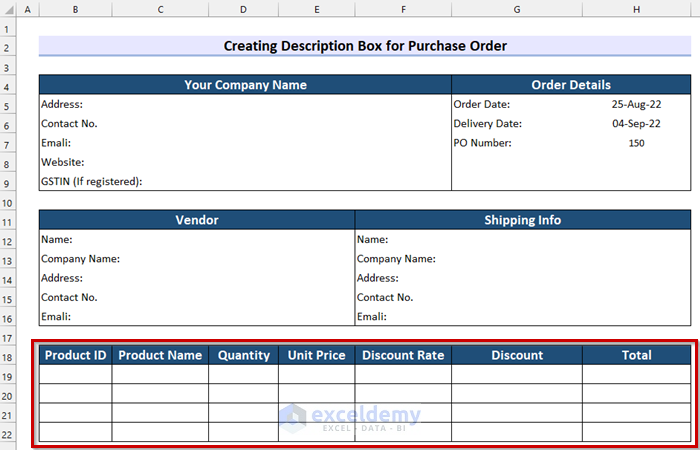
- After that, enter the data into the table. Here, I entered data from my dataset.
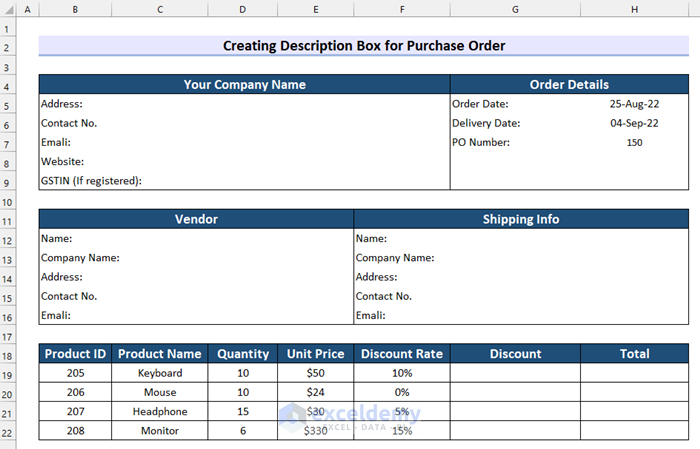
Now, I will calculate the discount from these data.
- Firstly, select the cell where you want to calculate the Discount. Here, I selected cell G19.
- Secondly, in cell G19 write the following formula.
=(D19*E19)*F19 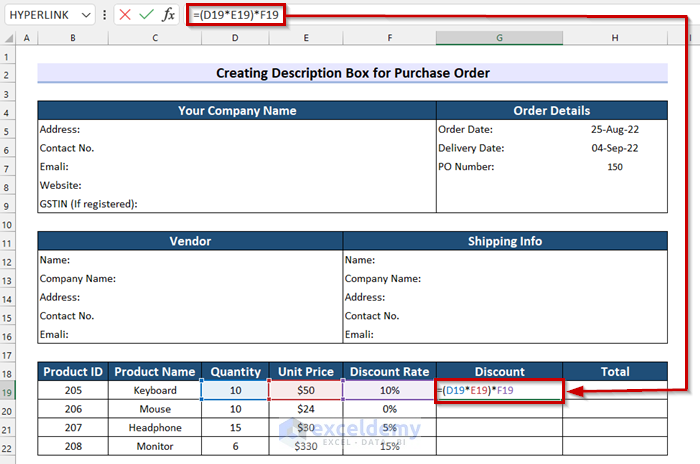
Here, I multiplied the Quantity by the Unit Price and then multiplied the result by the Discount Rate. And, the formula will return the Discount.
- Thirdly, press ENTER to get the result.
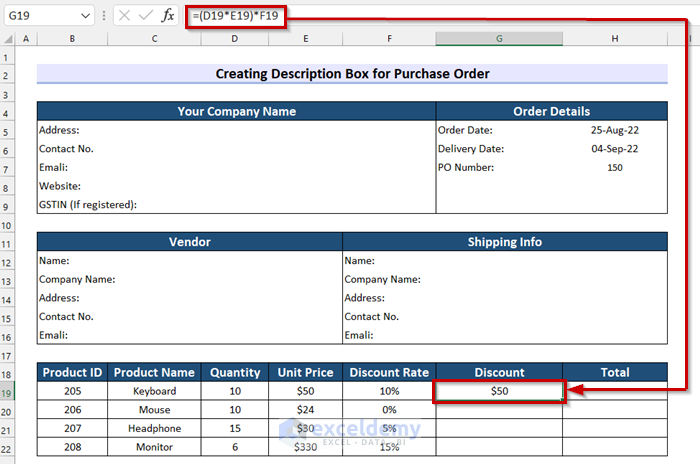
- After that, drag the Fill Handle to copy the formula.
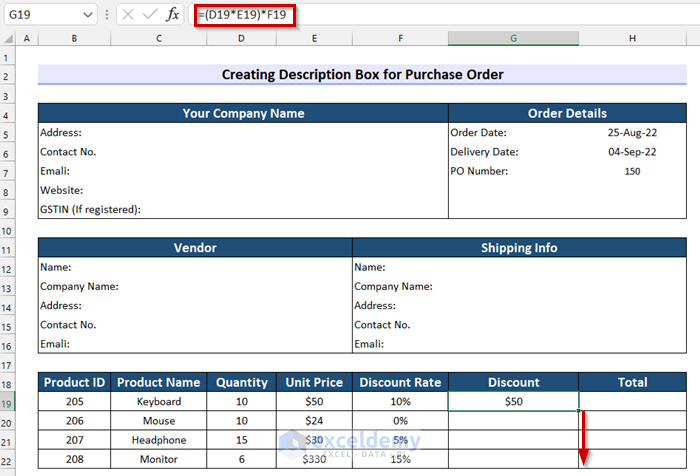
Now, you can see that I have copied my formula to all the other cells.
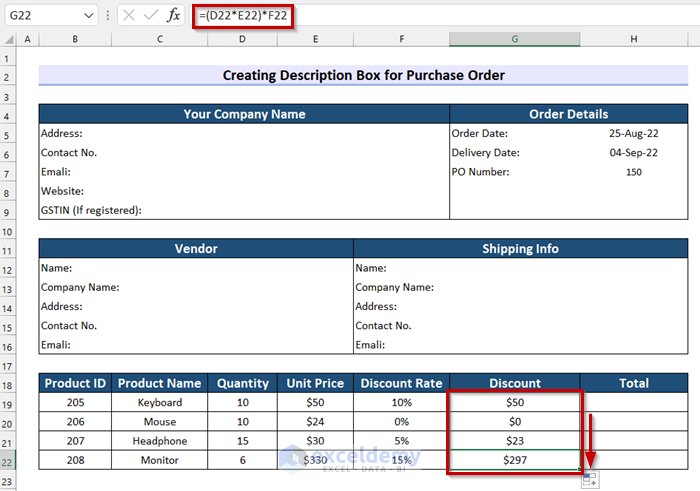
At this point, I will calculate the Total.
- Firstly, select the cell where you want the Total. Here, I selected cell H19.
- Secondly, in cell H19 write the following formula.
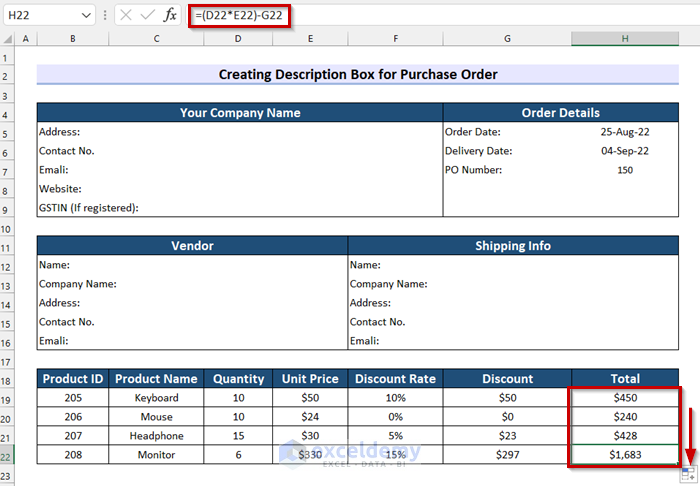
=(D19*E19)-G19 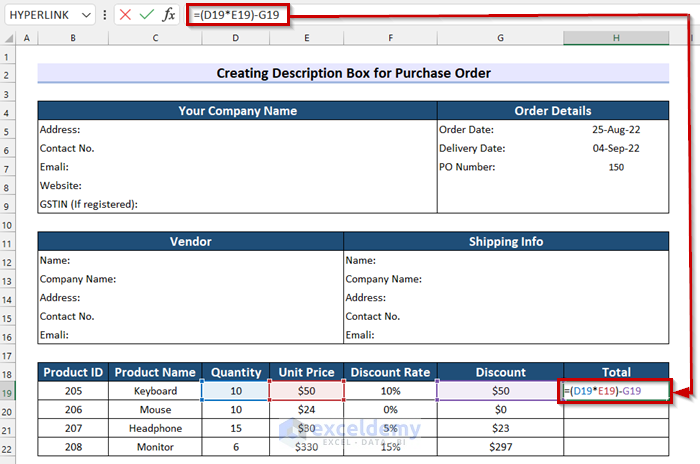
Here, I multiplied the Quantity by the Unit Price and then subtracted the Discount from the result. And, the formula will return the Total.
- Thirdly, press ENTER to get the Total.
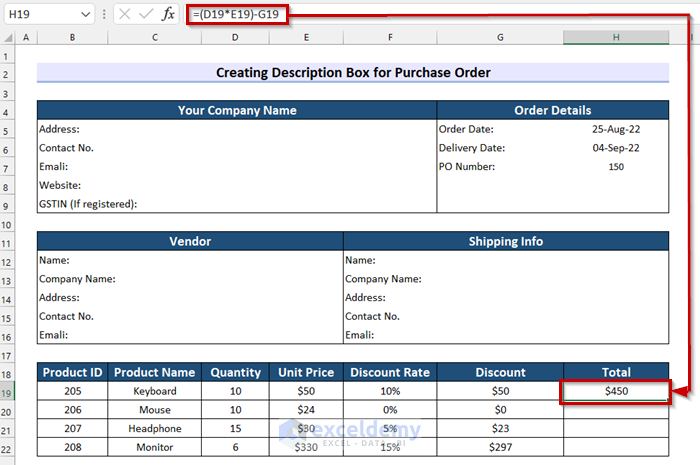
- After that, drag the Fill Handle to copy the formula to all the other cells.
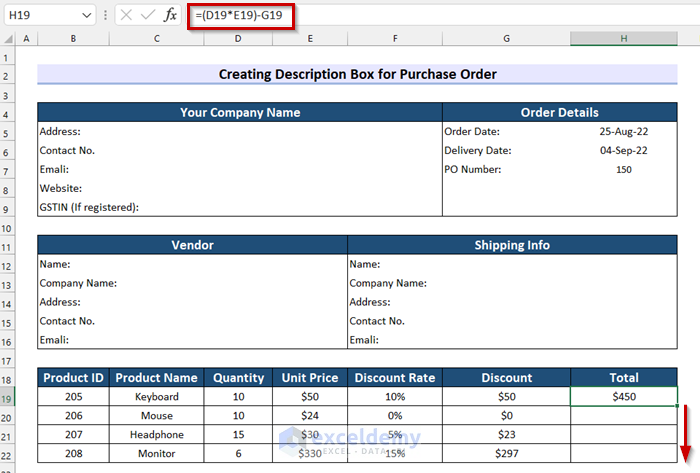
Finally, you can see that I have copied the formula to the other cells.
Step-05: Calculating Total Discount and Subtotal
In this step, I will explain how to calculate the Total Discount and Subtotal in GST purchase order format in Excel.
- Firstly, select the cell where you want to calculate the Total Discount. Here, I selected cell G23.
- Secondly, in cell G23 write the following formula.
=SUM(G19:G22)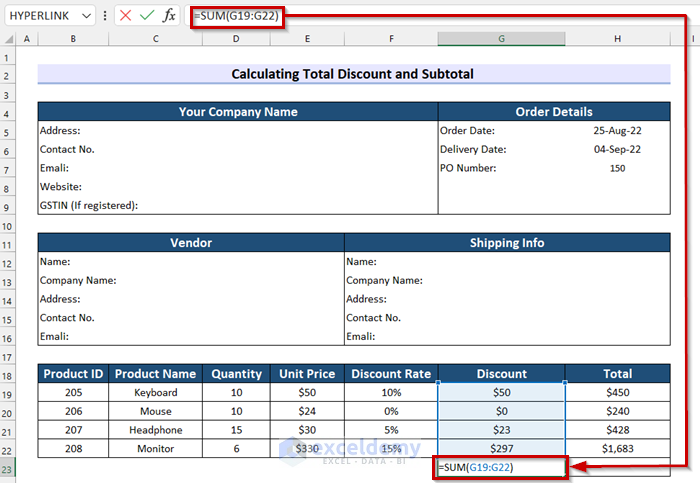
Here, in the SUM function, I selected G19:G22 as numbers. The formula will return the summation of the cell range G19:G23.
- Thirdly, press ENTER to get the Total Discount.
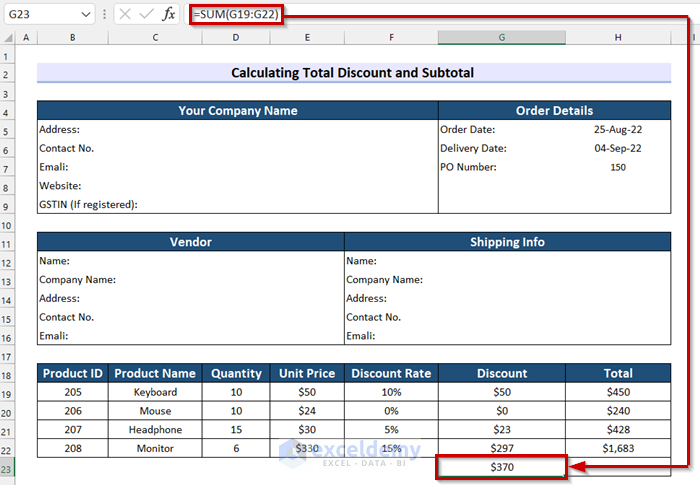
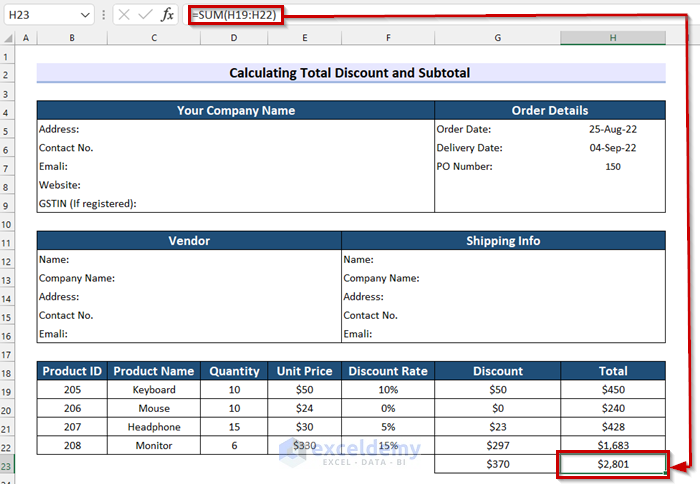
- After that, select the cell where you want to calculate the Subtotal. Here, I selected cell H23.
- Next, in cell H23 write the following formula.
=SUM(H19:H22)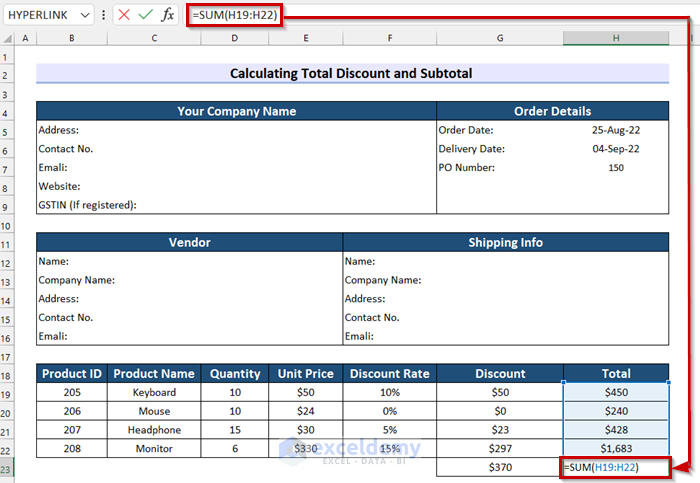
Now, in the SUM function, I selected H19:H22 as numbers. The formula will return the summation of the cell range H19:H23.
- Finally, press ENTER to get the Subtotal.
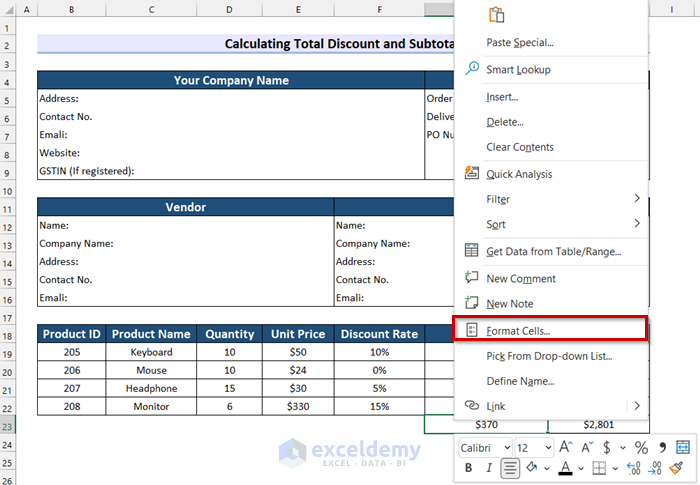
Here, I will change the format of the cells.
- Firstly, Right-click on the cell.
- Secondly, select Format Cells.
Now, the Format Cells dialog box will appear.
- Firstly, select Custom.
- Secondly, customize the format as you want. Here, I customized mine.
- Thirdly, select OK.

Here, you can see the format has changed and the cell is looking much better.
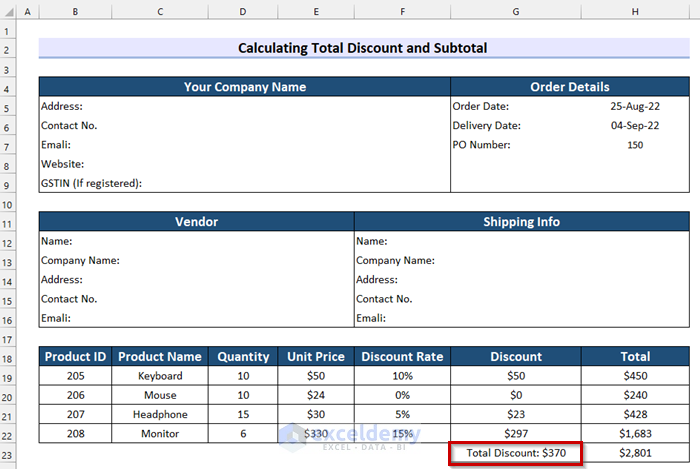
- After that, change the format of cell H23 by following the previous procedure.
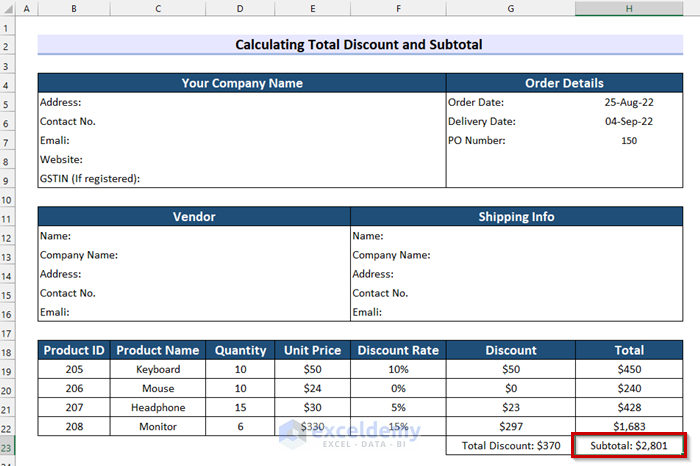
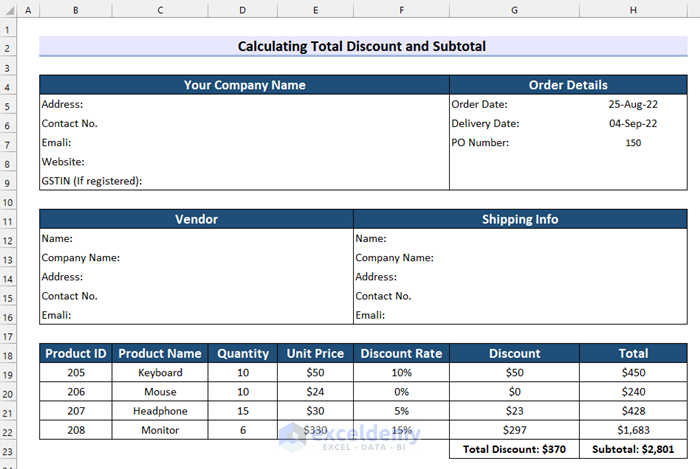
Now, I made these 2 cells bold to give them a more clear look. And this is how my GST purchase order format looks so far.
Step-06: Adding GST in Purchase Order Format in Excel
Here, I will show you how to add GST to your GST purchase order format in Excel.
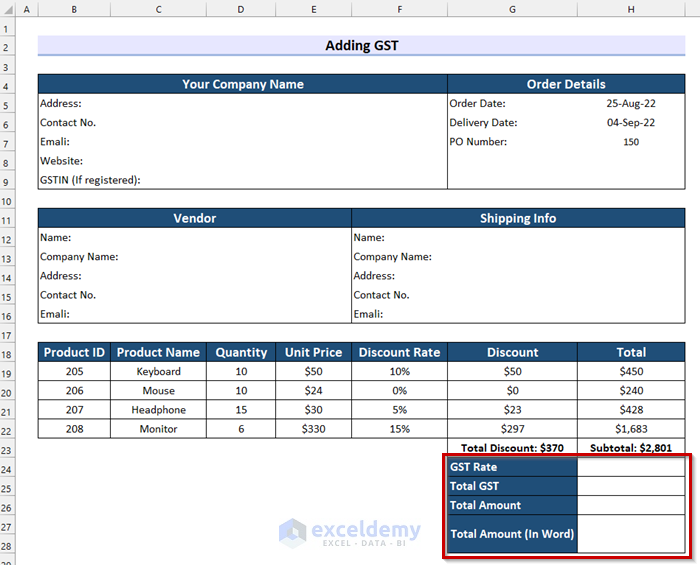
- Firstly, create another section and make rows for GST Rate, Total GST, Total Amount, and Total Amount (In Word).
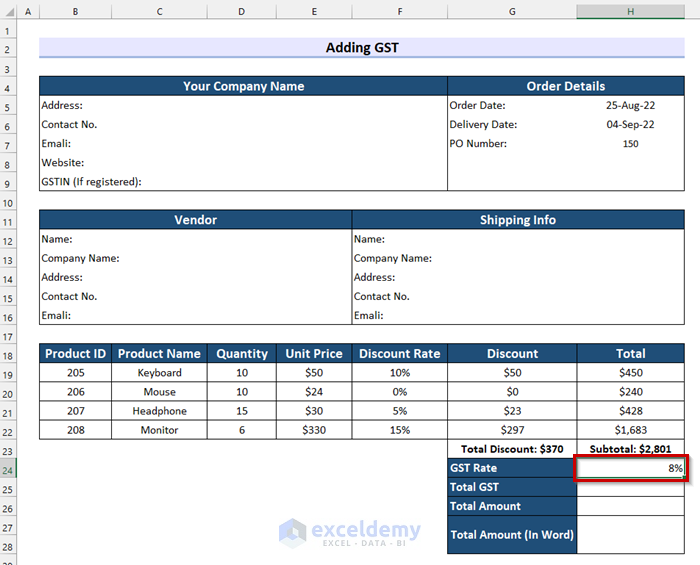
- Secondly, insert your GST Rate into the table.
- Thirdly, select the cell where you want to calculate the Total GST. Here, I selected H25.
- After that, in cell H25 write the following formula.
=H23*H24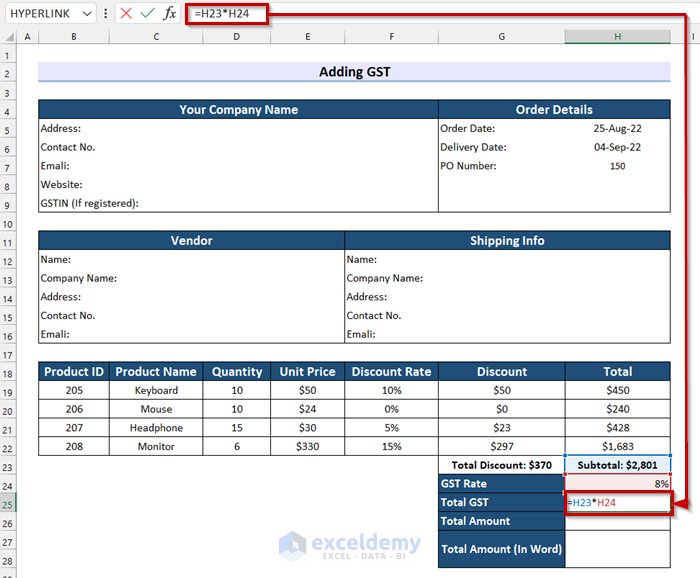
Here, I multiplied the Subtotal by the GST Rate and the formula will return the Total GST.
- Finally, press ENTER to get the result.
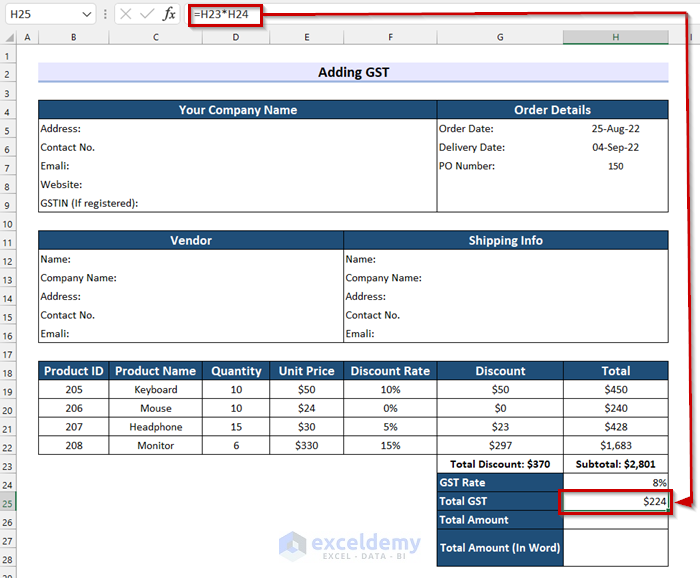
- After that, select the cell where you want to calculate the Total Amount. Here, I selected cell H26.
- Next, in cell H26 write the following formula.
=H23+H25
In the formula, I summed the Subtotal and Total GST and it will return the Total Amount.
- Now, press ENTER to get the Total Amount.
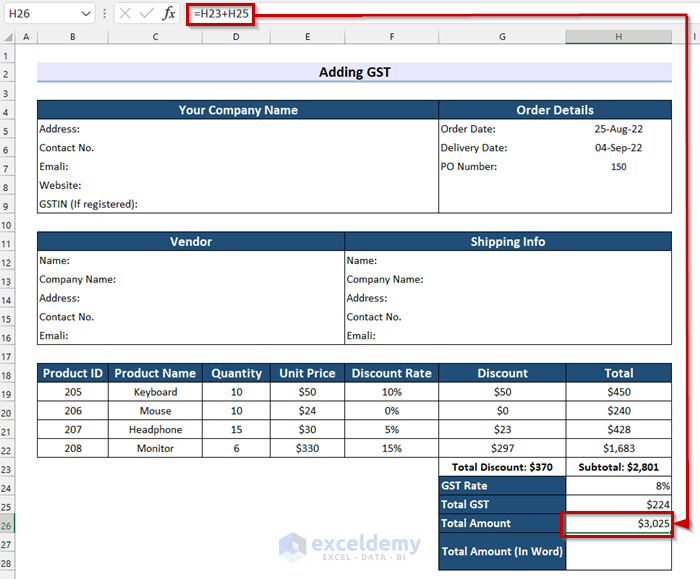
- After that, write the Total Amount in words.

Step-07: Creating Signature and Additional Section
In this step, I will add the additional section to add comments and signatures.
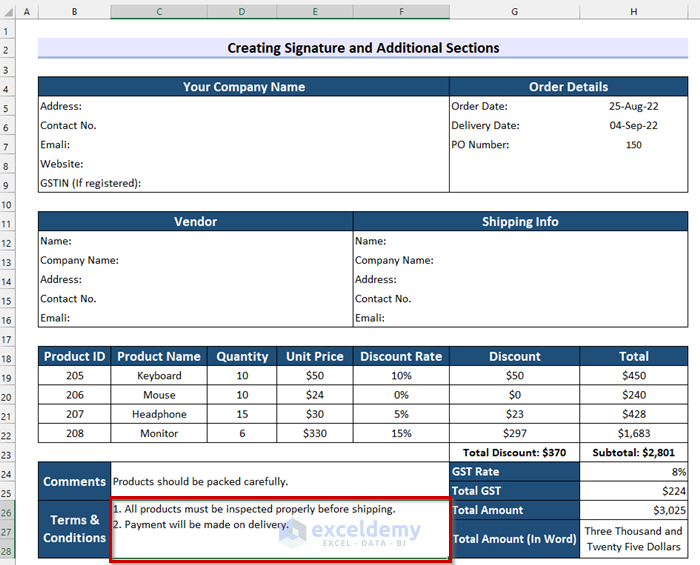
- Firstly, create a section on the right side of the GST section for adding Comments and Terms and conditions.
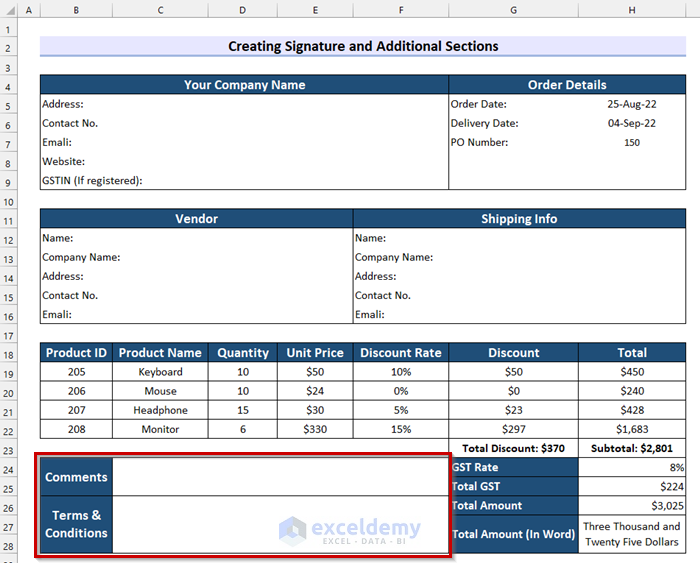
- Secondly, write your comments as you want. In the following picture, you can see that I have added mine.
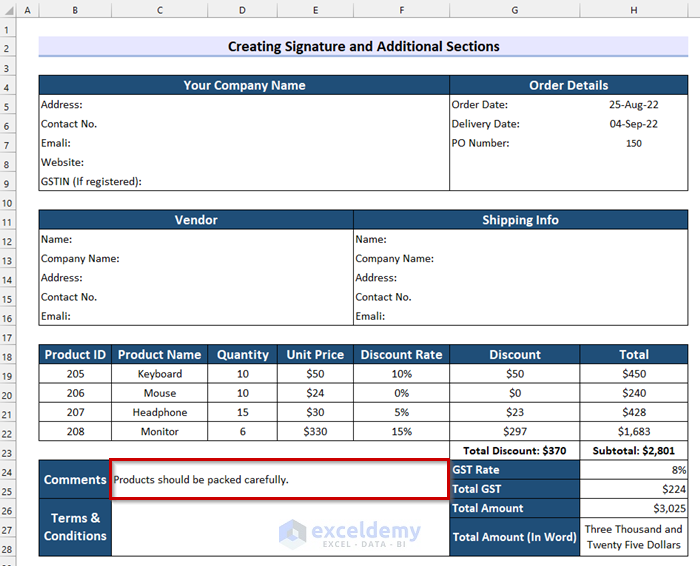
- Thirdly, write your Terms & Conditions. Here, I have written mine.
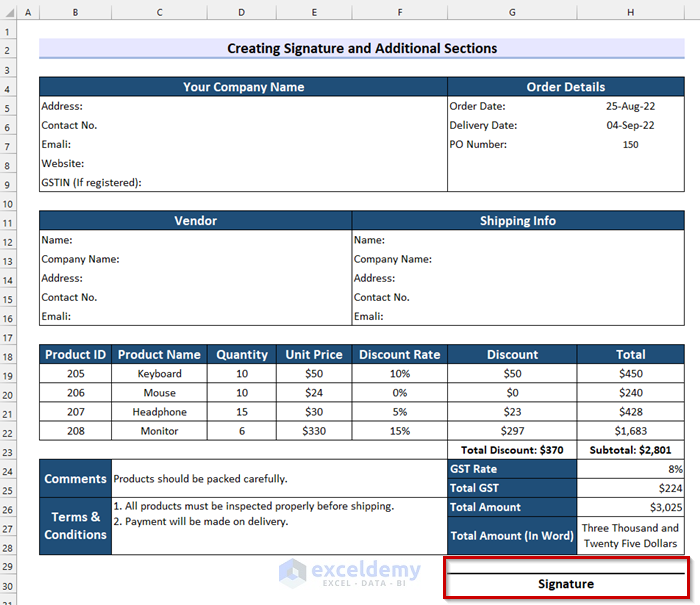
- After that, create another section for adding the Signature below the Total Amount.
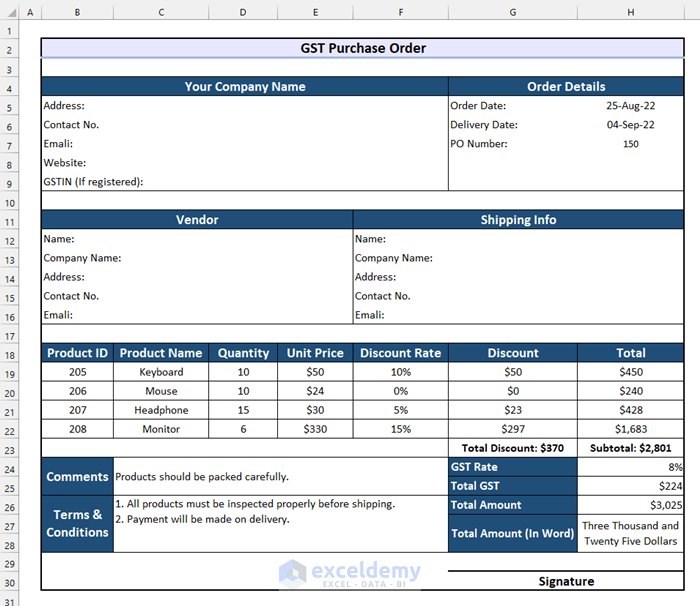
Finally, I have added a border and changed the header to GST Purchase Order. And, this is what my final GST purchase order format in Excel looks like.
Download Practice Workbook
Conclusion
To conclude, this article covers how to create a GST purchase order format in Excel. Here, I explained it with 7 simple steps. I truly hope this article was helpful to you. If you have any questions or suggestions, feel free to let me know by leaving a comment.
<< Go Back to Excel Order Form Template | Accounting Templates | Excel Templates
Get FREE Advanced Excel Exercises with Solutions!

