In this tutorial, we’ll be covering some easy ways to delete empty cells in Excel. We’ll use the following dataset (a sample student mark sheet) and methods.
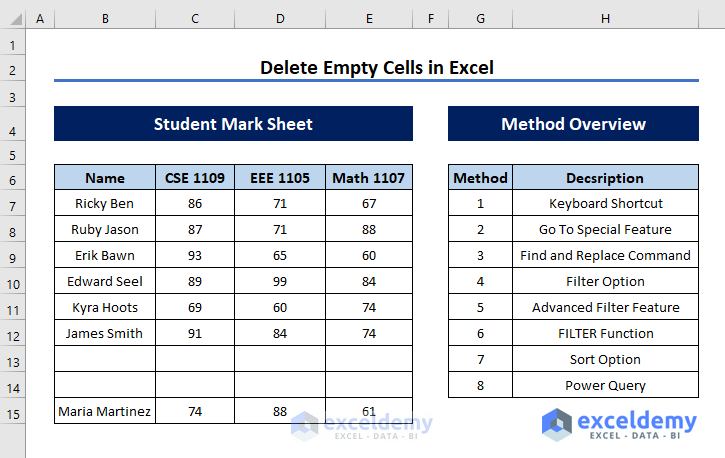
Method 1 – Using Keyboard Shortcuts
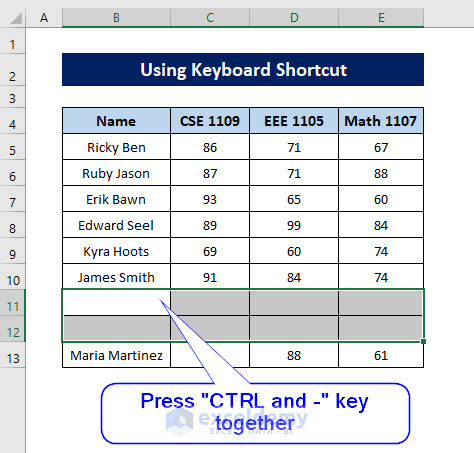
We can simply select the cells we want to delete and remove them manually.
Steps:
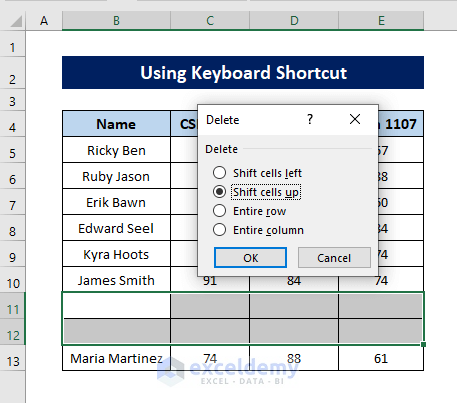
- Select an option as required from the dialog box.
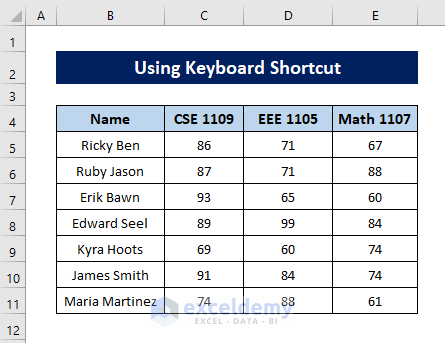
Excel will delete the empty cells from the worksheet.
Read More: How to Remove Blanks from List Using Formula in Excel (4 Methods)
Method 2 – Using Go To Special
You can use the Go To Special feature to first find the empty cells and then delete them.
Steps:
- Select the entire data table.

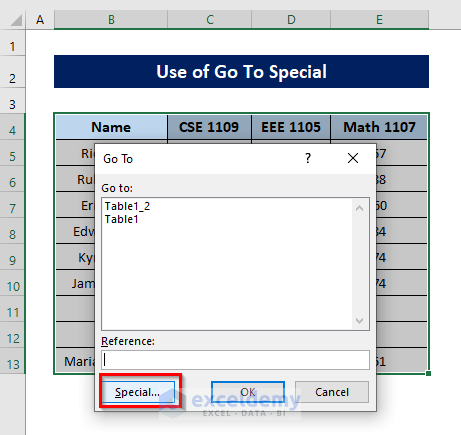
- Press CTRL + G to open up the Go To dialog box.
- Click on the Special option.
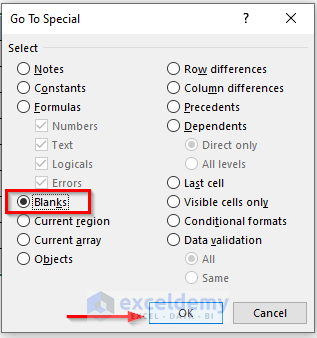
- Select Blanks from the list and hit OK.
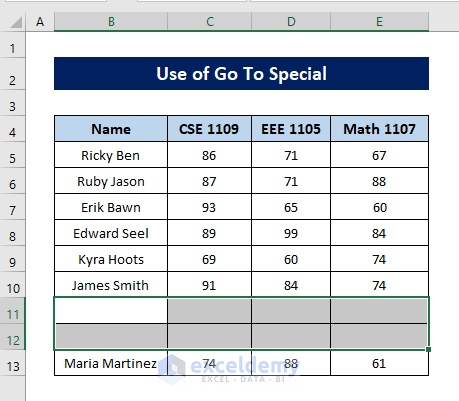
All the blank cells within the data table are selected.
- Press (CTRL and –).
The empty cells are deleted.
Read More: How to Find Blank Cells Using VBA in Excel (6 Methods)
Similar Articles
- How to Fill Blank Cells with 0 in Excel (3 Methods)
- If a Cell Is Blank then Copy Another Cell in Excel (3 Methods)
- VBA to Count Blank Cells in Range in Excel (3 Methods)
- Excel VBA: Find the Next Empty Cell in Range (4 Examples)
- How to Ignore Blank Cells in Range in Excel (8 Ways)
Method 3 – Using Find and Replace Command
We can also use the Find and Replace command to find empty cells. Then we can easily delete them:
Steps:
- Select the whole dataset.
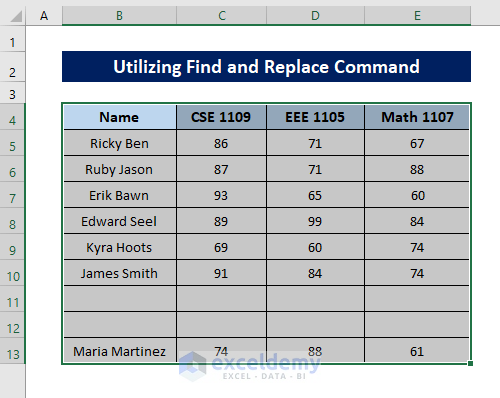
- Press CTRL+F to open the Find and Replace dialog box.
- Here, leave the Find what box empty.
- Tick Match entire cell contents.
- Select the Find All option.
- Press CTRL+A to select all the empty cells.
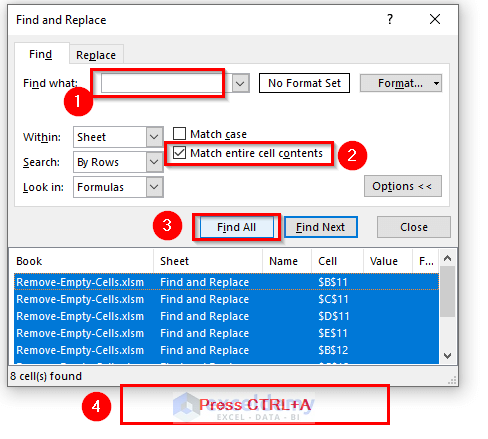 All the empty cells are identified.
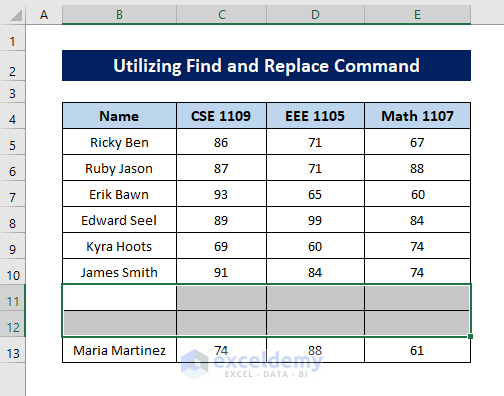
- Press (CTRL and –) to delete them all as in Method 1.
Method 4 – Using Filter Option
Steps:
- Select the whole data table.
- Go to Data ▶ Filter.
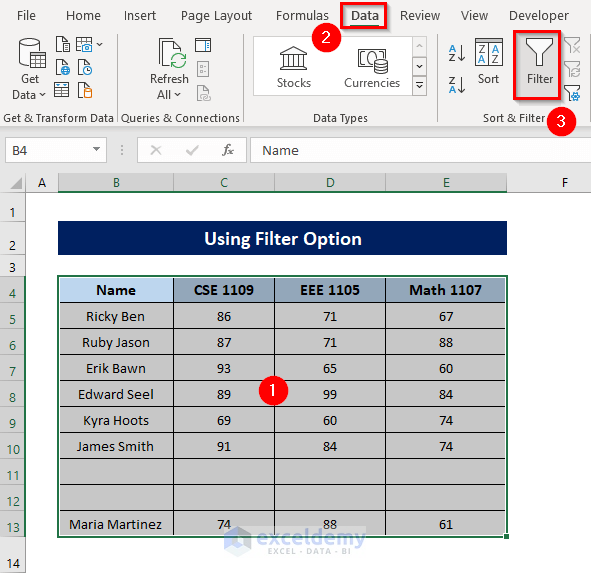
- Click on any one of the dropdown icons.
- Select Blanks and hit OK.
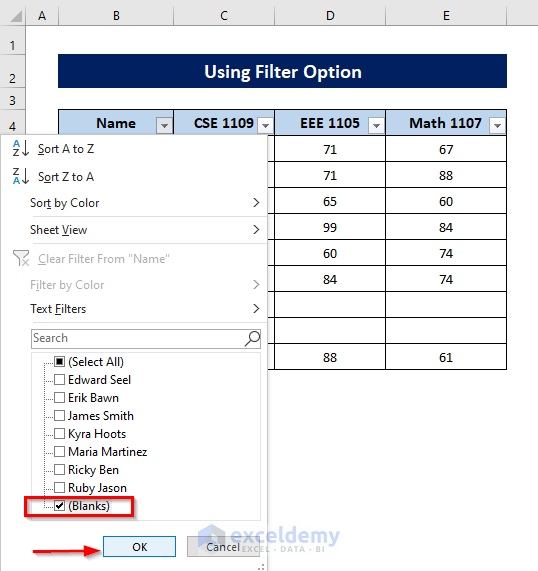
All the filtered empty cells are selected.
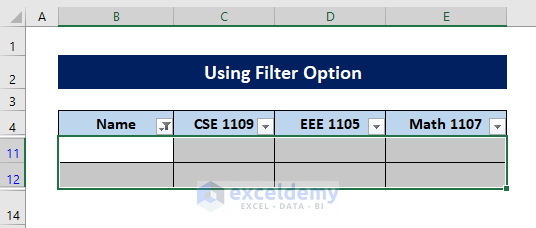
- Press (CTRL and –) to delete the filtered empty cells.
- To restore the whole dataset, repeat the process above, except untick Blanks this time.
Read More: How to Remove Blank Cells Using Formula in Excel (7 Methods)
Similar Articles
- How to Set Cell to Blank in Formula in Excel (6 Ways)
- Calculate in Excel If Cells are Not Blank: 7 Exemplary Formulas
- How to Return Value if Cell is Blank (12 Ways)
- Find & Count If a Cell Is Not Blank (with Examples)
- How to Fill Blank Cells with Value Above in Excel (4 Easy Methods)
Method 5 – Using Advanced Filter
In order to use the Advanced Filter option, we need to set up some criteria first.
STEPS TO SET UP CRITERIA:
- Specify one of the table headers in a different cell.
- Insert the following text within another cell to refer to the empty cells:
=""
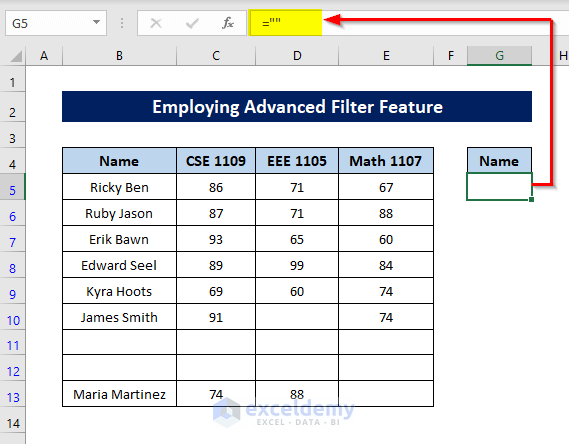
Our criteria are set up. Let’s delete some empty cells.
Steps:
- Select the whole data table.
- Go to Data ▶ Sort & Filter ▶ Advanced.
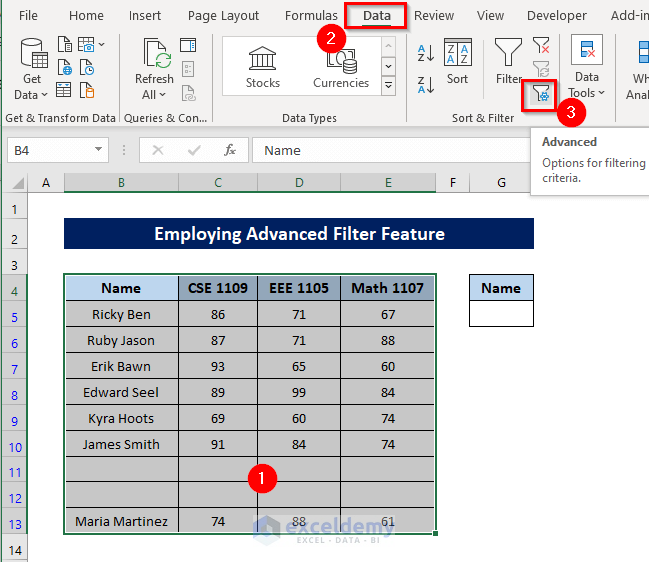
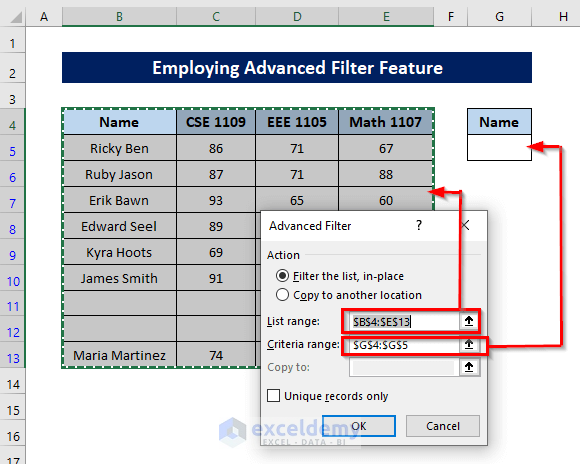
The Advanced Filter dialog box will appear.
- Set List range as:
$B$4:$E$13
- Set Criteria range as:
$G$4:$G$5
- Click OK.
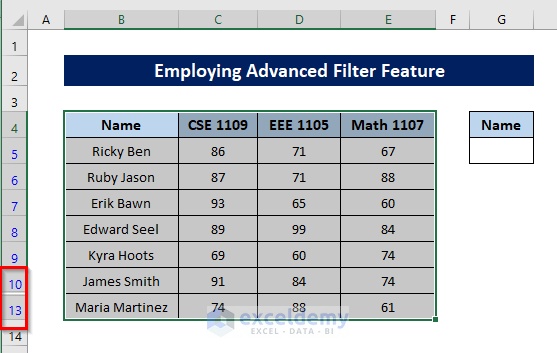
The corresponding rows will be hidden, and our data table without the empty cells is displayed.
Read More: How to Remove Blank Lines in Excel (8 Easy Ways)
Method 6 – Using FILTER Function
We can use a dynamic array function called the FILTER function to delete the empty cells in Excel. As this is a dynamic function, whenever we update our data in our data table, the filtered results get updated automatically too.
Steps:
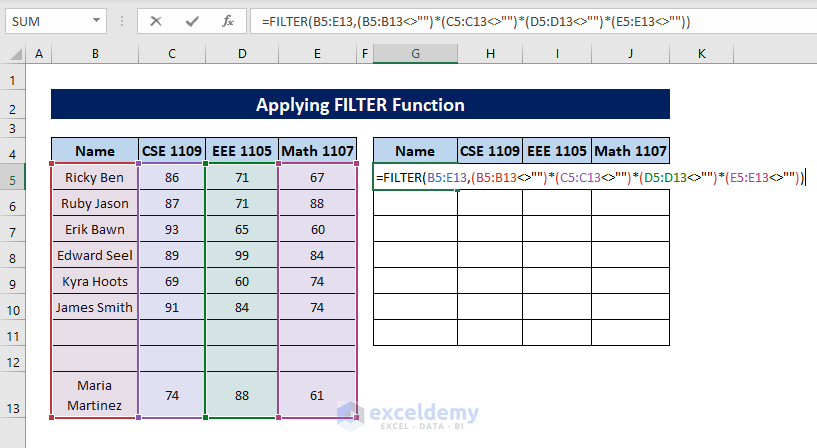
- Select cell G5 to insert the formula.
- Enter the following formula:
=FILTER(B5:E13,(B5:B13<>"")*(C5:C13<>"")*(D5:D13<>"")*(E5:E13<>""))
- Press ENTER.
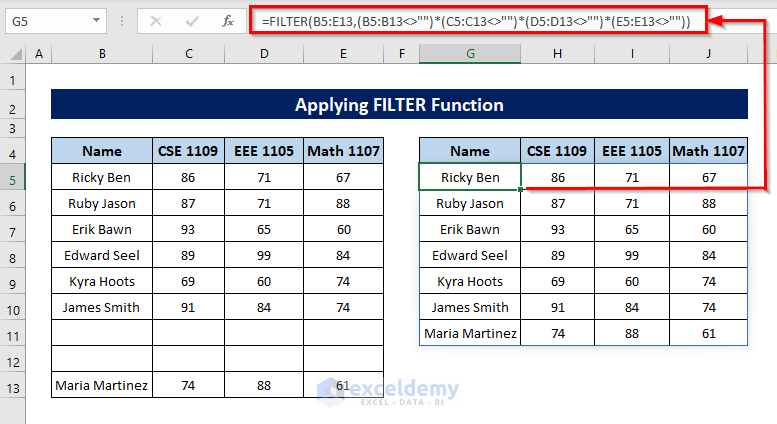
Since the FILTER function is a dynamic array function, it will immediately generate a new table excluding the empty cells.
Read More: How to Remove Blank Cells from a Range in Excel (9 Methods)
Method 7 – Using Sort Option
Steps:
- Select the data range
- Go to the Data tab.
- Select Sort A to Z option under Sort & Filter group.
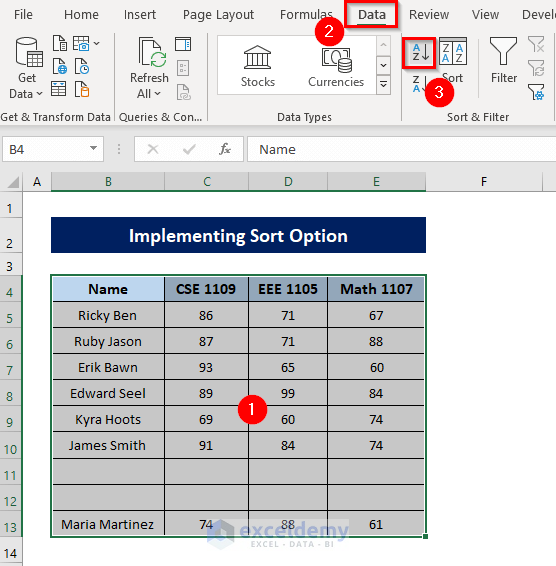
Excel will arrange the data in ascending order, leaving the blank cells at the bottom.
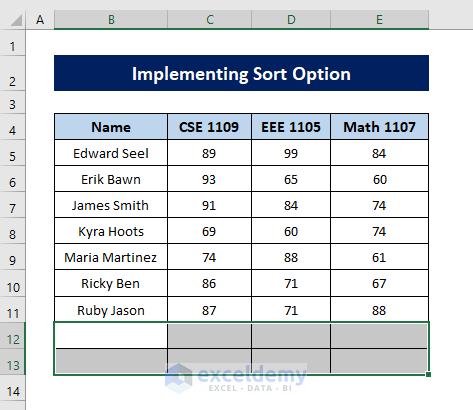
- Simply select them and delete them manually like in Method 1.
Method 8 – Using Power Query
Steps:
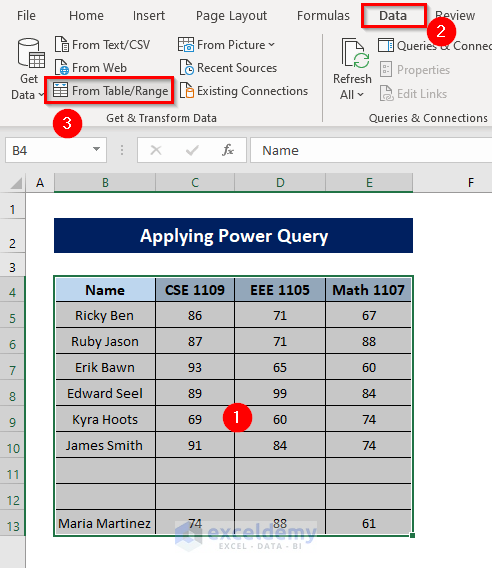
- Select the data range.
- Go to the Data tab.
- Select From Table/Range.
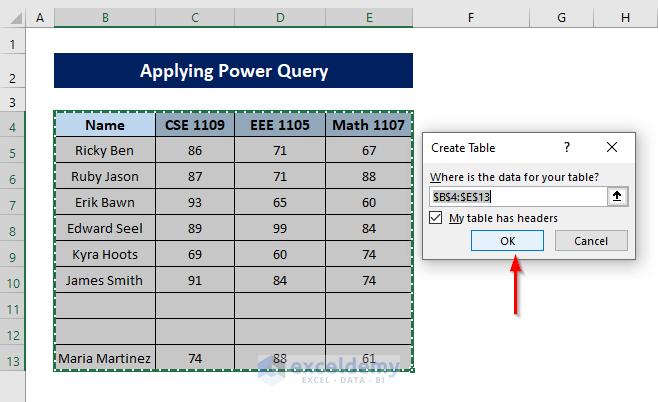
- In the Create Table dialog box that opens, keep the My table has headers option marked and click OK.
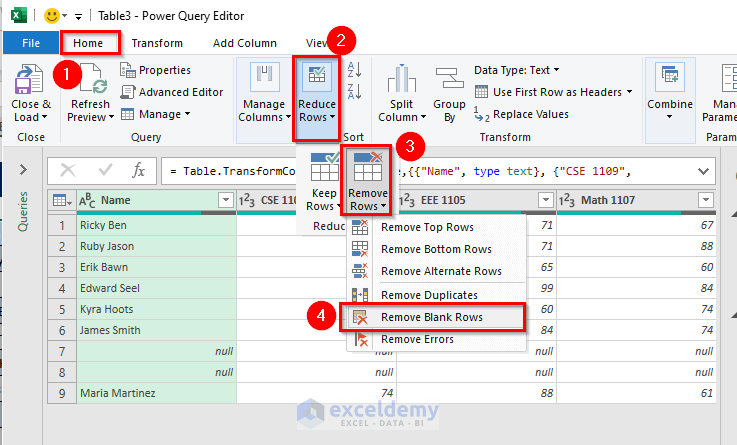
The Power Query Editor window will appear on the worksheet.
- Go to the Home tab.
- Click the dropdown of Reduce Rows.
- Click Remove Rows.
- Select Remove Blank Rows.
- Click Close & Load.
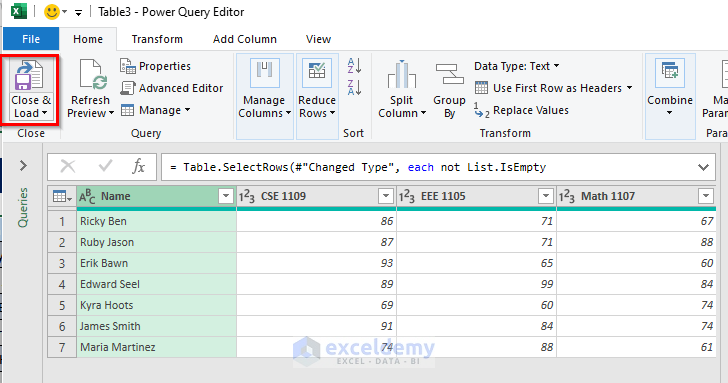
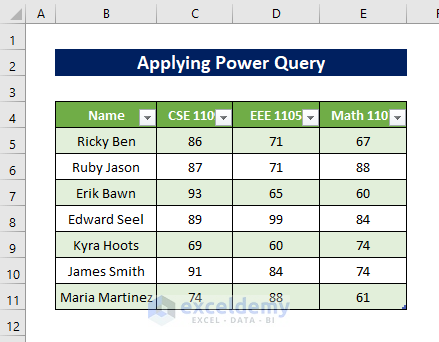
The data without empty rows is now displayed in the worksheet.
Using VBA Code to Delete Blank Cells in a Range
Steps:
- Select the range of data.
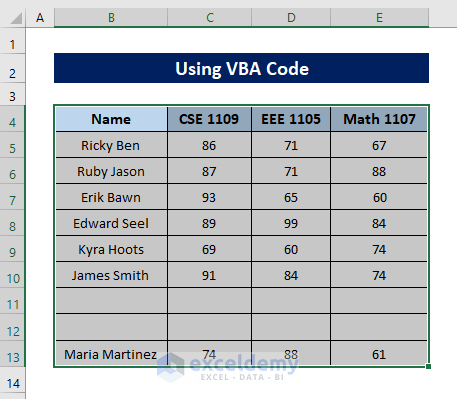
- Press ALT+F11 to open the Visual Basic Editor window.
- Here, click Insert and select Module.
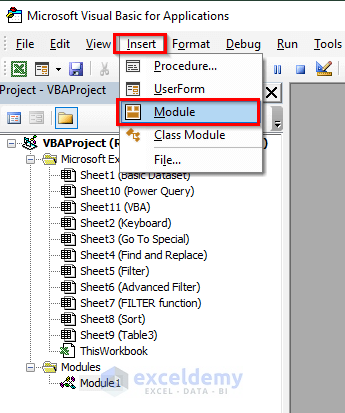
The Module window will appear.
- Enter the following code:
Code:
Sub Deleting_Empty_Rows()

  With Range("B4:E13")

    If WorksheetFunction.CountA(.Cells) > 0 _

    Then .SpecialCells(xlCellTypeBlanks).Delete Shift:=xlShiftUp

End With

End Sub
💡 Code Explanation
- Name the sub-routine Deleting_Empty_Rows().
- Use the With statement to specify the range of cells, here it is B5:E13.
- Use the If Then statement to check for blank cells with the help of the CountA function, and delete them.
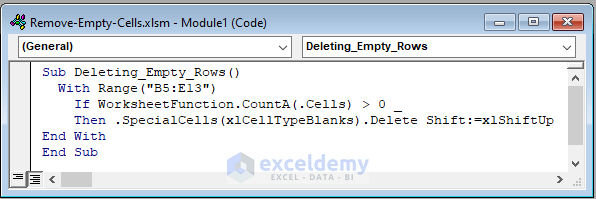
- Press F5 to run the code.
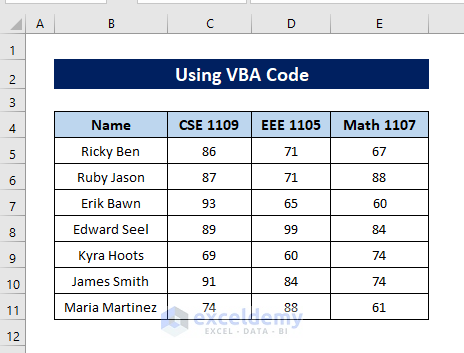
Output will look like the image below, without any blank cells in the selected range.
Things to Remember
Press the CTRL and – keys together to delete cells.
Press CTRL + G to open up the Go To dialog box.
Related Articles
- Fill Blank Cells in Excel with Go To Special (With 3 Examples)
- How to Fill Blank Cells with Value from Left in Excel (4 Suitable Ways)
- Fill Blank Cells with N/A in Excel (3 Easy Methods)
- How to Find and Replace Blank Cells in Excel (4 Methods)
- Excel VBA: Check If Multiple Cells Are Empty (9 Examples)
- How to Make Empty Cells Blank in Excel (3 Methods)


