Introduction to Excel Flash Fill
Flash Fill can recognize a pattern in values and fill in the rest of the range based on the initial provided values.
Location of Flash Fill in Excel
The Flash Fill tool is in the Data Tools group under the Data tab.
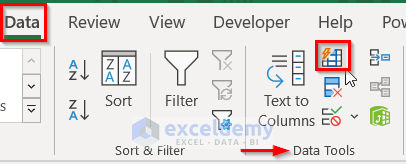
Shortcut for Excel Flash Fill
The shortcut key for Flash Fill is Ctrl + E.
Flash Fill in Excel: 7 Easy Examples
Example 1 – Separate First, Middle, and Last Names
We have a dataset (B4:E9) in Excel that contains some Full Names in column B. We want to separate the First Name, Middle Name, and Last Name into separate columns.
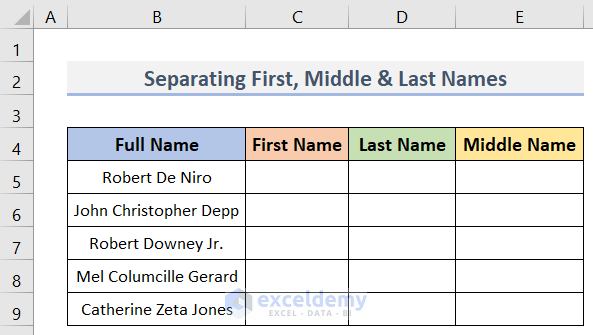
Steps:
- Enter the First Name in the first result cell and press Enter.
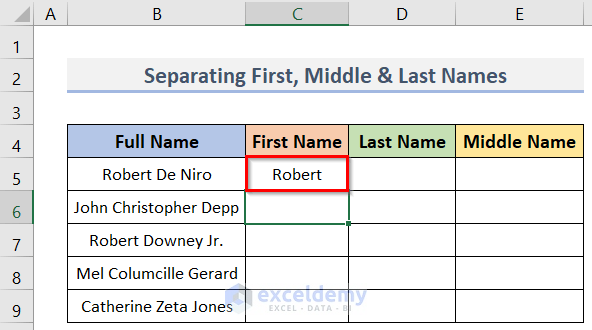
- Start typing the next name (cell C6).
- Flash Fill will suggest the first part of all names (C6:C9).
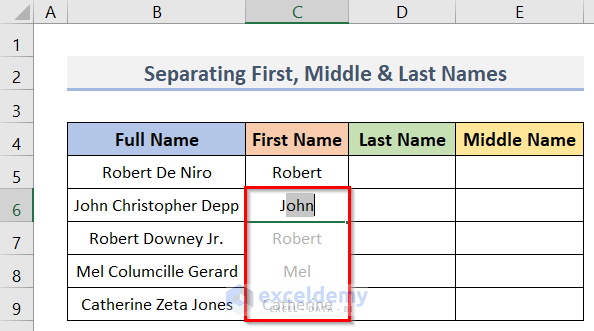
- Press Enter.
- You can see all the First Names in column C.
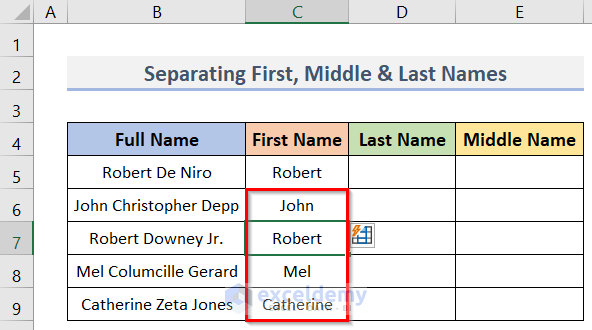
- Separate the Last Names and the Middle Names in columns D and E (see screenshot).
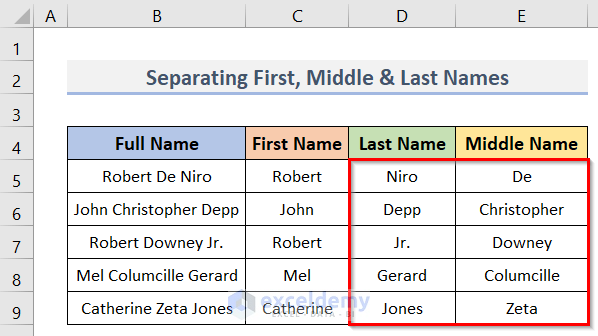
Note:
Names you select must have the same pattern, so must include the same number of words.
Example 2 – Split Text Using Flash Fill
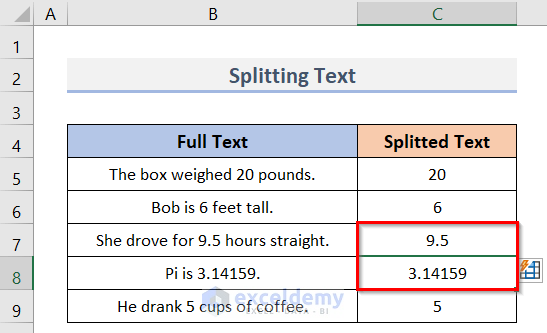
Consider the following dataset where there is a number embedded inside the text. However, the values don’t follow a set pattern apart from having a single number in them. We’ll extract only the number.
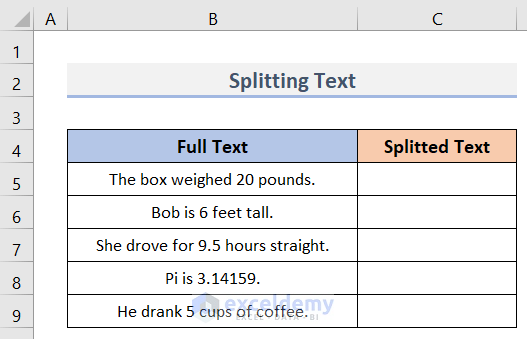
Steps:
- Enter the first number 20 in cell C1 (which appears in B1).
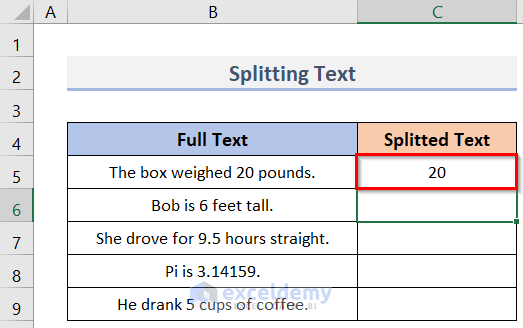
- Move to cell B2 and type the second number 6 in this cell.
- Go to the Data tab and click on Flash Fill (or press Ctrl + E).
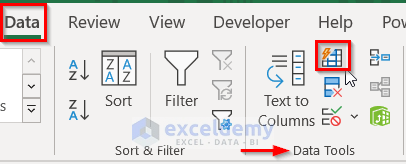
- The rest of the cells (C6:C9) are automatically filled by Excel.
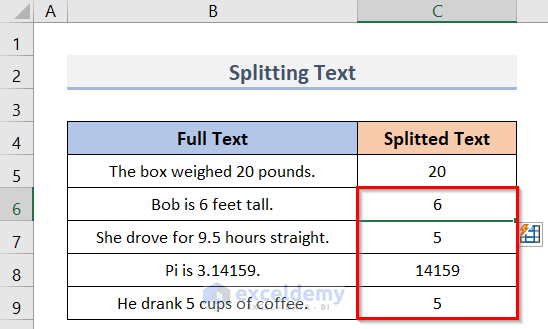
- Excel has identified most of the numbers accurately but didn’t extract the part before the decimal point.
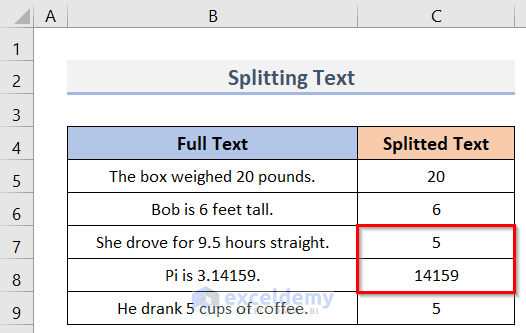
- Delete the suggested value (5) in cell C7.
- Type the accurate value (9.5) in the cell (C7).
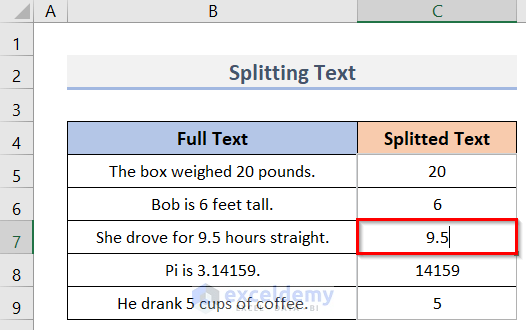
- Press Enter.
- You will also get the accurate number (3.14159) in cell C8.
Example 3 – Apply Flash Fill to Merge Columns
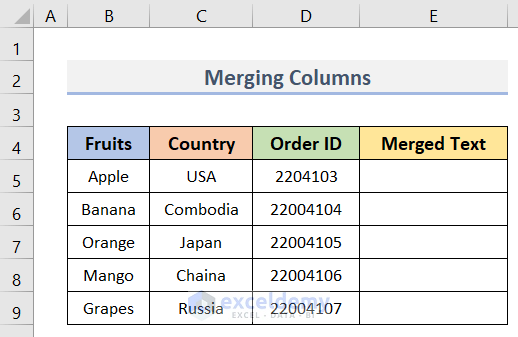
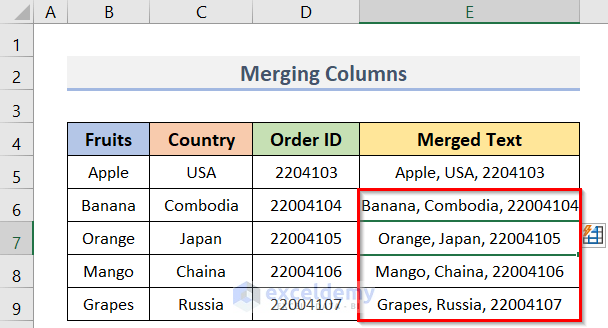
We have a dataset (B4:E9) below that contains the names of some Fruits, Countries, and the Order IDs of the fruits. We will use the Flash Fill feature to merge the data in columns B, C, D, and place it in column E.
Steps:
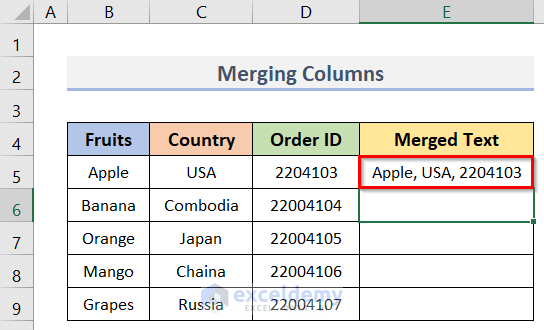
- Go to cell E5.
- Type the values from cells B5, C5, and D5 along with comma and space (see screenshot).
- Press Enter and you will automatically go to the next cell (E6).
- Start typing the next Fruit (Banana) and you will see the suggestions in the range (E6:E9).
- The suggestions are in the same pattern as the merged data in cell E6.
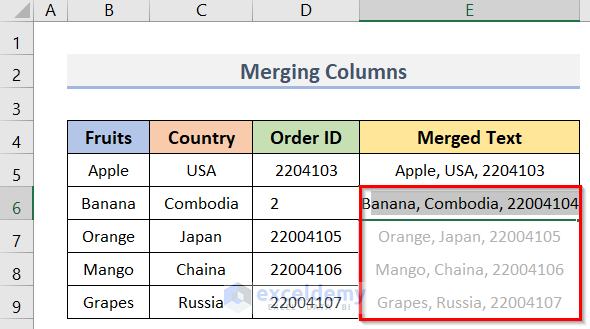
- Press the Enter button on the keyboard.
Example 4 – Clean Data with Flash Fill
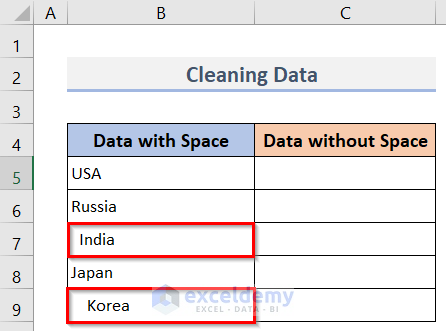
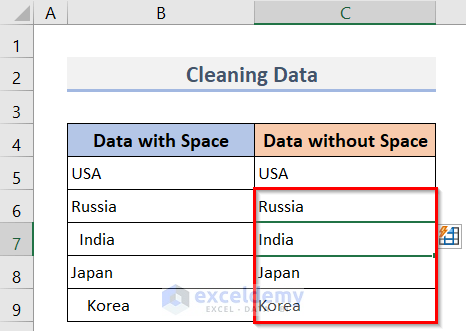
We have a dataset in Excel containing the names of some countries in the range B5:B9. We’ll remove the excess spaces from the dataset.
Steps:
- Select cell C5.
- Type ‘USA’ without any space from the cell before.
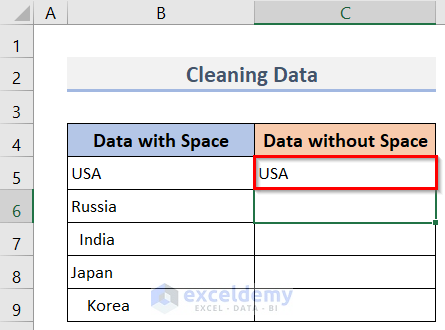
- Press the Enter key to move to the next cell (C6).
- If you start typing the name of the next country (Russia), you will see the suggestions of all the countries below (C6:C9).
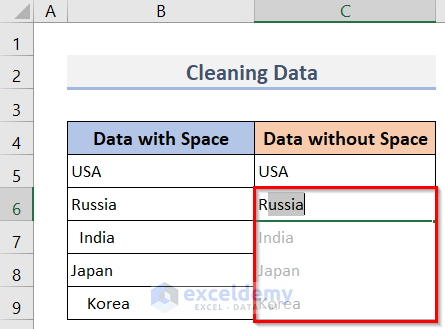
- If you press the Enter key, you will get all the countries without any spaces.
Example 5 – Excel Flash Fill to Format Data
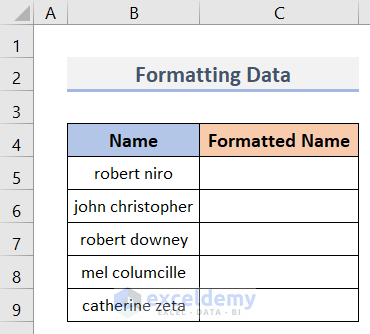
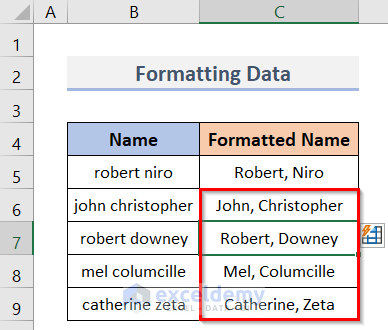
We will use the dataset below that contains some Names starting with lowercase. We want to format these Names (both the first name and the second name) so that they start in uppercase and have a comma in between.
Steps:
- Select cell C5 by clicking on it.
- Type the Name from cell B5 in the desired format.
- Press Enter.
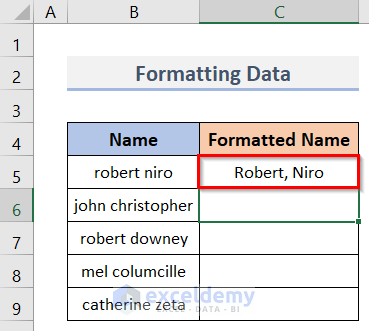
- Type the first letter (uppercase) of the next name (john christopher) in cell C6.
- All the names will be suggested in the same format (see screenshot)
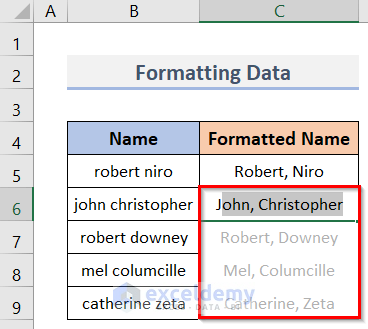
- After pressing the Enter button, you will get the rest of the names (C6:C9) in the same format specified in cell C5.
Example 6 – Create Email Addresses
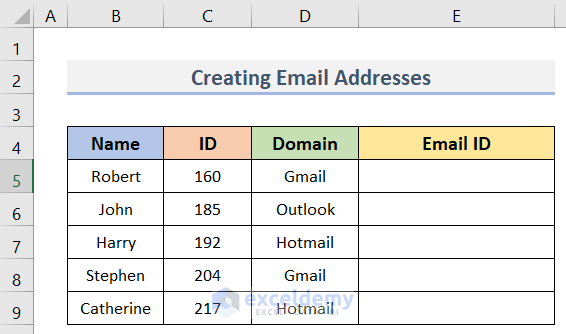
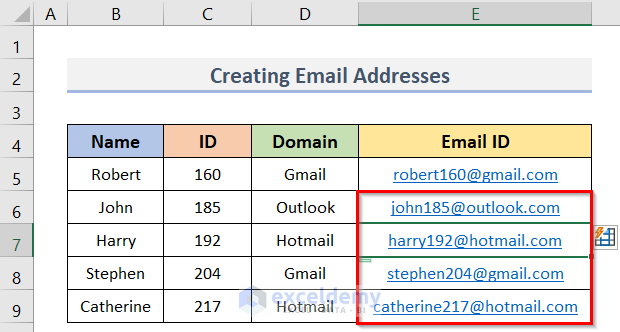
We have a dataset (B4:E9) in Excel. It contains some Names (B5:B9), IDs (C5:C9) and Domains (D5:D9). We will use the Flash Fill tool to form the Email IDs in the range E5:E9.
Steps:
- Activate cell E5.
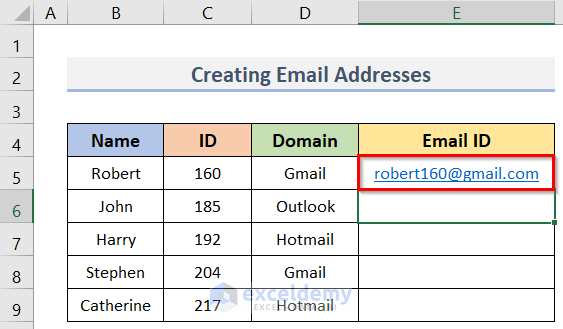
- Type the Email ID using the data in the B5:D5 range.
- A sample format of the Email ID is shown in cell E5 of the following screenshot.
- Press the Enter key.
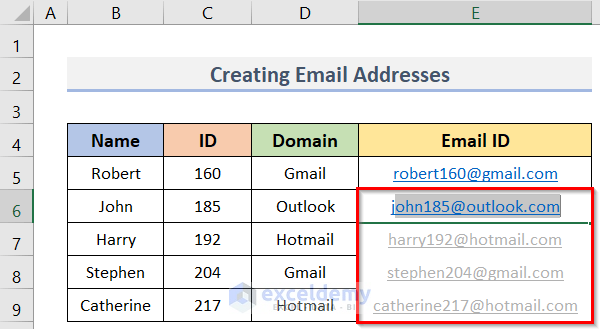
- Type the first letter (j) of the next name.
- You will see the suggestion of the Email IDs for the cells (E6:E9) below.
- See the following image.
- Press the Enter key to accept the suggested Email IDs.
- You will get all the Email IDs at once.
Example 7 – Replace a Part of Data Using Flash Fill
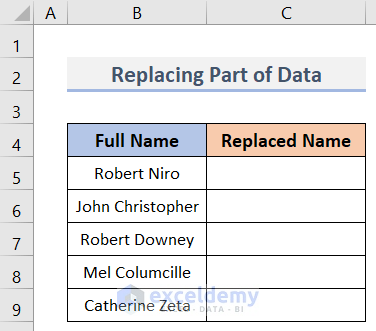
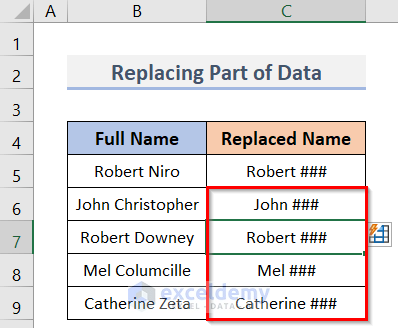
We have a dataset below containing some Full Names in the range B5:B9. We want to replace the second names (for example, Niro) with ‘###’.
Steps:
- Select cell C5.
- Type ‘Robert ###’.
- Press the Enter key.
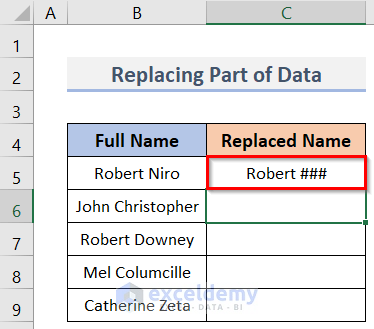
- Type the first letter (J) of the second name in cell C6.
- You will see the suggestions of all the names in the same pattern specified in cell C5.
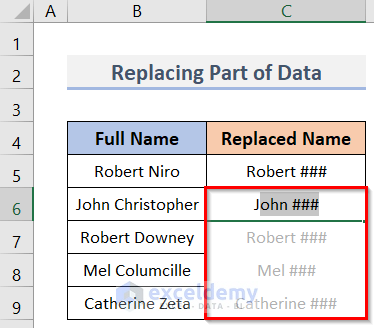
- Press the Enter key and accept the suggestions.
Flash Fill Options in Excel
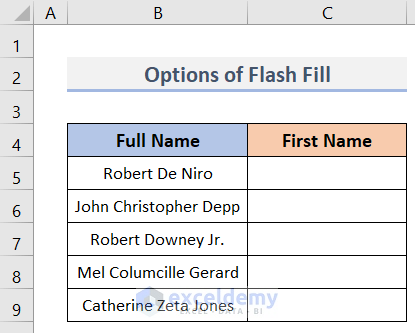
We will use the dataset (B4:C9) below.
Steps:
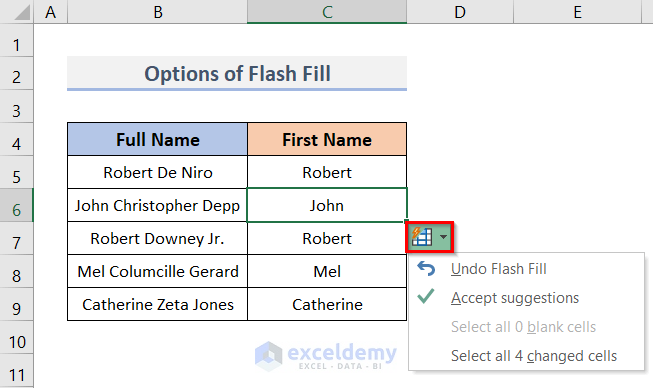
- Apply any method for Flash Filling in the range C5:C9.
- You will see the drop-down menu of the Flash Fill beside column (C) where you applied Flash Fill.
- Click on the drop-down menu.
- You can find the Flash Fill options.
How to Turn Off Flash Fill in Excel
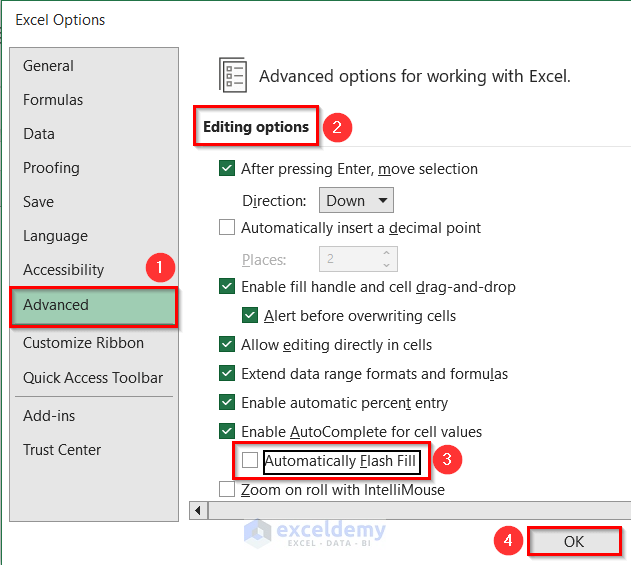
Steps:
- Go to the File tab.
- Click on the Options button.

- The Excel Options dialog box will appear.
- Click on Advanced and select Editing options, then uncheck the Automatically Flash Fill box and click OK.
Limitations of Flash Fill in Excel
- Flash Fill is not a dynamic technique. If your data changes, columns created by Flash Fill do not update automatically (you must use a formula to update automatically then).
- Flash Fill ignores cells that contain non-printable data.
- Sometimes, it changes numbers into strings.
Things to Remember
- You must check your data very carefully after using Flash Fill.
- Flash Fill works successfully only when the data is consistent.
- Flash Fill has increased accuracy when you provide more examples.
Download the Practice Workbook
Flash Fill in Excel: Knowledge Hub
<< Go Back to Learn Excel
Get FREE Advanced Excel Exercises with Solutions!

