Download the Practice Workbook
What Are Form Controls in Excel?
Form controls in Excel are objects we can insert in the spreadsheet to use for different purposes to work with the data in the spreadsheet. These are meant as controls for the actions of a sheet. We can assess them through the Developer tab of the ribbon.
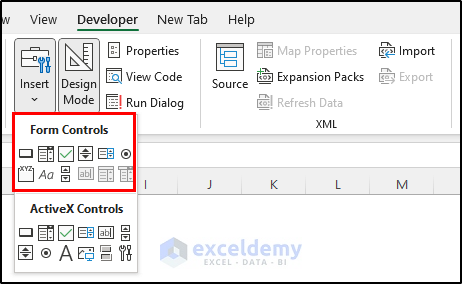
8 Different Types of Form Controls That You Can Use in Your Excel Spreadsheet
To use any type of form control in Excel, you’ll need to display the Developer tab on your ribbon.
Type 1 – Button
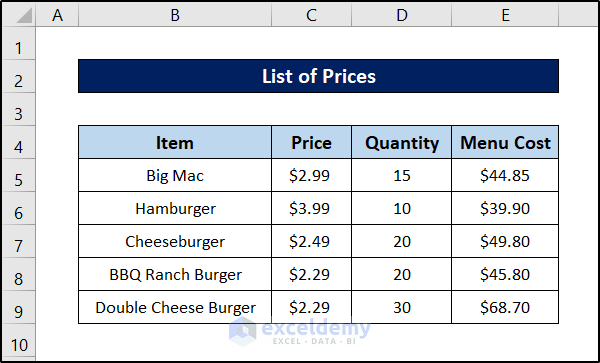
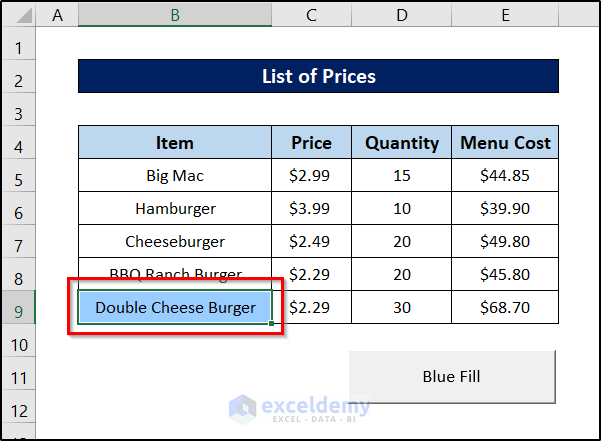
This is the spreadsheet before adding any button or running any code. We are going to add a button on it that can turn any selected cell blue.
Steps:
- Go to the Developer tab on your ribbon.
- Select Visual Basic from the Code group.

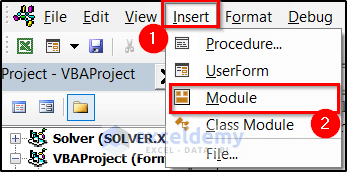
- Click on the Insert tab and select Module from the drop-down list.
- Select the module and enter the following code in it.
Sub blue_fill()
Selection.Interior.ColorIndex = 37
End Sub- Close the window and go to the Developer tab on your ribbon again.
- Select Insert from the Controls group.
- Select Button (Form Control) from the drop-down list.
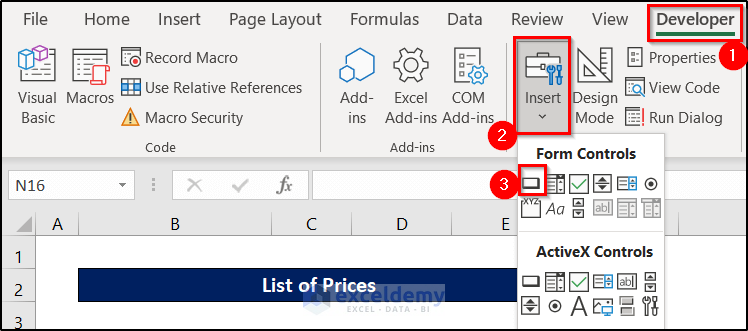
- The mouse cursor will turn into a cross sign after that.
- Click and drag over the area of the spreadsheet where you want your button.
- Select the macro through the sub name in the Assign Macro box and click on OK.
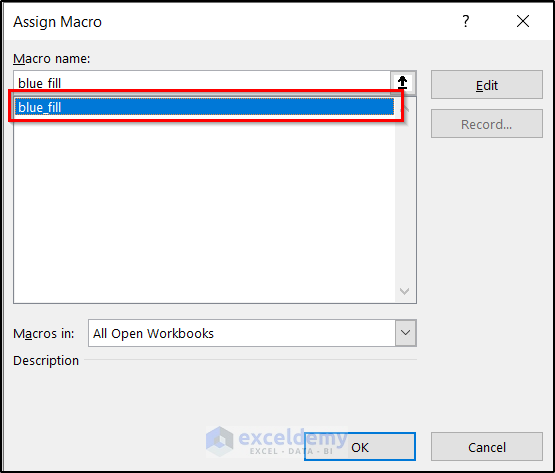
- A button will appear over the area you dragged in the previous step.
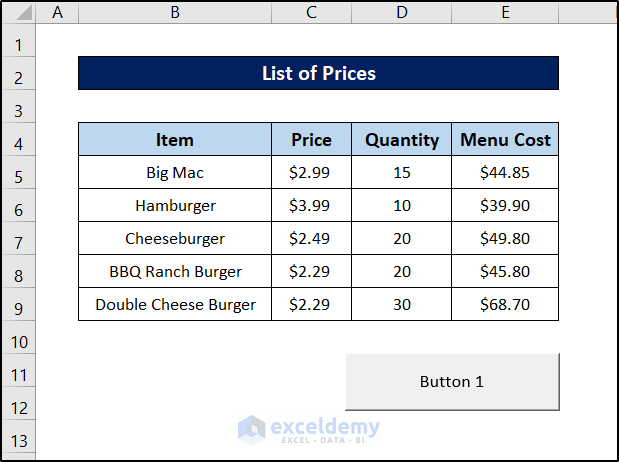
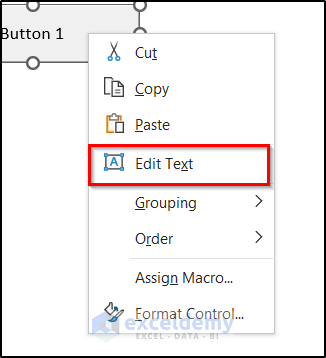
- You can also rename the button by right-clicking on it and selecting Edit Text from the context menu.
- This is the final result.
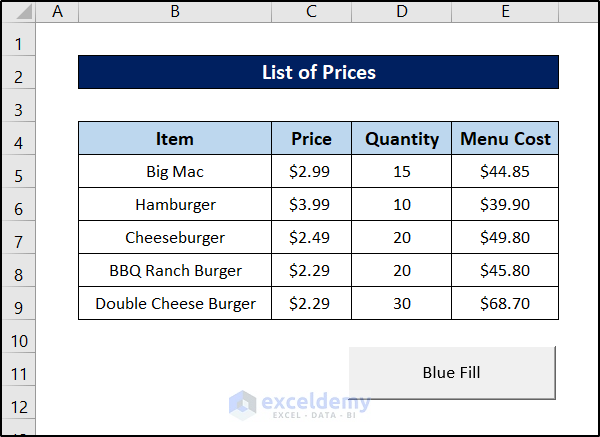
- If you select a cell and click on the button, the cell will turn blue.
Type 2 – Combo Box
Instead of manually typing the values every time, the combo box can do the same with a few clicks.
Steps:
- Go to the Developer tab on your ribbon.
- From the Controls group, select Insert.
- Select Combo Box (Form Control) from the drop-down list.
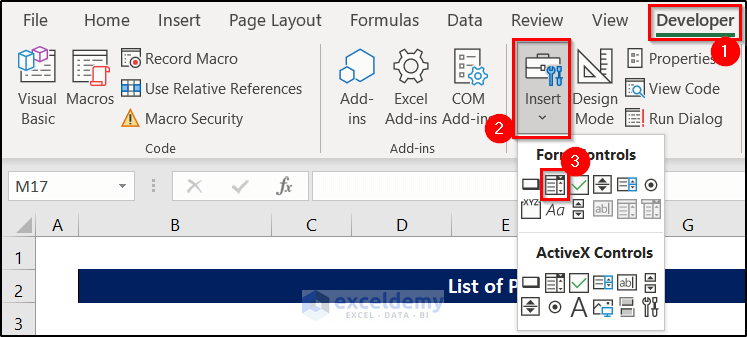
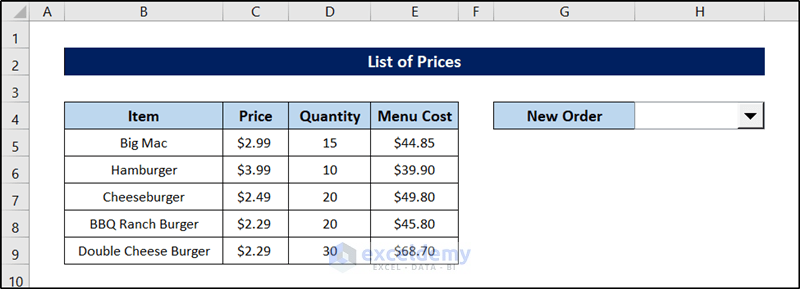
- Click and drag over the area where you want your combo box to be in on the spreadsheet. It will look something like this.
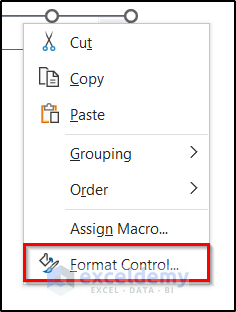
- Right-click on the combo box and select Format Control from the context menu.
- Go to the Controls tab of the Format Control box and select the range B5:B9 as the Input Range. You can also change other parameters if needed.
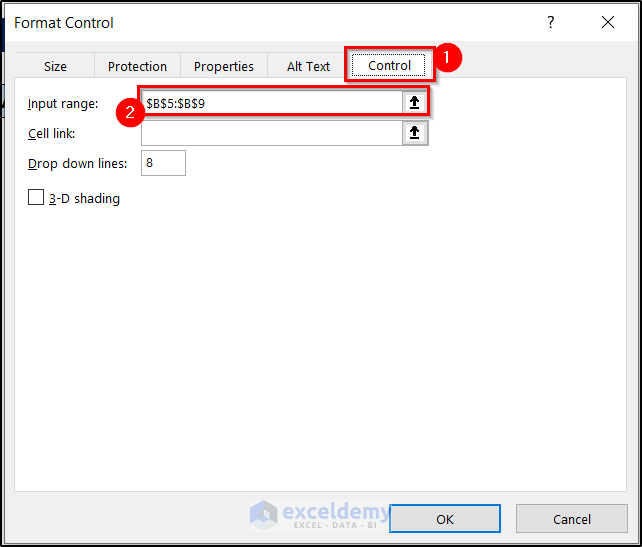
- Click on OK.
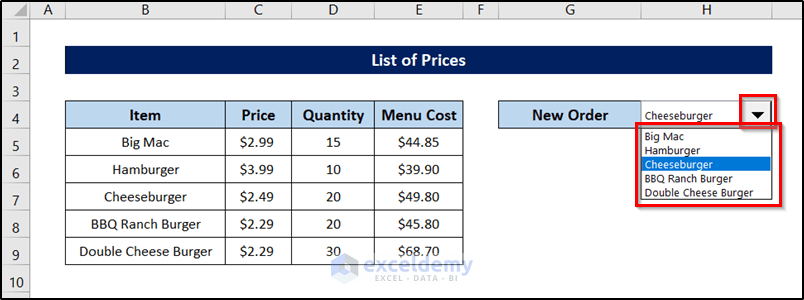
- If you click on the downward-facing arrow of the combo box, you will see the list of the selected range as a drop-down menu.
Type 3 – Checkbox
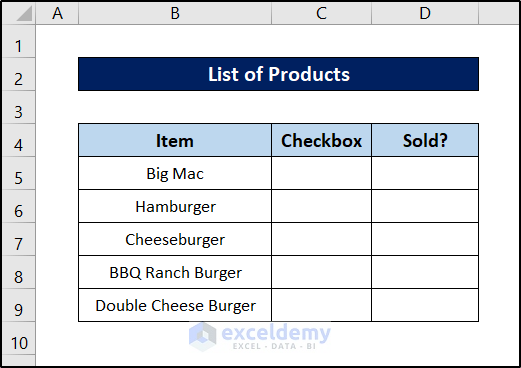
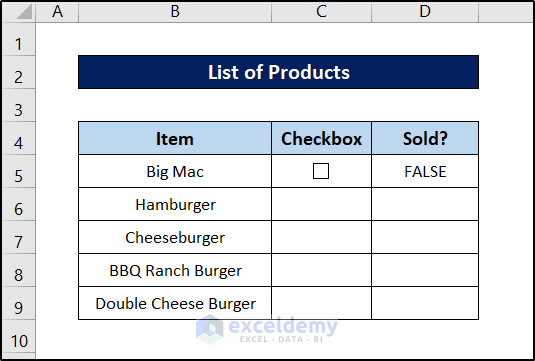
Checkboxes can be used to display binary information such as whether a task is complete. For the demonstration, we are going to use the following dataset. We are going to insert checkboxes in column C and display a corresponding value in column D.
Steps:
- Go to the Developer
- Select Insert from the Controls group.
- Select Check Box (Form Control) from the drop-down menu.
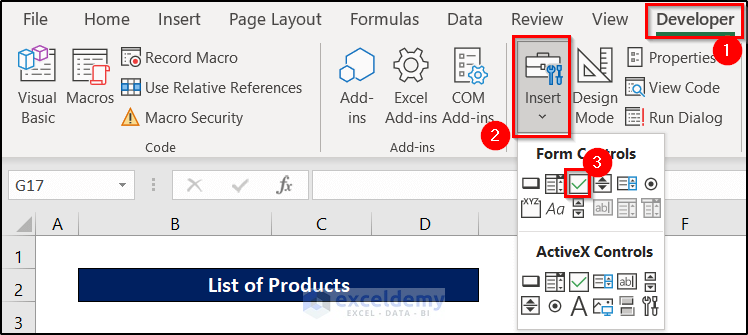
- Click and drag over the area of the spreadsheet where you want to insert the check box. We have done it over the area of cell C5.
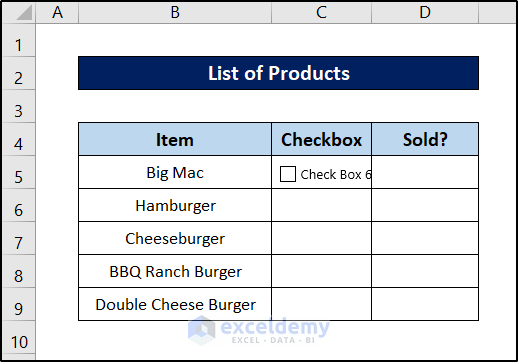
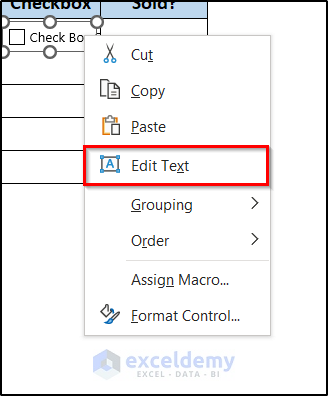
- Right-click on the box and select Edit Text from the context menu, then clear the cell.
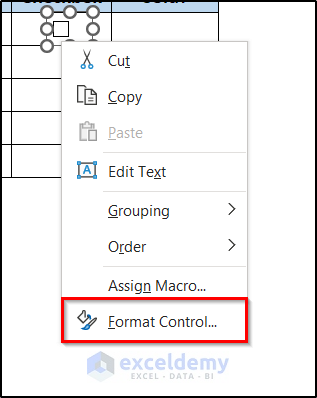
- Right-click over the check box again. This time, select Format Control from the context menu.
- Go to the Control tab on the Format Control box and select cell D5 as the linked cell.
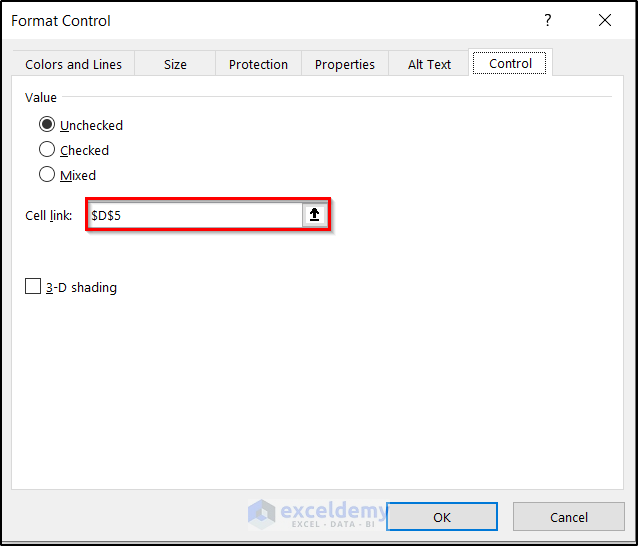
- Click on OK. It will look something like this.
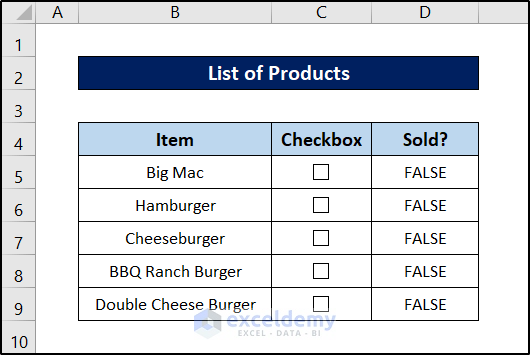
- Repeat this for all of the rows you need.
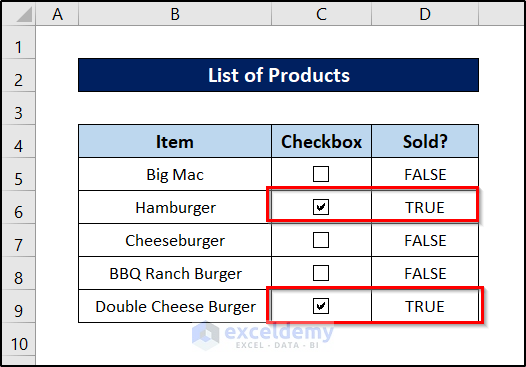
- If you check any of the checkboxes, the cell value beside it will turn into TRUE.
Type 4 – Spin Button
Spin buttons change the values of a cell by a set of intervals. This is helpful if your values can only be in a certain range and can have certain intervals in between them.
Steps:
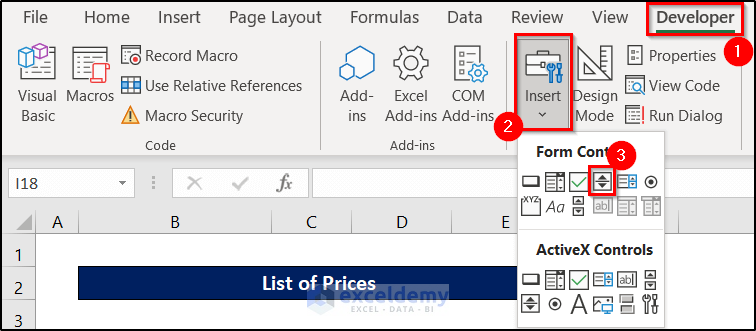
- Go to the Developer tab on the ribbon.
- From the Controls group, select Insert.
- Select Spin Button (Form Control) from the drop-down.
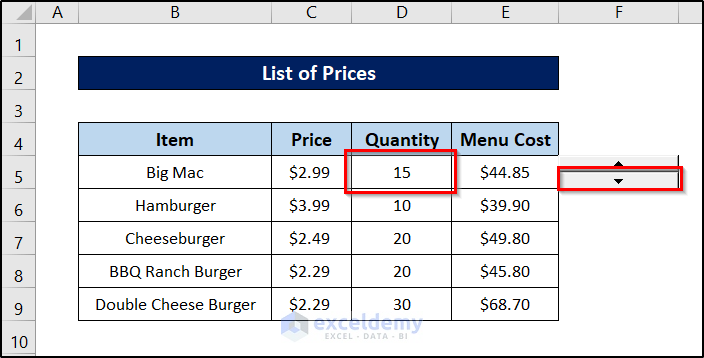
- Click and drag the mouse icon over the area you want the spin button to be in. We selected the area over cell F5 for the demonstration.
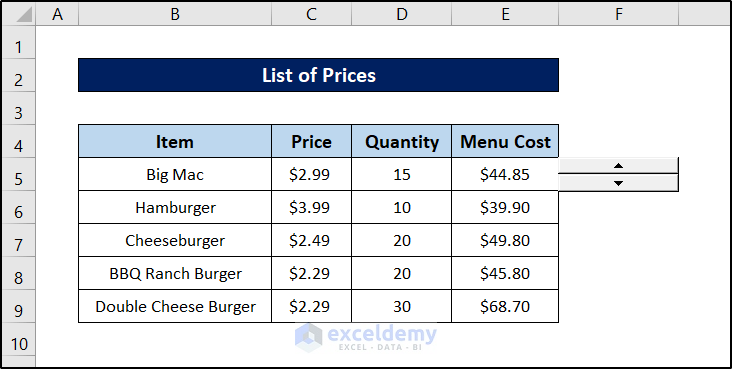
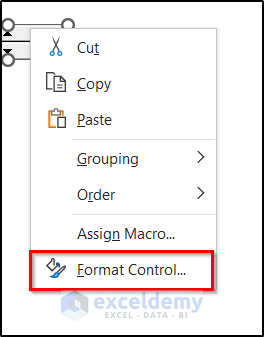
- Right-click on the spin button and select Format Control from the context menu.
- The Format Control box will pop up. Go to the Control tab in it.
- Set the minimum, maximum, and incremental change values.
- Put the value of the linked cell beside the Cell Link. We have selected cell D5 for it.
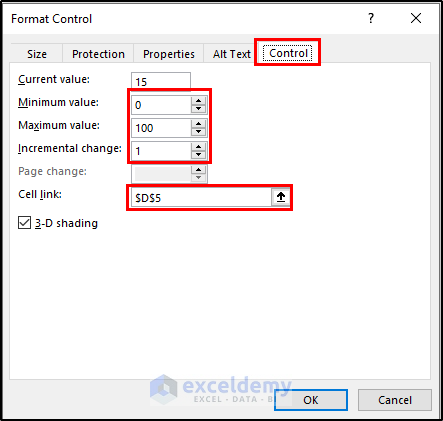
- Click on OK.
- The value of cell D5 will go up by the increment if we press the up button of the spin box.
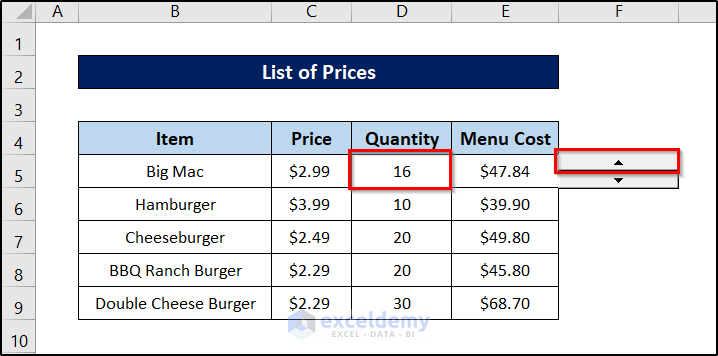
- The value will go down if we click on the down arrow.
Type 5 – List Box
Steps:
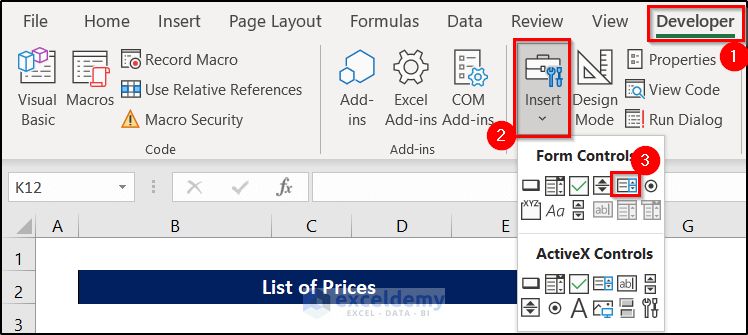
- Go to the Developer tab on your ribbon.
- Select Insert from the Control group.
- Select List Box (Form Control) from the drop-down menu.
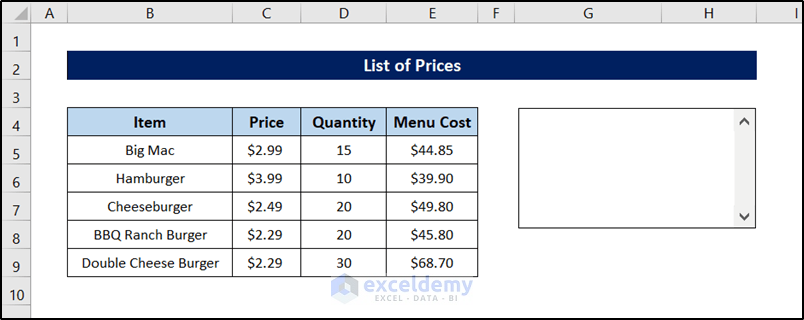
- Click and drag the area on the spreadsheet where you want the list box to be.
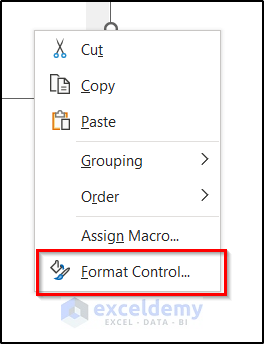
- Right-click on the list box and select Format Control from the context menu.
- The Format Control box will pop up. Go to the Control tab in it.
- Select the range B5:B9 as the Input range.
- We put cell G5 as the linked cell.
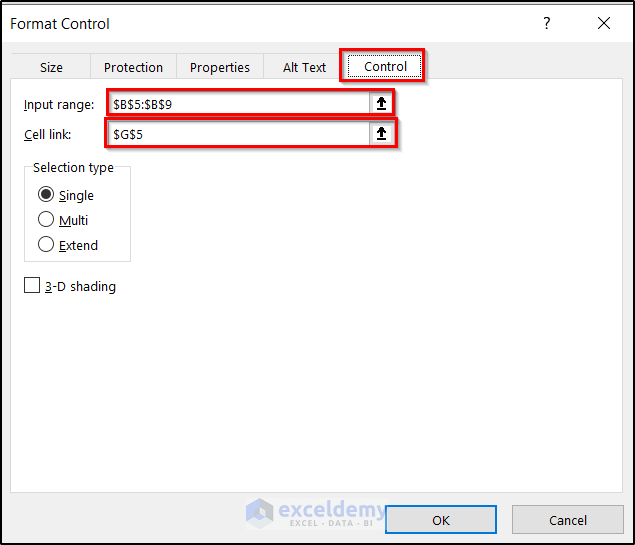
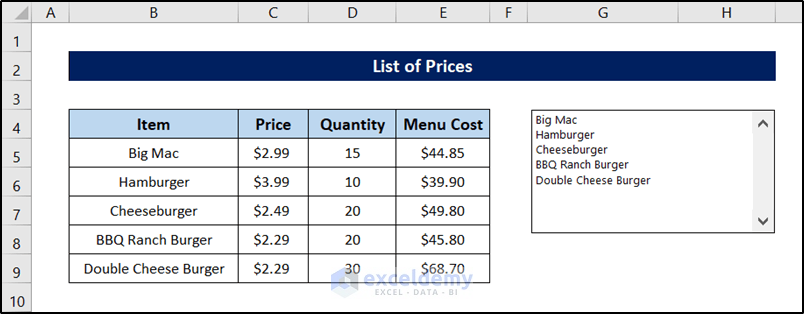
- Click on OK. This will pop up on the spreadsheet.
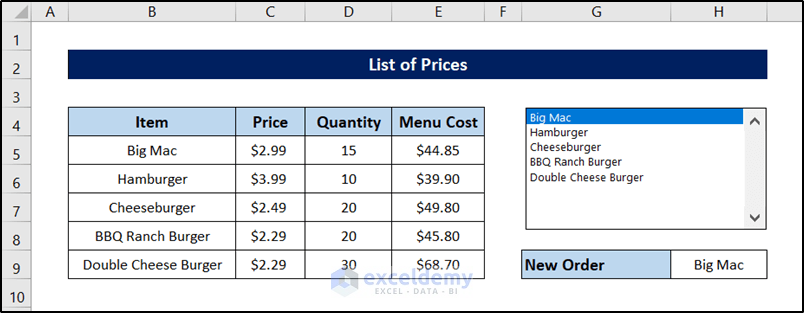
Let’s modify the sheet and select an option from the list.
Type 6 – Combination Group Box with an Option Button
Steps:
- Go to the Developer tab on your ribbon.
- Select Insert from the Control group.
- Select Group Box (Form Control) from the drop-down list.
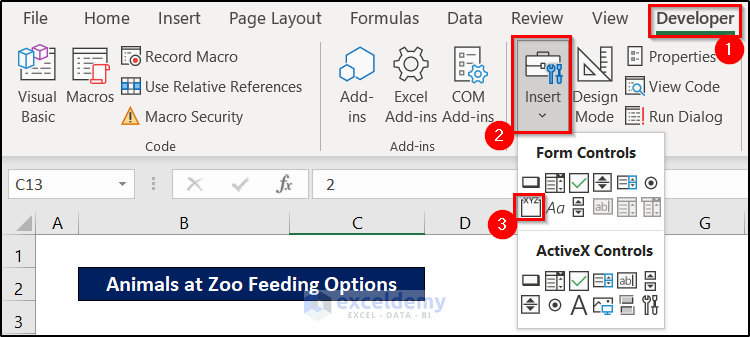
- Click and drag the area on the spreadsheet where you want to add the group box.
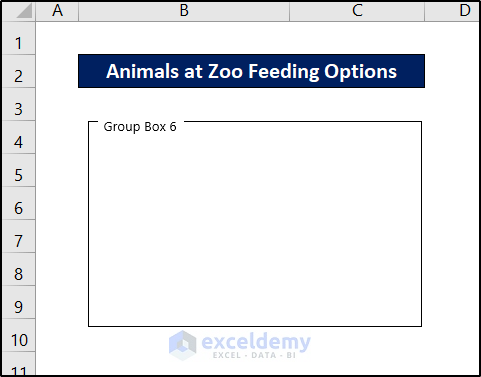
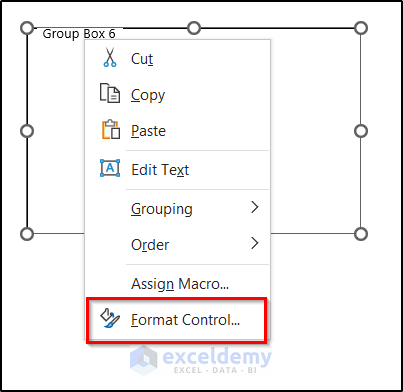
- Modify it by right-clicking on it and then selecting Edit Text from the context menu.
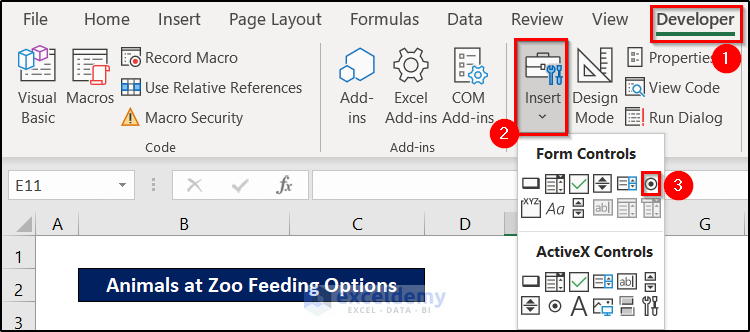
- Select the Option Button(Form Control) from the drop-down from the Insert of the Control group of the Developer tab.
- Click and drag over the area on the group box where you want to add options.
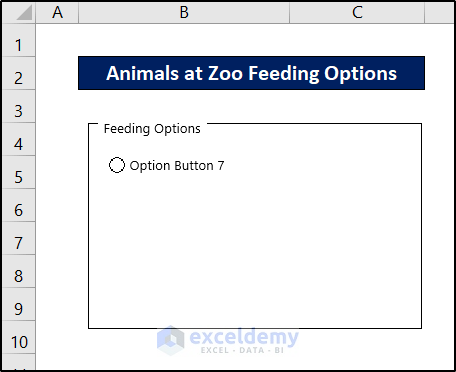
- You can right-click the area and select Edit Text to rename the option.
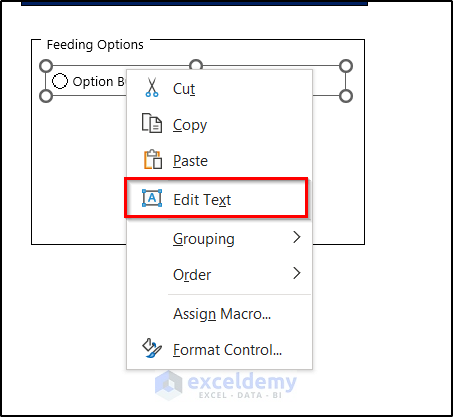
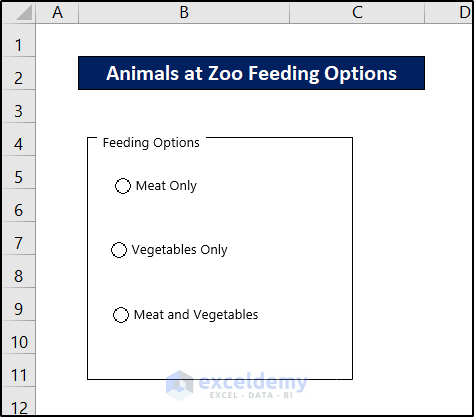
- Copy and paste the options box and edit the texts.
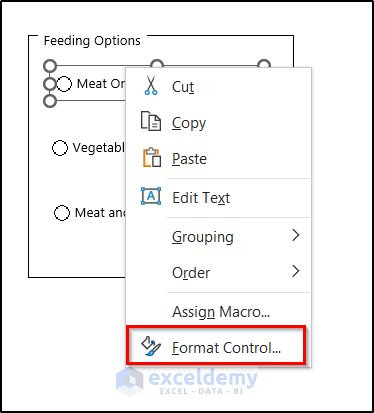
- Right-click on the group box and select Format Control from the context menu.
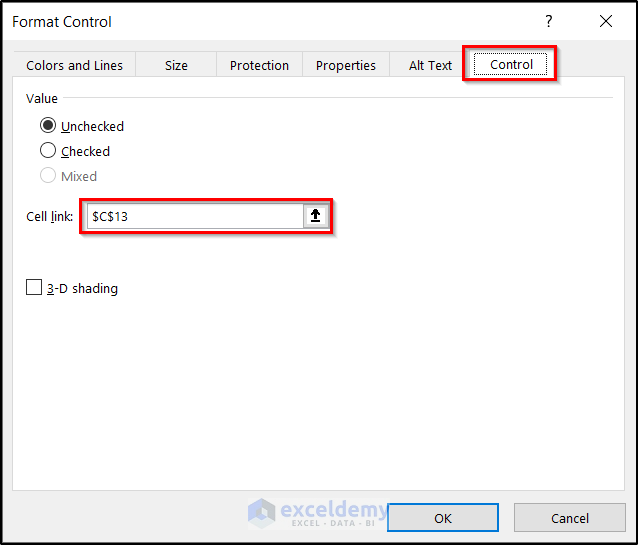
- In the Format Control box, go to the Control tab and link the cell to C13.
- Click on OK.
- Select an option and there will be a number on the cell.
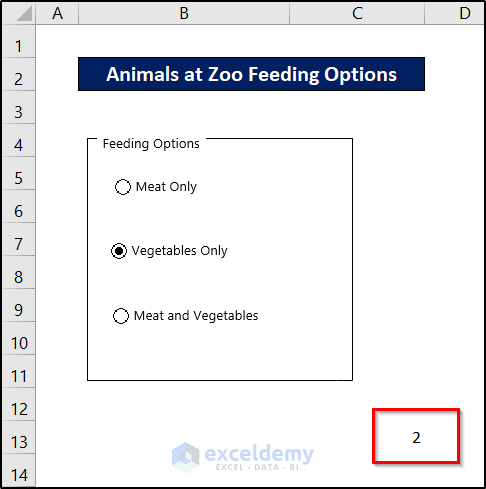
- Select cell C14 and insert the following formula.
=IF(C13=1,"Carnivore",IF(2,"Herbivore","Omnivore"))
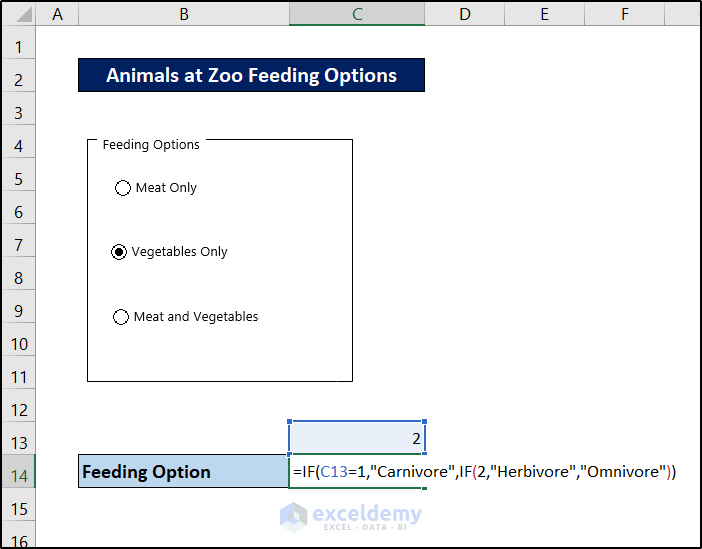
- Press Enter.
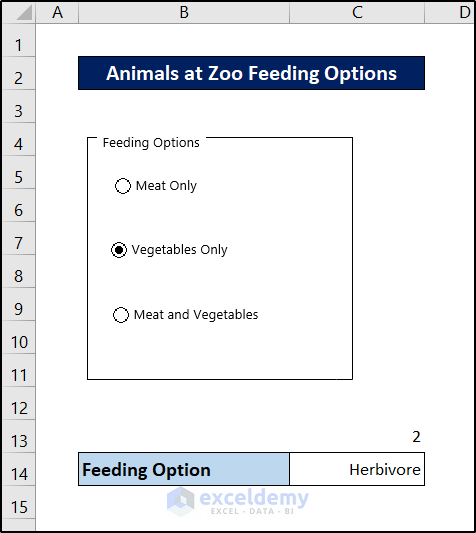
- Select cell C13 and press Ctrl + 1.
- Go to the Number tab in the Format Cells box and select Custom on the left.
- On the right, under Type, type in ;;; (three semi-colons).
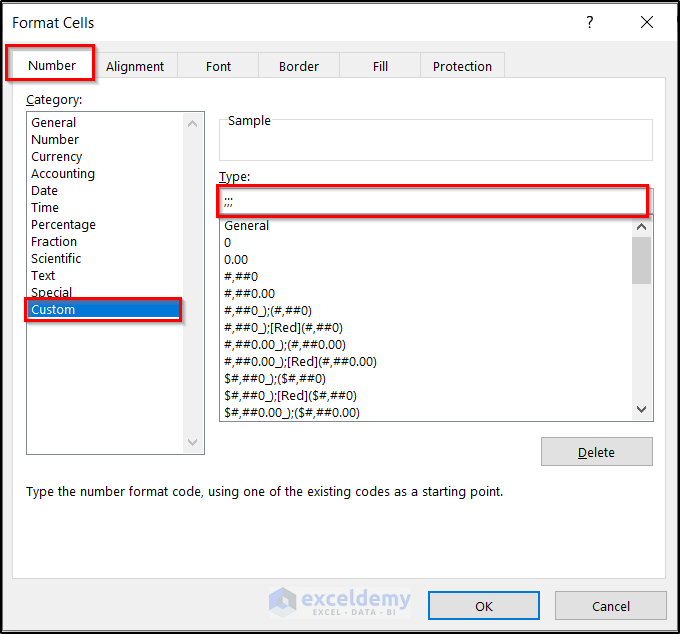
- Click on OK.
- The sheet will look like this.
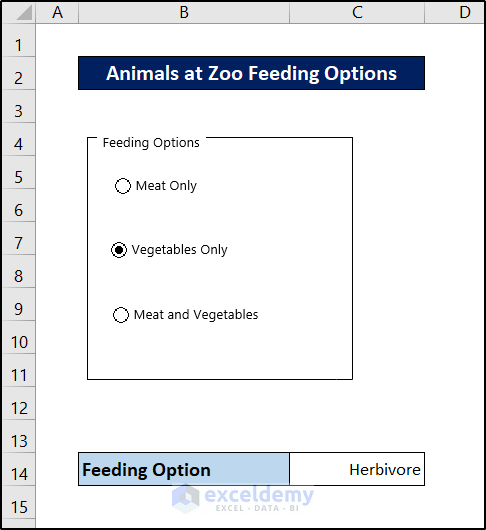
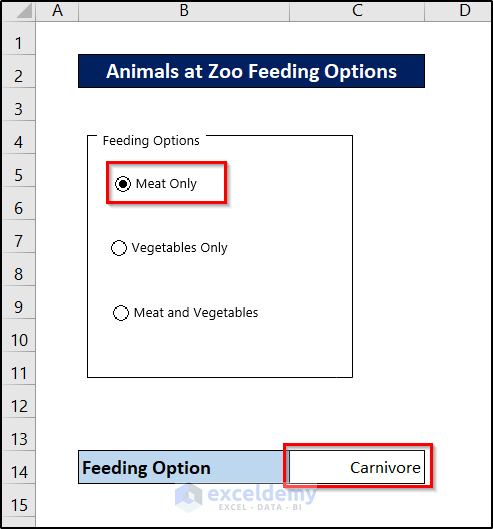
- If you choose another option now, the value in cell C14 will change accordingly.
Type 7 – Label
Steps:
- Go to the Developer tab in the ribbon.
- Select Insert from the Control group.
- Select Label (Form Control) from the drop-down.
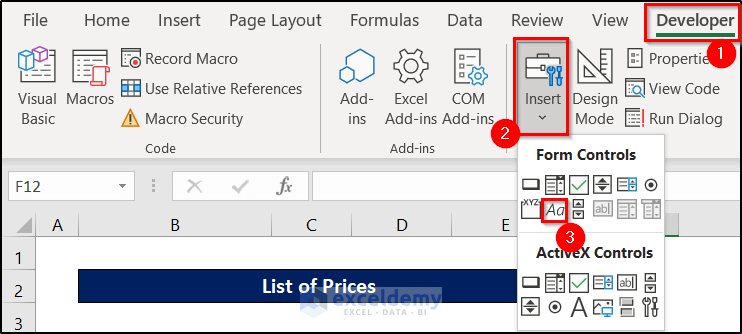
- Click and drag over the area of the spreadsheet where you want to place the label.
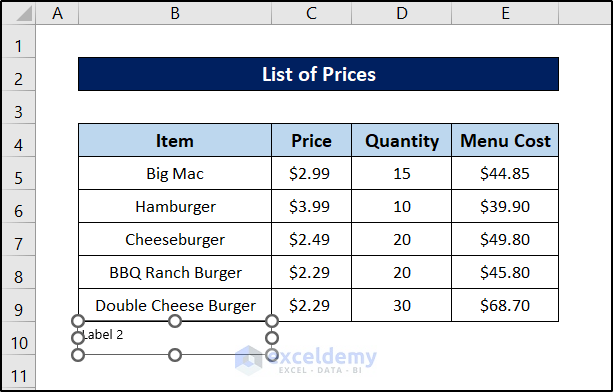
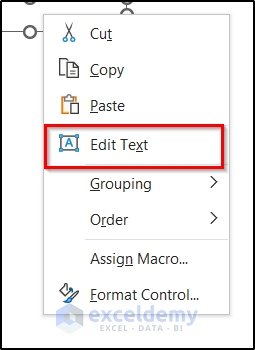
- You can edit the label by right-clicking on it and then selecting Edit Text from the context menu.
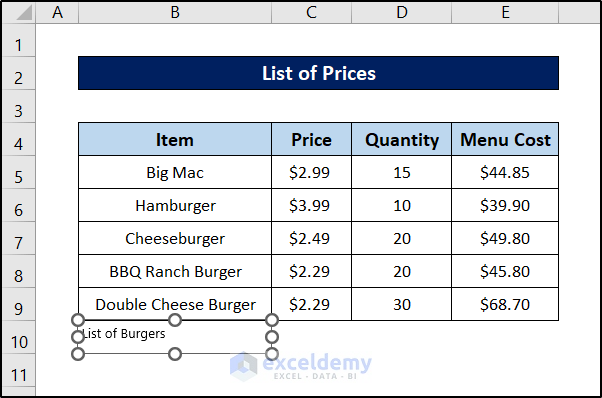
- The label from the form control will look like this on the Excel spreadsheet.
Type 8 – Scroll Bar
Steps:
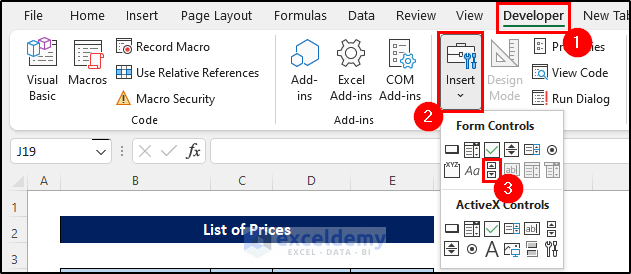
- Go to the Developer tab in your ribbon.
- Select Insert from the Controls group.
- Select Scroll Bar (Form Control) from the drop-down menu.
- Click and drag over the area where you want the scroll bar to be.
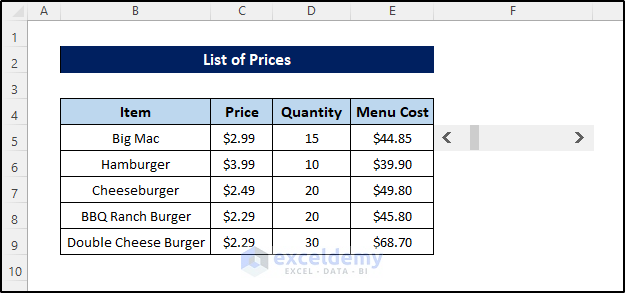
- Upon release, there will be a scroll bar on top of the spreadsheet.
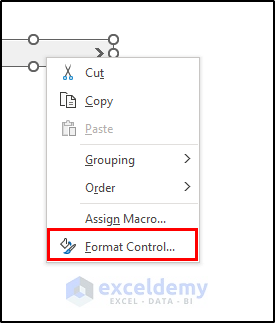
- Right-click on the scroll bar and select Format Control from the context menu.
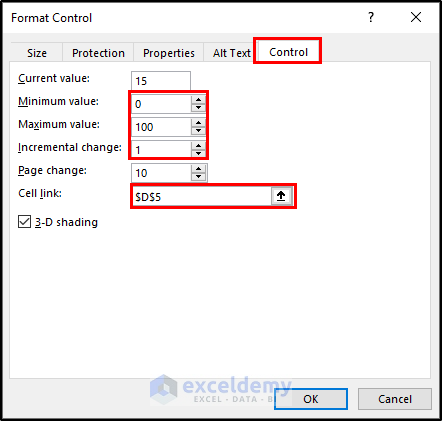
- Go to the Control tab in the Format Control box and set the Minimum value, Maximum value, and Increment change. We have selected the range 0 to 100 with an increment change of 1.
- Make sure to link the scroll bar with a cell in the Cell link. For this dataset, we have selected cell D5.
- Click on OK.
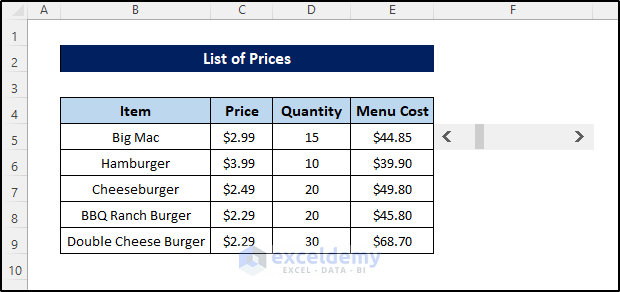
- The scroll bar is ready to use on our spreadsheet at this point.
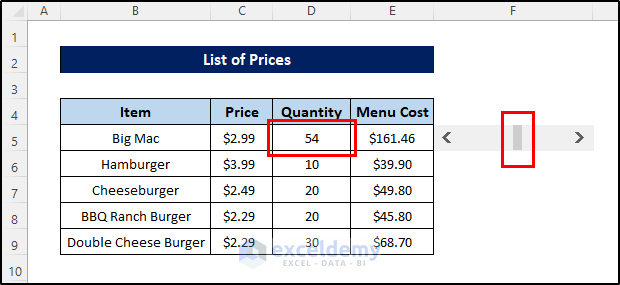
- If we move the scroll bar, the value of cell D5 will change.
Form Controls vs. ActiveX Controls in Excel
If you go down to the drop-down list of the Insert from the Controls group of the Developer tab, you can see there are two types of objects available to insert – Form controls and ActiveX controls. While they may seem the same, there are some basic differences between them.
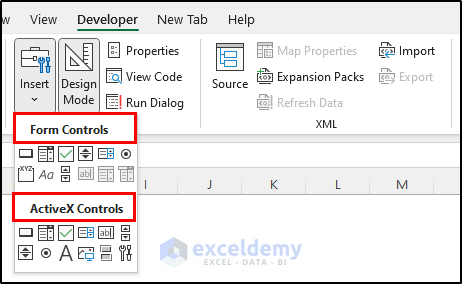
- One major difference between them is that you can access ActiveX controls through the VBA editor and control them programmatically.
- Form controls provide much simpler functions and designs.
- Although ActiveX is a bit complex compared to Form controls, these provide a much more flexible design and provide functionalities that Form controls cannot provide.
- Many systems won’t trust ActiveX controls and you need to manually activate them through the trust center.
- ActiveX is only available on Windows.
Read More: Key Differences in Excel: Form Control Vs. ActiveX Control
Things to Remember
You can toggle between design and edit mode easily for the form control objects by right-clicking on the object and clicking elsewhere.
To delete a form control object, you need to go to the edit mode and then press Delete on your keyboard. Another way of doing the same is to right-click on the object and then select Cut from the context menu.
There is another option to go into edit mode for the objects of the form controls through the Excel ribbon. You can toggle the design mode off and on through the option under the same name in the Controls group of the Developer tab.
Related Articles
- How to Remove a Form Control in Excel
- How to Create Chart Slider in Excel
- How to Make Games in Excel
<< Go Back to Form Control in Excel | Learn Excel
Get FREE Advanced Excel Exercises with Solutions!


This was awsome Taryn, well done. Need Some more like this from you, it really helpss!!!!!
Thank you so much :-).