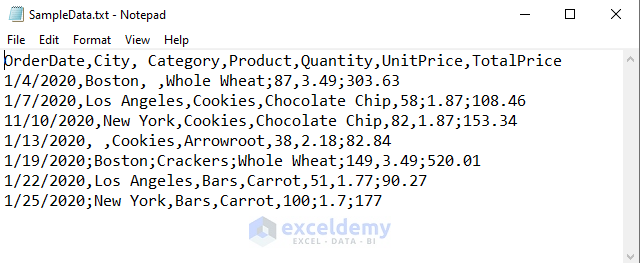
The sample dataset represents sale details for a shop. The data is separated by either a comma or a semicolon. We want to import this data from the Text File to an Excel spreadsheet.
Method 1 – Import Text File Data with Multiple Delimiters Using the Legacy Wizards Feature
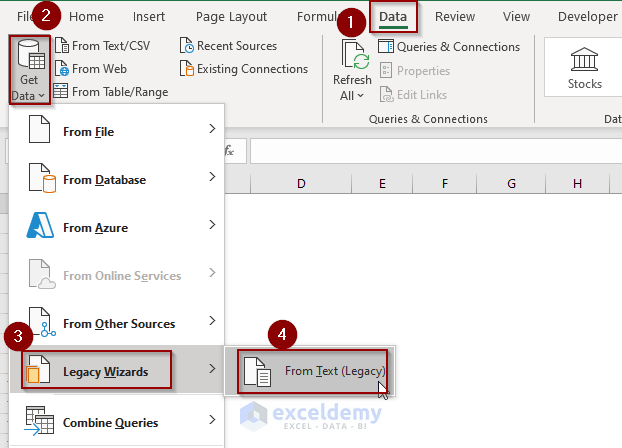
Go to the Legacy Wizards
- Go to the Data tab.
- Click on the Get Data option.
- Hover the mouse on the Legacy Wizards option.
- Choose the From Text (Legacy) option.
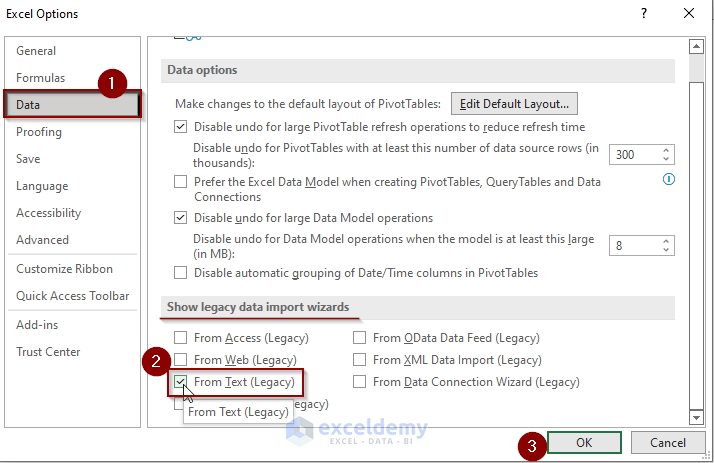
If the From Text (Legacy) Option is not Available
- Press Alt + T + O to open the Excel Options.
- Click on the Data tab.
- Check the box named “From Text (Legacy)” under the “Show legacy data import wizards” options.
- Press OK to save the settings.
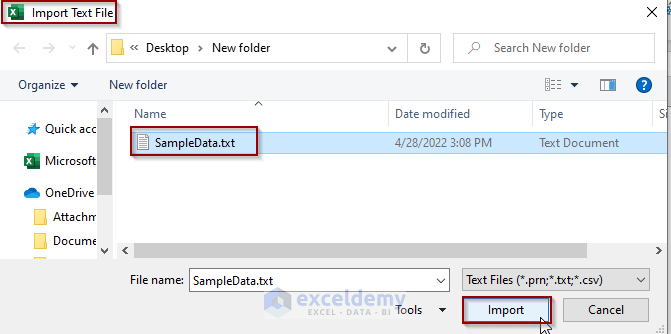
Import the Text File
As we clicked on the From Text (Legacy) option from the Legacy Wizards, it opened the “Import Text File” window to choose the Text File. Navigate to the file location and choose to import it.
Configure the Settings
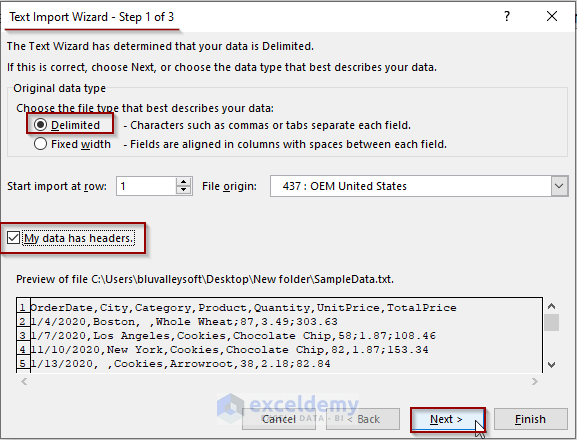
Step 1 of 3:
- Select the Delimited option.
- Check the “My data has headers” option.
- Click the Next option.
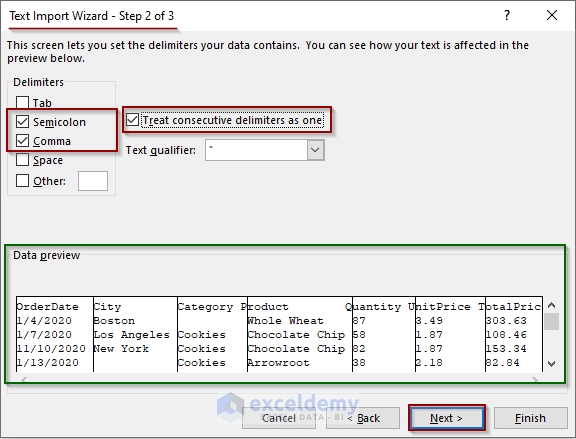
Step 2 of 3:
- Check the Semicolon and Comma options under the Delimiters options.
Note: Our dataset has these two delimiters. There are some more options including the “Other” option for delimiters that are not available in the list.
- Check the “Treat consecutive delimiters as one” option.
- Click Next.
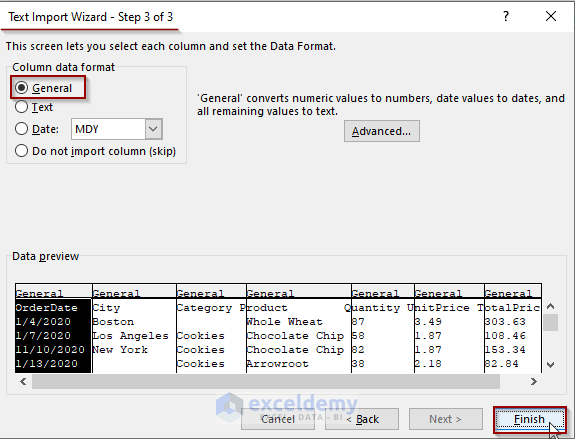
Step 3 of 3:
- By default, the column data format is General. In this example, we’ll leave it as it is.
- Click Finish.
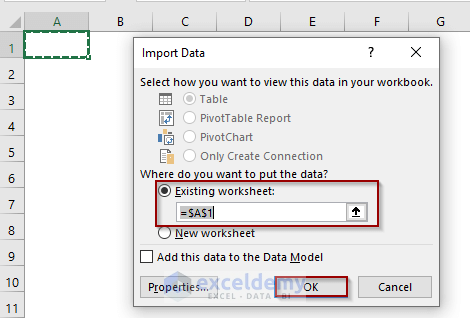
Choose the Target
Choose where to put your imported data. We have chosen cell A1 in the current worksheet.
Imported Dataset
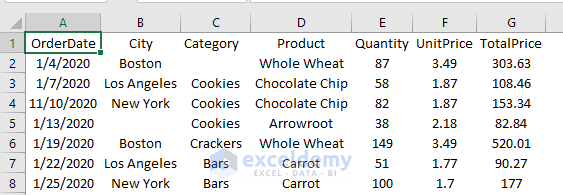
Read More: How to Import Data from Text File into Excel
Method 2 – Prepare and Then Import Text File Data with Multiple Delimiters Using the Get and Transform Data Feature
Prepare the Dataset
- Create a copy of the original text file named txt.
- Open the file and pressed Ctrl + H.
- In the Replace window put a semicolon in the “Find what” input box and a comma in the “Replace with” input box.
- Click on Replace All.
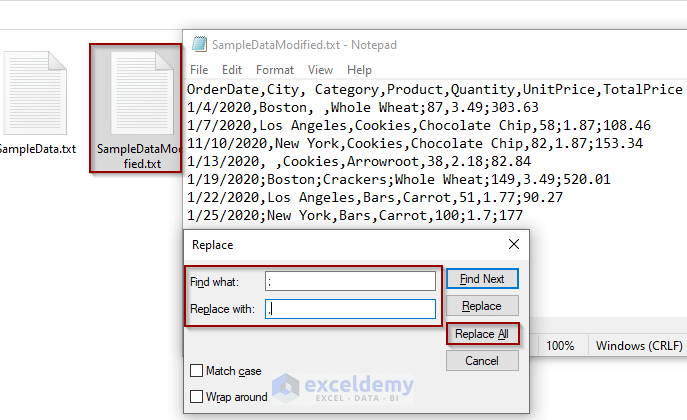
- We now have only commas as delimiters in our dataset.
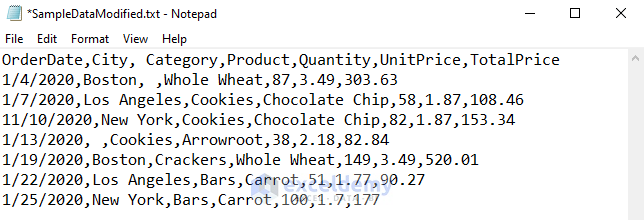
Import the Text File
- Go to the Data tab.
- Click on the Get Data button.
- Hover on the From File option.
- Click on the From Text/CSV option.
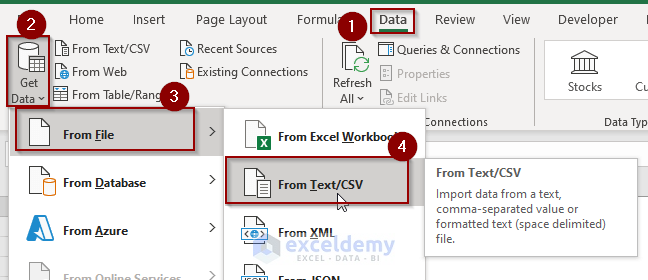
- Navigate to the file location of the SampleTextModified.txt, select the file and click on Import.
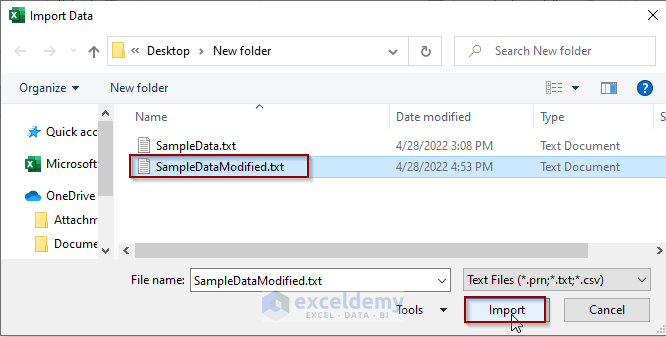
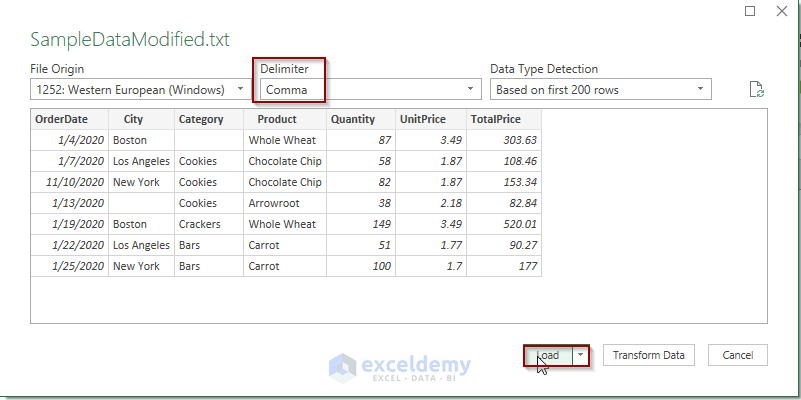
- In the preview, the dataset is shown as a table.
- Click on the Load button.
Imported Dataset

Method 3 – Run a VBA Code to Import Text File Data with Multiple Delimiters into Excel Worksheet
VBA Split Function: The VBA Split function in Excel VBA is used to split a string into substrings. The function returns a zero-based one-dimensional array. Each element of the array is a substring separated by a predefined delimiter. The syntax of the VBA function is-
Split(expression, [delimiter, [limit, [compare]]])
expression– This required parameter represents a text string that contains substrings and a delimiter. If the string is empty, the function will also return an empty array.
delimiter– A string character that is used to split the string into substrings. If omitted the function will use a space character as the delimiter. And if it is an empty string, it’ll return the original string as the output.
limit– It represents the number of substrings to return in the output. If omitted, the function will return all the substrings.
compare– It has several values. We can use vbBinaryCompare for a case-sensitive delimiter and vbTextCompare for a case-insensitive delimiter in the Split function.
VBA InStr Function: We use the InStr function in Excel VBA to search a specific string within a given string from a predefined position. The syntax is-
InStr([start], string 1, string 2, [compare])
[start]- The position from which it starts searching. The default is 1 if omitted.string 1- The given string from which the function searches for the desired string.
string 2- The specific string that the function searches within the given string.
[compare]- The type of comparison. The default is Binary Comparison.
To import Text File data with multiple delimiters into an Excel worksheet, we need to open and write VBA code in the Visual Basic Editor. Follow the steps to open the Visual Basic Editor and write some code there.
- Go to the Developer tab.
- Click the Visual Basic option.

- In the Visual Basic For Applications window, click the Insert dropdown to select the New Module option.

Enter the code inside the visual code editor and press F5 to run it. The following code replaced the semicolons of the Text File with commas by using the VBA Replace function.
Sub ImportTextFileDatatoExcel()
    Dim fileLocation As String, textData As String
    Dim rowNum As Long
    folderLocation = "D:\Exceldemy"
    Set fso = CreateObject("Scripting.FileSystemObject")
    Set folder = fso.GetFolder(folderLocation)
    rowNum = 1
    Close #1
    For Each textFile In folder.Files
        fileLocation = folder & "\" & textFile.Name
        Open fileLocation For Input As #1
        Do While Not EOF(1)
            Line Input #1, textData
            textData = Replace(textData, ";", ",")
            If InStr(textData, ",") = 0 Then
                Cells(rowNum, 1) = textData
            Else
                tArray = Split(textData, ",")
                nColumn = 1
                For Each element In tArray
                    Cells(rowNum, nColumn) = element
                    nColumn = nColumn + 1
                Next element
            End If
            rowNum = rowNum + 1
        Loop
        Close #1
    Next textFile
End Sub
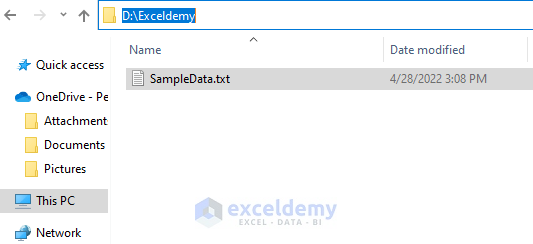
In the above code, put your own folder location that holds the Text File in the code. The following screenshot shows the file location for this illustration.
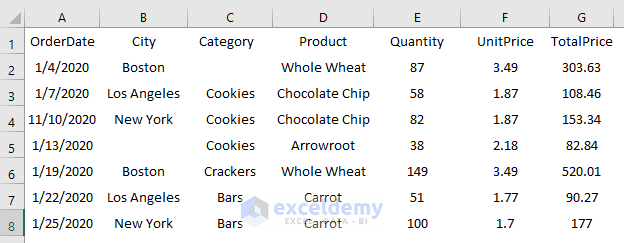
Imported Dataset
Read More: How to Convert Text File to Excel Automatically
Notes
- The VBA code we used can work with multiple Text Files in the destined folder efficiently.
- If the specified delimiter doesn’t exist in the source string, the Split function will return the string as it is.
- If the compare argument of the Split function is omitted, the default value is
- The InStrRev function returns 0 if the substring doesn’t exist in the given string.
Download Practice Workbook
Related Articles
<< Go Back to Import Text File to Excel | Importing Data in Excel | Learn Excel
Get FREE Advanced Excel Exercises with Solutions!

