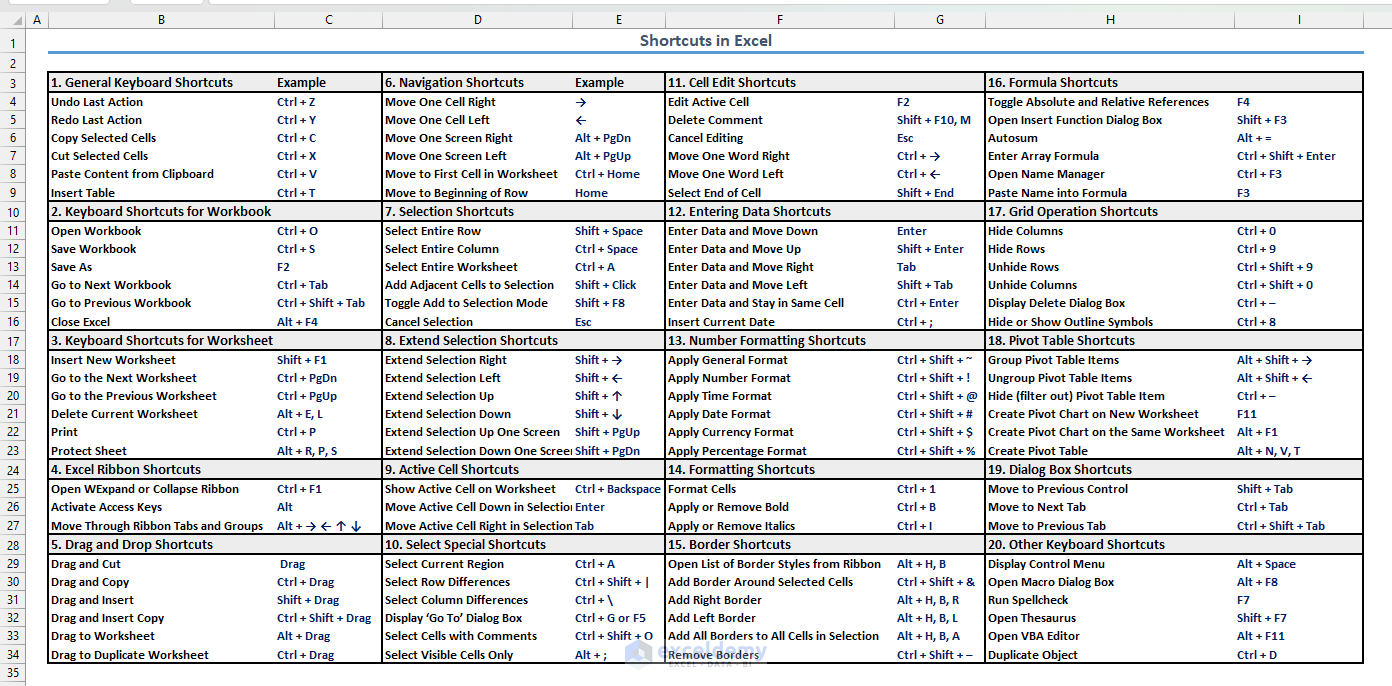
In this article, you will learn to over 200+ shortcuts in Excel with practical examples.
How Do I Read Shortcuts in Excel?
- Shortcut keys that need to be pressed simultaneously are shown like this:
Ctrl + P
It means press Ctrl and P together.
- Shortcut keys that need to be pressed one after another are shown like this:
Alt + H, A, C
It means press Alt and H together, release those keys, and press A and C.
⏷ 220++ Excel Keyboard Shortcuts in 20 Categories for Quick Navigation
⏵ General Keyboard Shortcuts
⏵ Keyboard Shortcuts for Excel Workbook
⏵ Keyboard Shortcuts for Excel Worksheet
⏵ Excel Ribbon Shortcuts
⏵ Drag and Drop Shortcuts
⏵ Navigation Shortcuts
⏵ Selection Shortcuts
⏵ Extend Selection Shortcuts
⏵ Active Cell Shortcuts
⏵ Select Special Shortcuts
⏵ Cell Edit Shortcuts
⏵ Entering Data Shortcuts
⏵ Number Formatting Shortcuts
⏵ Formatting Shortcuts
⏵ Border Shortcuts
⏵ Formula Shortcuts
⏵ Grid Operation Shortcuts
⏵ Pivot Table Shortcuts
⏵ Dialog Box Shortcuts
⏵ Other Keyboard Shortcuts
224 Excel Keyboard Shortcuts in 20 Categories for Quick Navigation
1. General Keyboard Shortcuts
| Actions | Windows Shortcut |
|---|---|
| Open Help | F1 |
| Undo Last Action | Ctrl + Z |
| Redo Last Action | Ctrl + Y |
| Copy Selected Cells | Ctrl + C |
| Cut Selected Cells | Ctrl + X |
| Paste Content from Clipboard | Ctrl + V |
| Repeat last action | F4 |
| Display the Paste Special Dialog Box | Ctrl + Alt + V |
| Display Find and Replace | Ctrl + F |
| Display Find and Replace, Replace Selected | Ctrl + H |
| Create Embedded Chart | Alt + F1 |
| Create Chart in New Worksheet | F11 |
| Toggle AutoFilter | Ctrl + Shift + L |
| Activate Filter | Alt + ↓ |
| Insert Table | Ctrl + T |
| Select Table Row | Shift + Space |
| Select Table Column | Ctrl + Space |
| Select Table (when active cell is in table) | Ctrl + A |
1.1 Open Help: F1
Open the Help panel by pressing F1 on your keyboard.

Note: For Mac users, press Command (⌘) + / as keyboard shortcuts in Excel.
1.2 Undo Last Action: Ctrl + Z
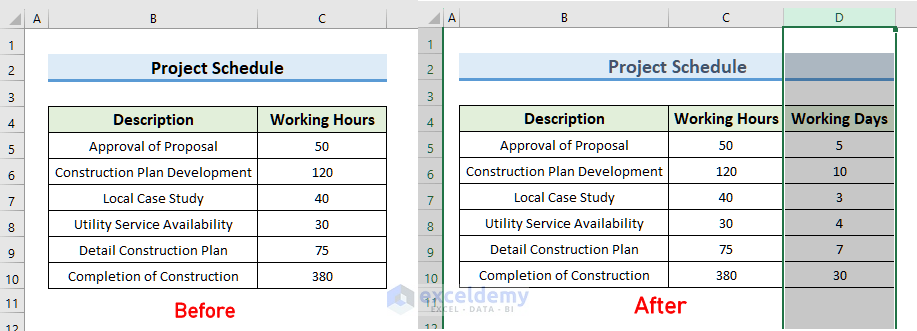
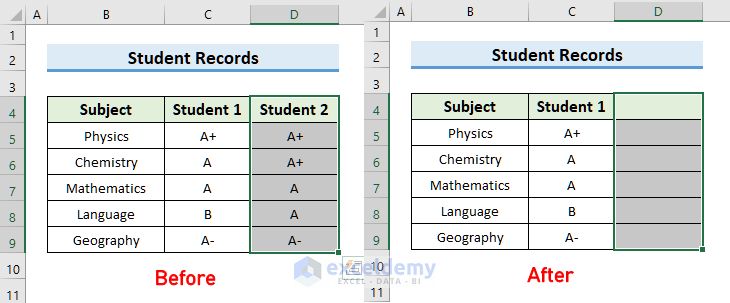
We deleted Column D and will return it by pressing Ctrl + Z on the keyboard. Apply the same to undo any kind of last action in Excel.
Note: For Mac users, press Command (⌘) + Z.
1.3 Redo Last Action: Ctrl + Y
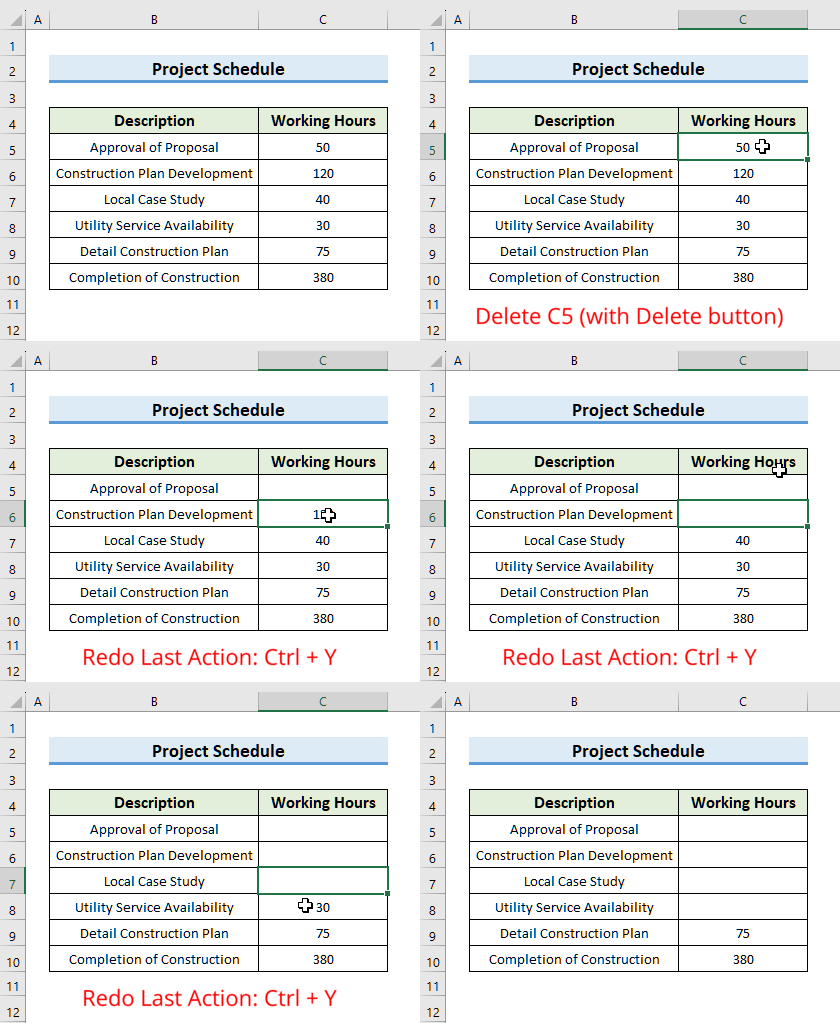
Delete the C5 cell value using the Delete button. To redo this last action, select another cell (C6) and press Ctrl + Y. The shortcut will delete the C6 cell value.
You can redo the last action for other commands.
Note: For Mac Users, press Command (⌘) + Y.
1.4 Copy Selected Cells: Ctrl + C
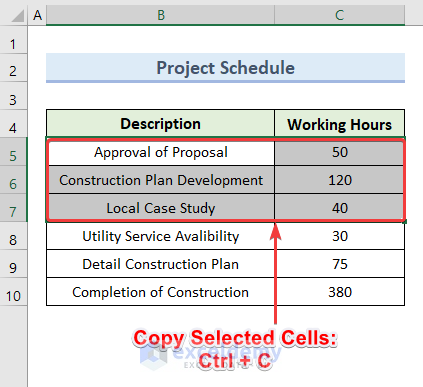
Press Ctrl + C after selecting any number of cells to copy them from your worksheet.
Note: For Mac users, press Command (⌘) + C.
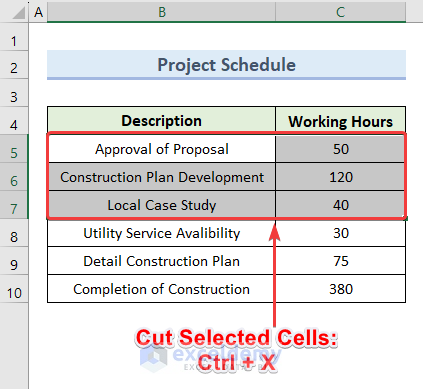
1.5 Cut Selected Cells: Ctrl + X
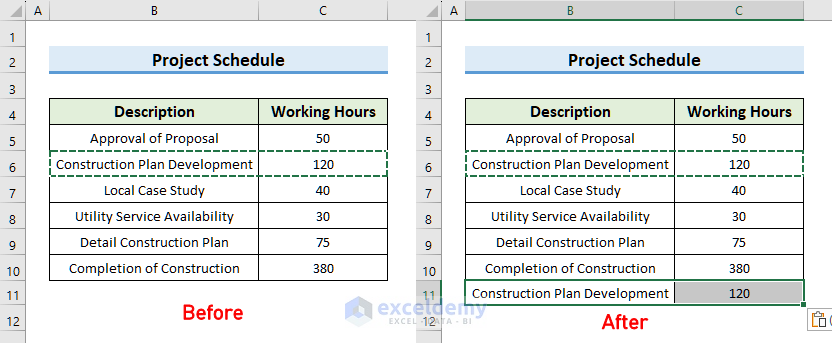
To permanently cut the selected cell from the worksheet, press Ctrl + X.
Note: For Mac users, press Command (⌘) + X.
1.6 Paste Content from Clipboard: Ctrl + V
After copying cells from the worksheet, paste them with the command Ctrl + V anywhere in your workbook.
Note: For Mac Users, press Command (⌘) + V.
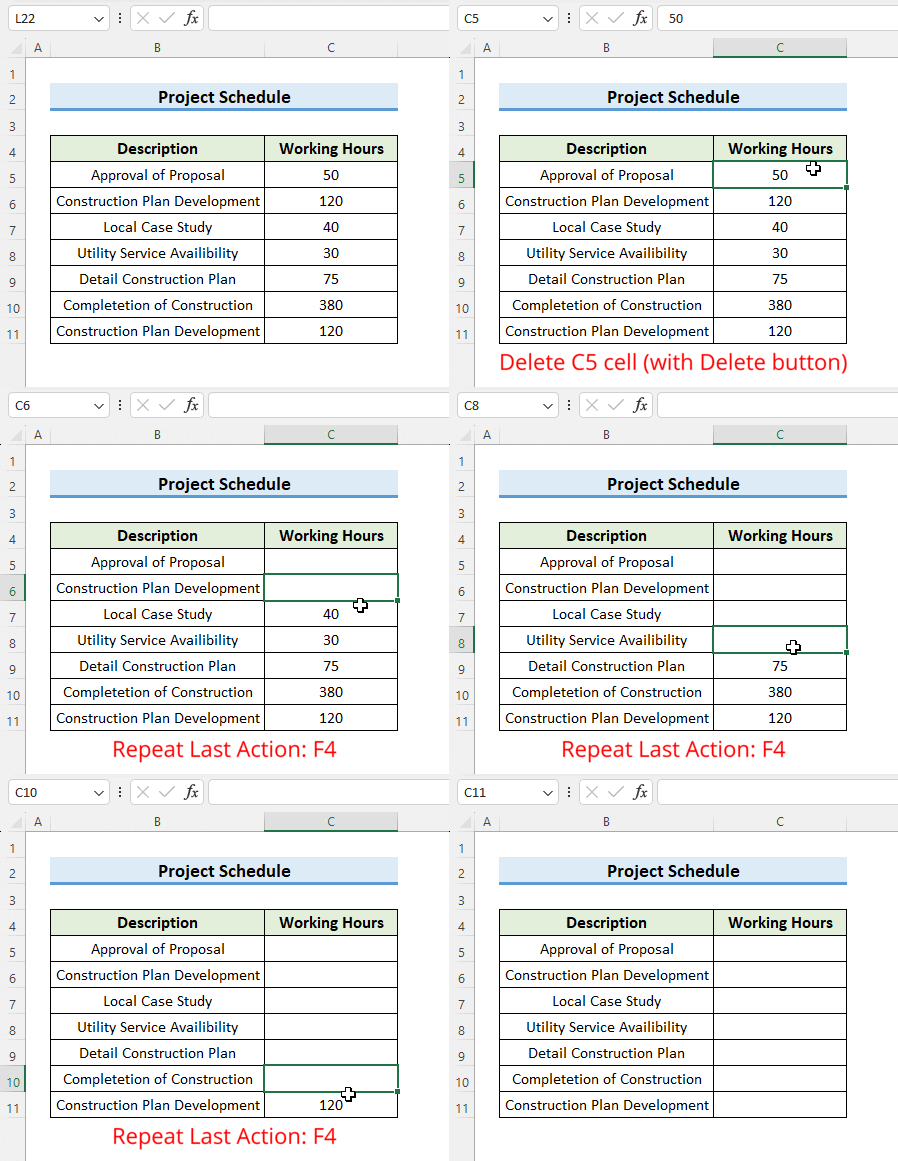
1.7 Repeat Last Action: F4
To repeat your last command or action in the active worksheet, press F4.
Note: For Mac Users, press Command (⌘) + Y.
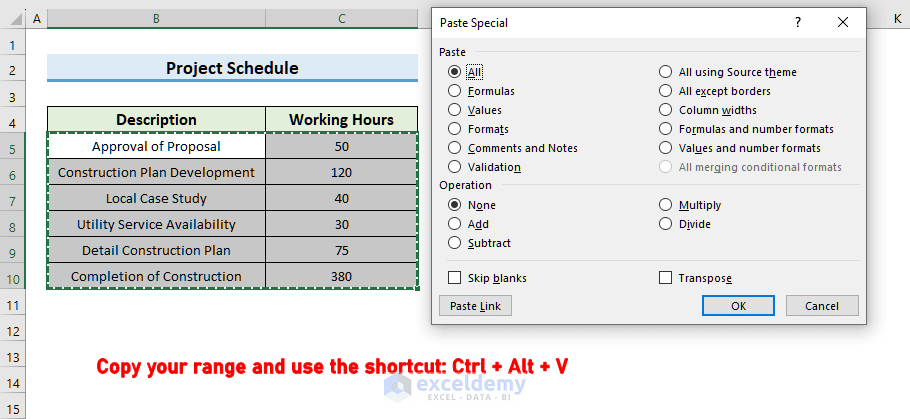
1.8 Display Paste Special Dialog Box: Ctrl + Alt + V
Copy the range and use the shortcut Ctrl + Alt + V.
Note: For Mac Users, press Control (^) + Command (⌘) + V.
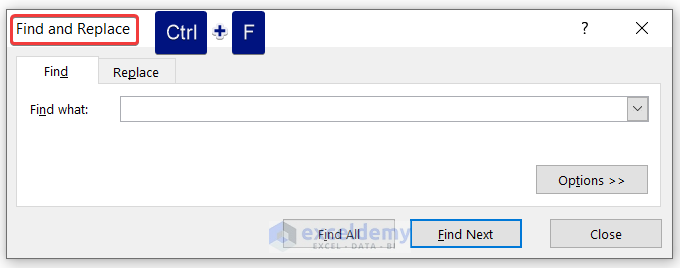
1.9 Display Find and Replace, Find Selected: Ctrl + F
To go to the Find tab from the Find and Replace dialogue box, use the shortcut Ctrl + F.
Note: For Mac users, press Command (⌘) + F.
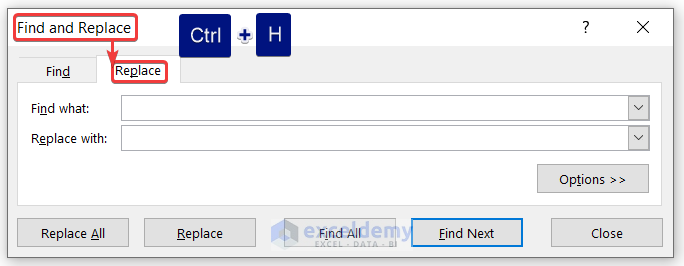
1.10 Display Find and Replace, Replace Selected: Ctrl + H
To go to the Replace tab from the Find and Replace dialogue box, use the shortcut Ctrl + H.
Note: For Mac users, press Control (^) + H.
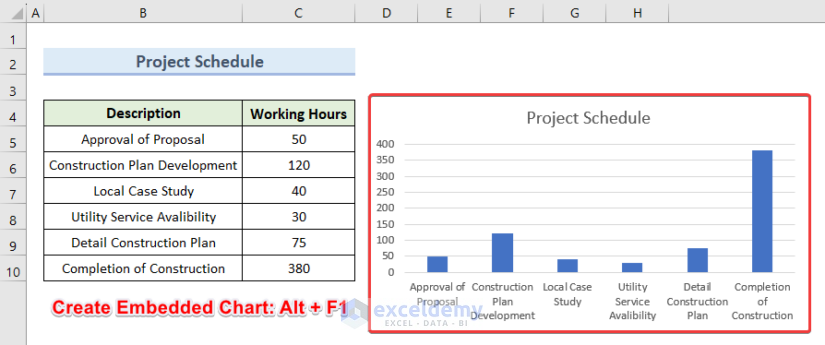
1.11 Create Embedded Chart: Alt + F1
Select your data range, i.e. B4:C10, and press Alt + F1.
Note: For Mac users, press Function (Fn) + Option/Alt (⌥) + F1.
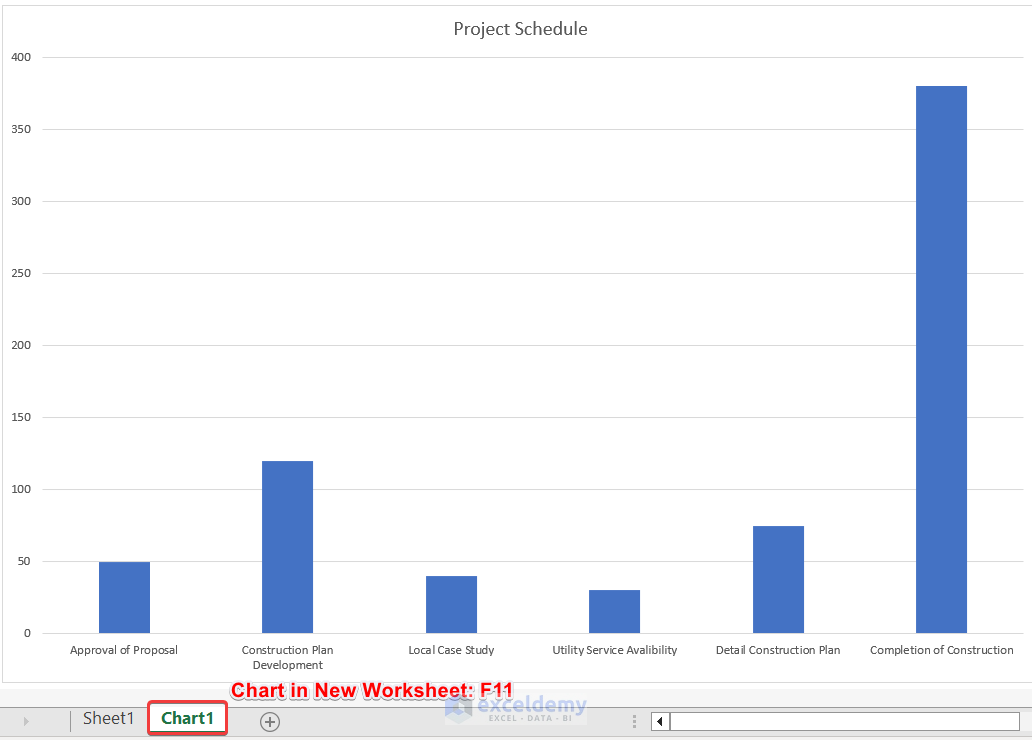
1.12 Create Chart in New Worksheet: F11
Select your dataset, and press F11 to create a chart in a new worksheet.
Note: For Mac users, press Function (Fn) + F11.
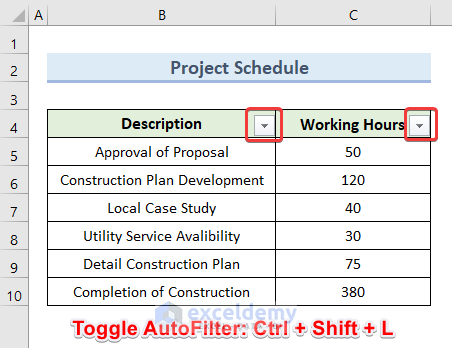
1.13 Toggle AutoFilter: Ctrl + Shift + L
Select the data range, i.e. B4:C10 and press Ctrl + Shift + L and access the auto filter.
Note: For Mac users, press Command (⌘) + Shift (⇧) + F.
1.14 Activate Filter: Alt + ↓
Select the data range B4:C10 and click on Filter from the Data tab.
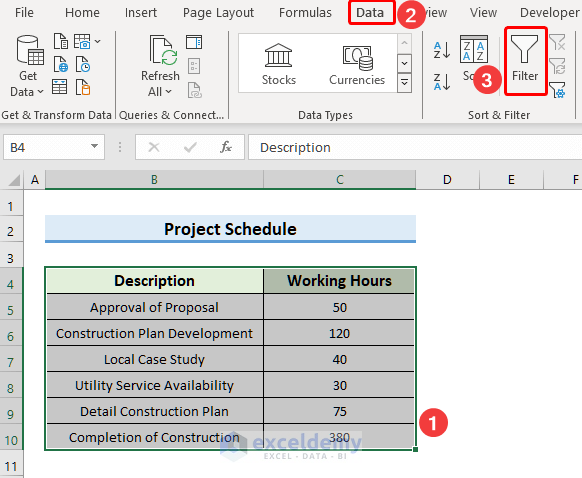
This will activate the filter for the data range.
To activate the filter list for each column, press Alt + ↓ and it will generate the list below.
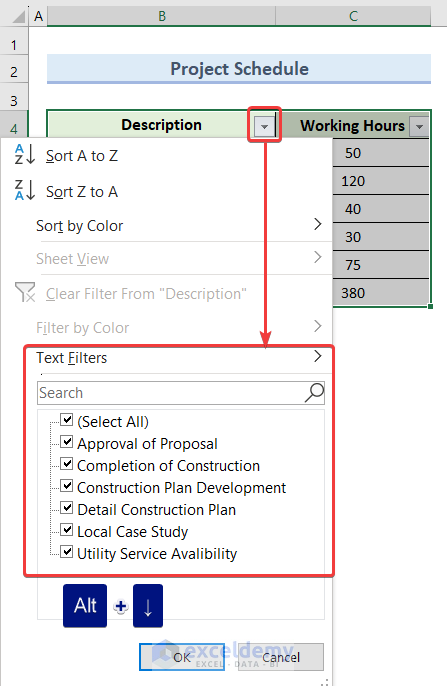
Note: For Mac users, press Option/Alt (⌥) + ↓
1.15 Insert Table: Ctrl + T
To create a table from the source dataset, select any cell within the data range and press Ctrl + T to create the table.
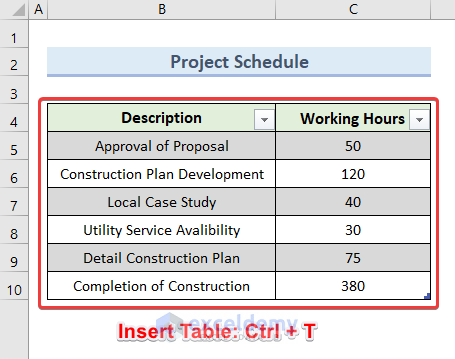
Note: For Mac users, press Control (^) + T
1.16 Select Table Row: Shift + Space
To select the entire table row (range B7:C7) from the data table. Select any cell within the data range “B7:C7” >> press Shift + Space.
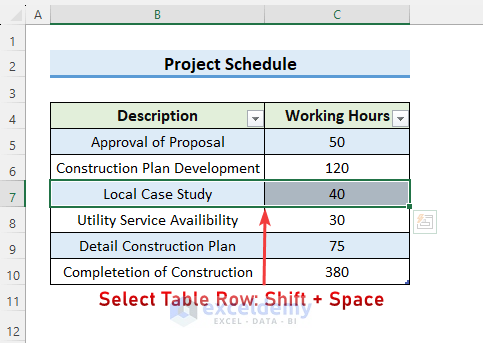
Note: For Mac users, press Shift (⇧) + Space
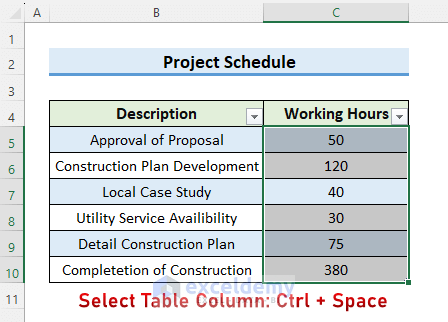
1.17 Select Table Column: Ctrl + Space
To select the table column “Working Hours” from the data table.
Select any cell within the data range C5:C10 >> use the shortcut Ctrl + Space. This will select the whole table column, as shown in the image below.
Note: For Mac users, press Control (^) + Space
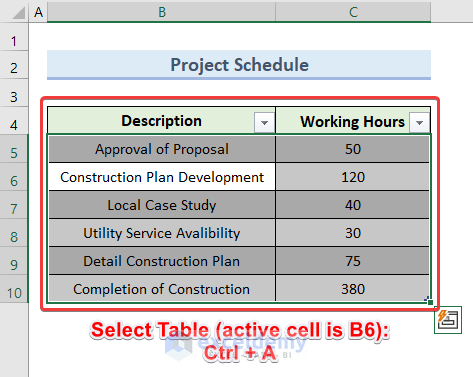
1.18 Select Table (when active cell is in table): Ctrl + A
Press Ctrl + A to select the whole table, keeping the active cell inside the table.
Note: For Mac users, press Command (⌘) + A
2. Keyboard Shortcuts for Excel Workbook
| Actions | Windows Shortcut |
|---|---|
| Create new workbook | Ctrl + N |
| Open workbook | Ctrl + O |
| Save workbook | Ctrl + S |
| Save as | F12 |
| Go to next workbook | Ctrl + Tab |
| Go to previous workbook | Ctrl + Shift + Tab |
| Minimize current workbook window | Ctrl + F9 |
| Maximize current workbook window | Ctrl + F10 |
| Protect workbook | Alt + R, P, W |
| Close current workbook | Ctrl + F4 |
| Close Excel | Alt + F4 |
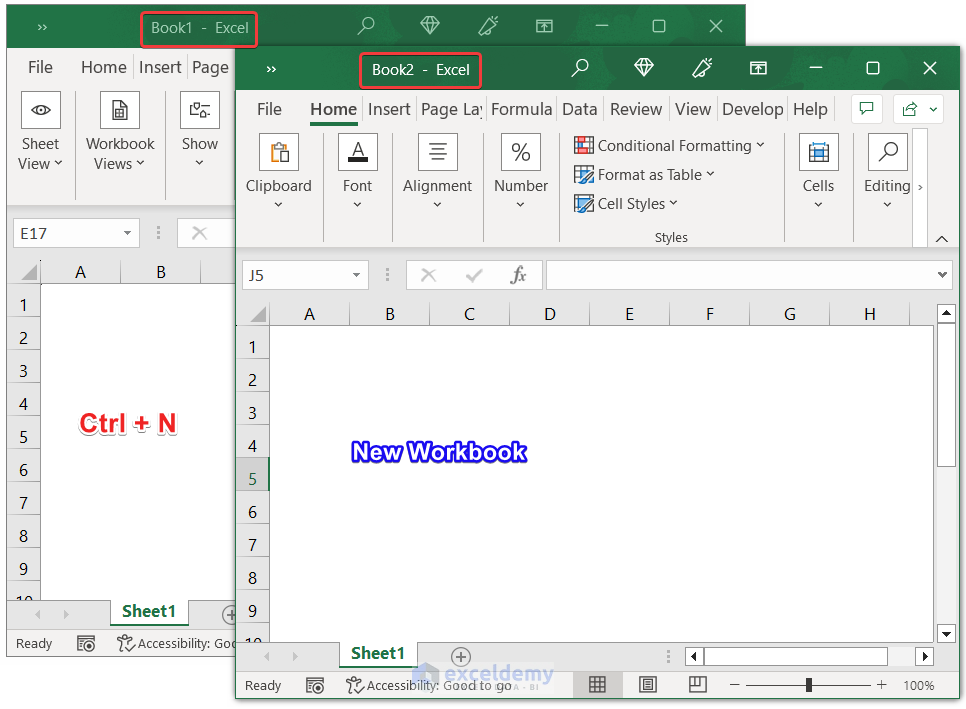
2.1 Create New Workbook in Windows: Ctrl + N
Press Ctrl + N to open a new Excel workbook alongside the old one.
Note: For Mac users, press Command (⌘) + N
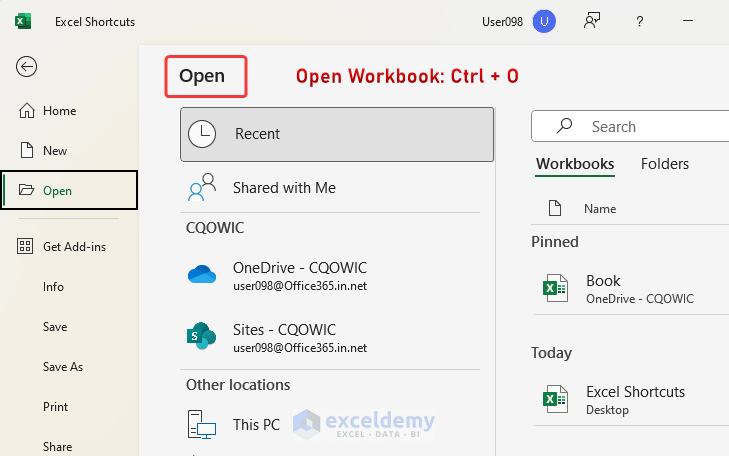
2.2 Open Workbook: Ctrl + O
Press the Ctrl + O buttons and you will be directed to the Open section. Choose the required file to open.
Note: For Mac users, press Command (⌘) + O
2.3 Save Workbook: Ctrl + S
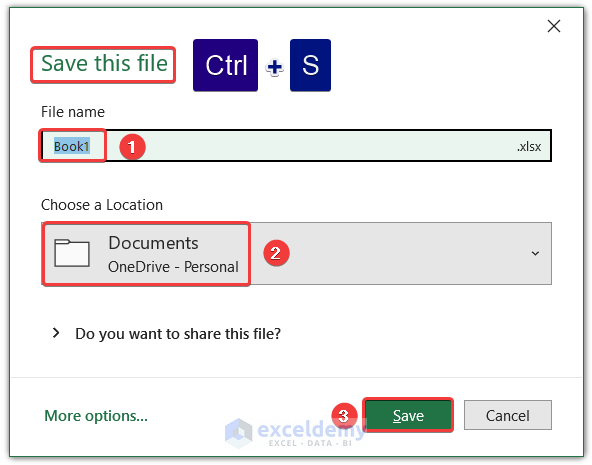
Apply this command to open the Save this file window. Insert the File name > Choose a Location > Save it.
Note: For Mac users, press Command (⌘) + S
2.4 Save As: F12
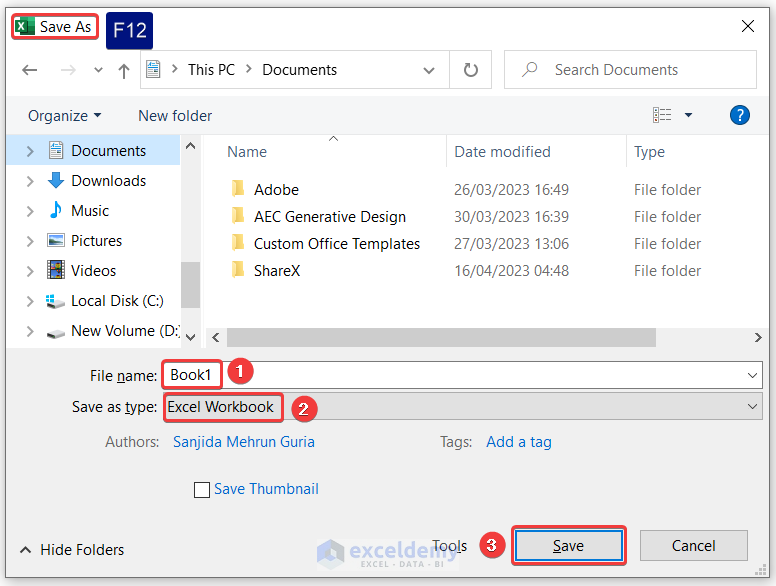
Use this command to open the Save As window and insert File name > determine the file type in Save as type > Save the workbook.
Note: For Mac users, press Command (⌘) + Shift (⇧) + N
2.5 Go to Next Workbook: Ctrl + Tab
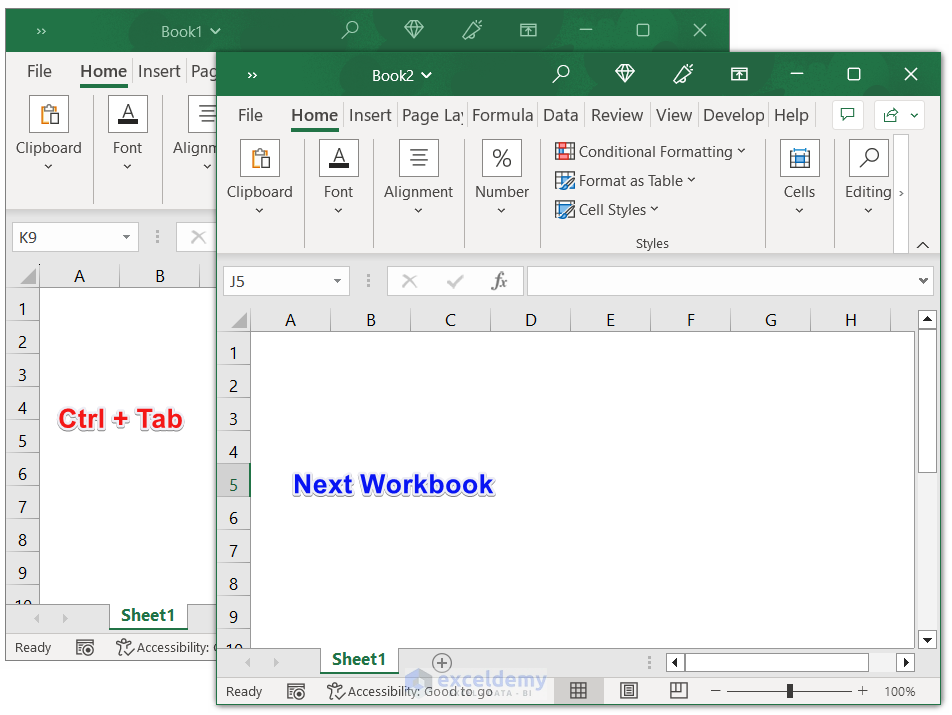
If multiple workbooks are open, press Ctrl + Tab and you will be directed to the next workbook from the active one.
2.6 Go to Previous Workbook: Ctrl + Shift + Tab
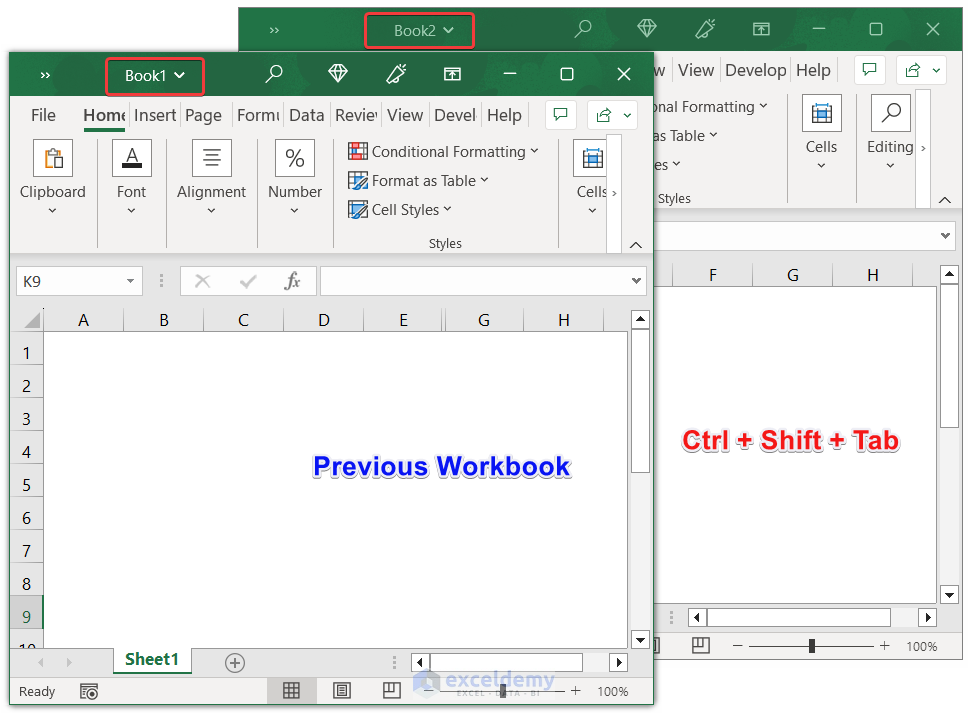
When you need to go back from the active workbook to the previous one, press Ctrl + Shift + Tab.
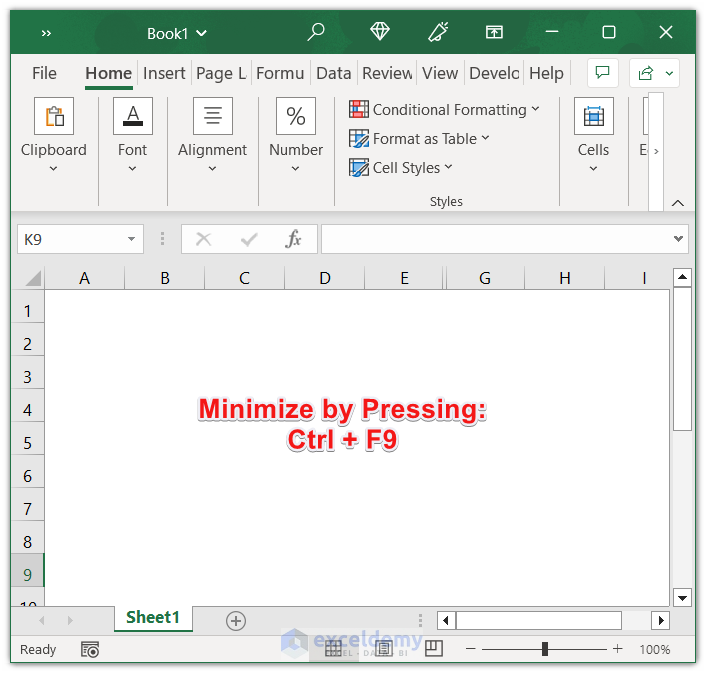
2.7 Minimize Current Workbook Window: Ctrl + F9
Minimize your active workbook window by pressing Ctrl + F9.
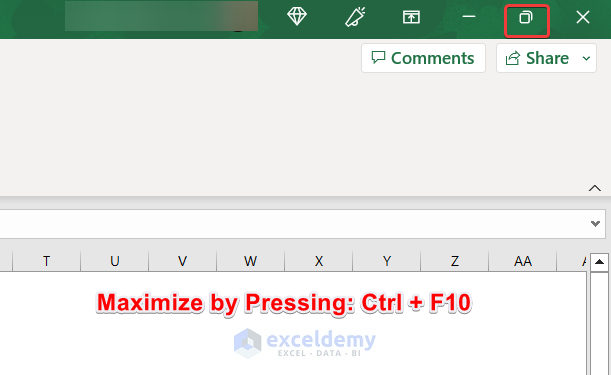
2.8 Maximize Current Workbook Window: Ctrl + F10
Press Ctrl + F10 to maximize it.
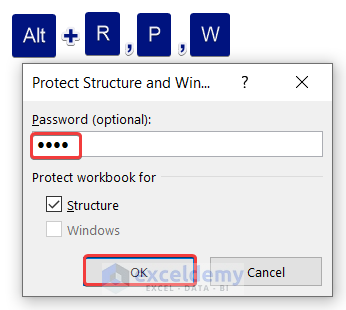
2.9 Protect Workbook: Alt + R, P, W
Press Alt and R, P, and W in sequence to open the Protect Structure window. Insert the password to protect your workbook >> press OK.
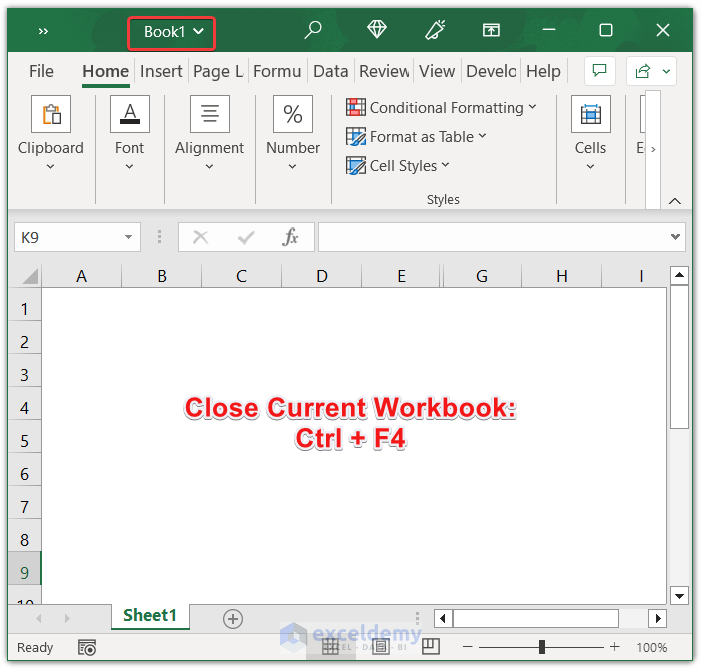
2.10 Close Current Workbook: Ctrl + F4
Press Ctrl + F4 to close the active workbook.
Note: For Mac users, press Command (⌘) + W
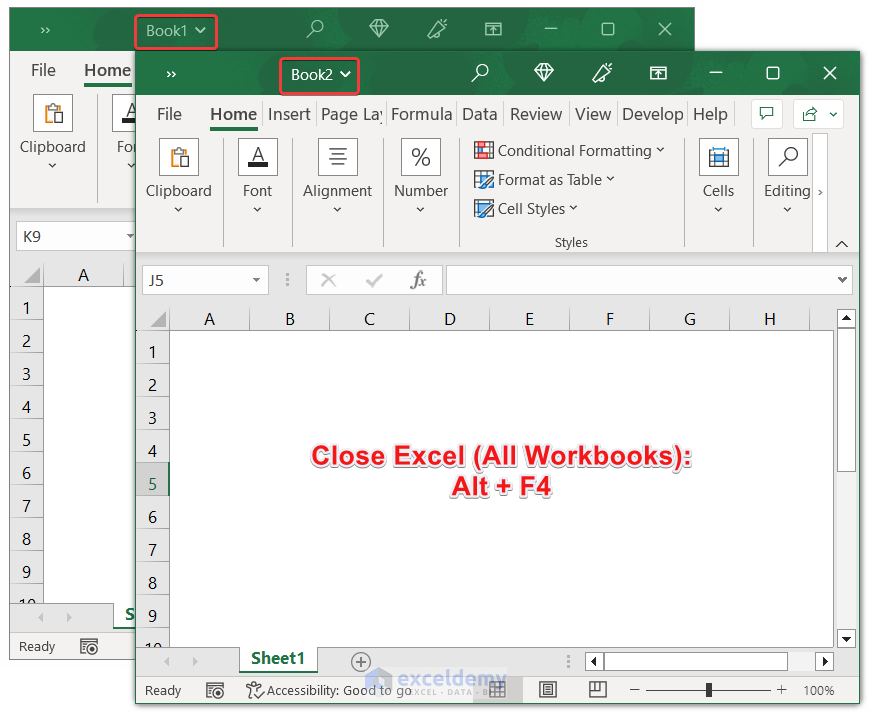
2.11 Close Excel: Alt + F4
To close all opened workbooks, press Alt + F4.
Note: For Mac users, press Command (⌘) + Q
3. Keyboard Shortcuts for Excel Worksheet
| Actions | Windows Shortcut |
|---|---|
| Insert new worksheet | Shift + F11 |
| Go to the next worksheet | Ctrl + PgDn |
| Go to the previous worksheet | Ctrl + PgUp |
| Rename current worksheet | Alt + O, H, R |
| Delete current worksheet | Alt + E, L |
| Display Move or Copy | Alt + E, M |
| Move between the worksheet, Ribbon, task pane, and zoom controls in a worksheet that has been split | F6 or Shift + F6 |
| Select adjacent worksheets | Ctrl + Shift + PgUp/PgDn |
| Select non-adjacent worksheets | Ctrl + Click |
| Toggle full-screen | Ctrl + Shift + F1 |
| Ctrl + P | |
| Open print preview window | Ctrl + F2 |
| Set print area | Alt + P, R, S |
| Clear print area | Alt + P, R, C |
| Zoom in | Ctrl + Mouse Wheel Up |
| Zoom out | Ctrl + Mouse Wheel Down |
| Protect sheet | Alt + R, P, S |
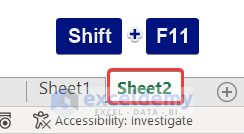
3.1 Insert New Worksheet: Shift + F11
Press Shift + F11 to get a new worksheet beside the old one in your Excel workbook.
Note: For Mac users, press Shift (⇧) + F11
3.2 Go to the Next Worksheet: Ctrl + PgDn
Go to the next worksheet from an active worksheet in the same workbook by pressing Ctrl + PgDn.

Note: For Mac Users, press Function (Fn) + Control (^) + ↓
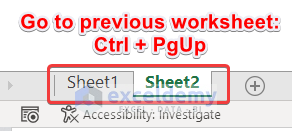
3.3 Go to the Previous Worksheet: Ctrl + PgUp
Go to the previous worksheet from an active worksheet in the same workbook by pressing Ctrl + PgUp.
Note: For Mac users, press Function (Fn) + Control (^) + ↑
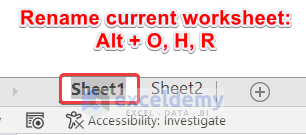
3.4 Rename Current Worksheet: Alt + O, H, R
To rename your current worksheet, press Alt + O, H, R and change the worksheet name.
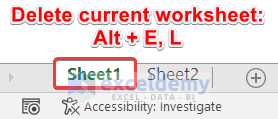
3.5 Delete Current Worksheet: Alt + E, L
Press Alt + E, L to delete the active worksheet in your workbook.
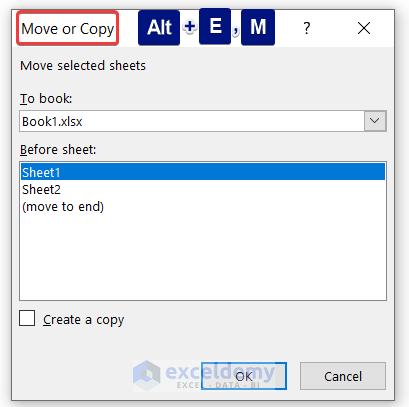
3.6 Display Move or Copy: Alt + E, M
To show the Move or Copy dialogue box and apply your preferred selection, press Alt + E, M.
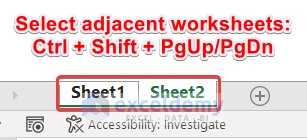
3.7 Select Adjacent Worksheets: Ctrl + Shift + PgUp/PgDn
To select two adjacent worksheets simultaneously, press Ctrl + Shift + PgUp/PgDn.
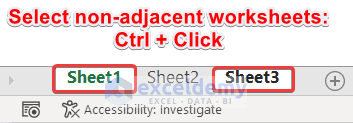
3.8 Select Non-Adjacent Worksheets: Ctrl + Click
In the case of non-adjacent worksheets, press Ctrl while staying on the active worksheet, put the cursor over the other worksheet and Right-Click on it.
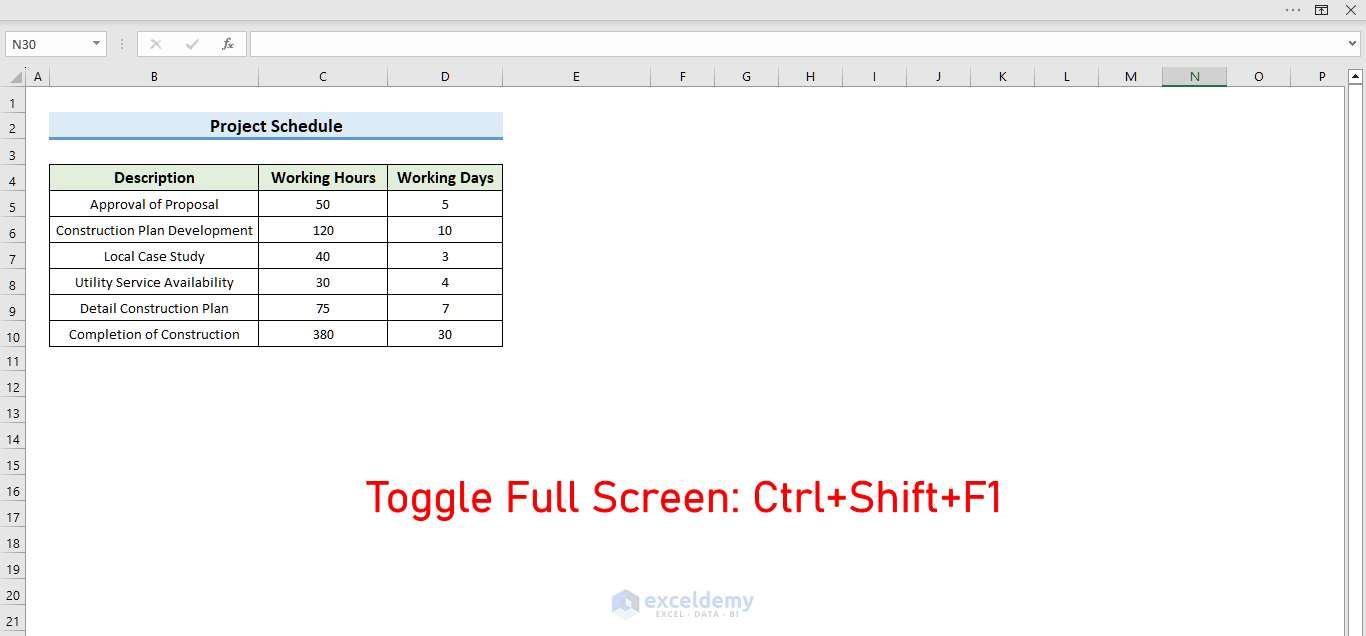
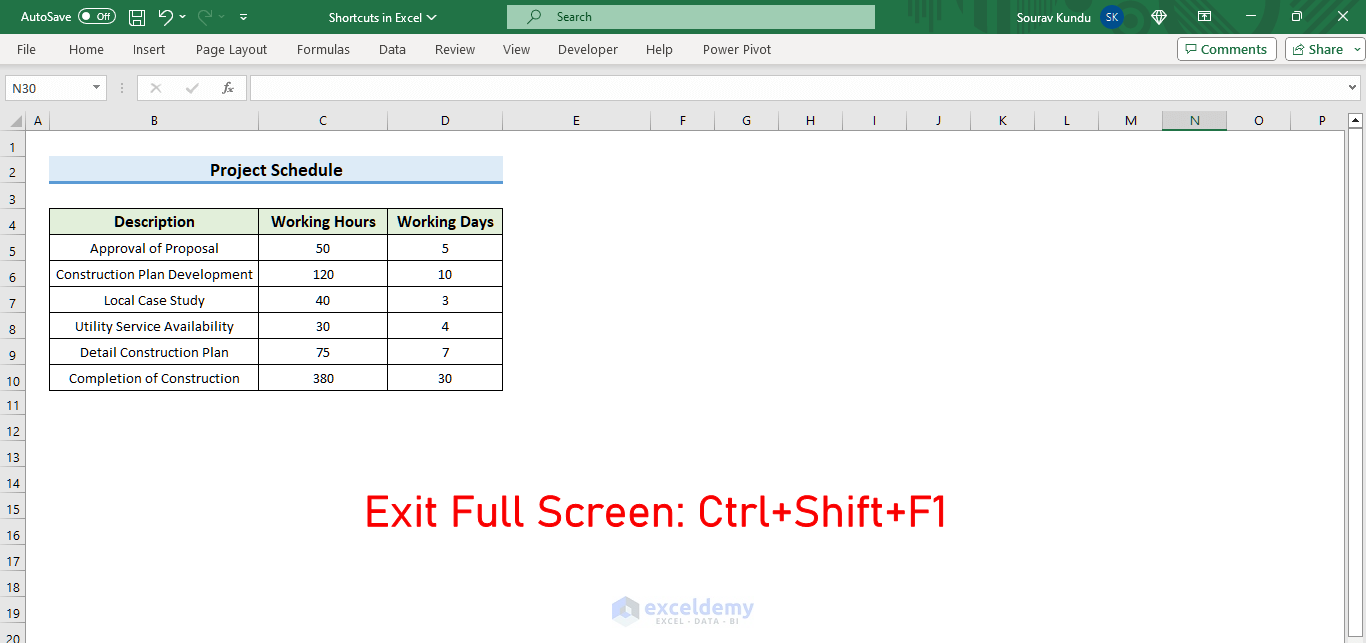
3.9 Toggle Full-Screen: Ctrl + Shift + F1
Use the shortcut Ctrl + Shift + F1 to enable the full screen mode.
To exit the full screen mode, use the same shortcut: Ctrl + Shift + F1.
3.10 Print: Ctrl + P
Apply the Print command by pressing Ctrl + P.
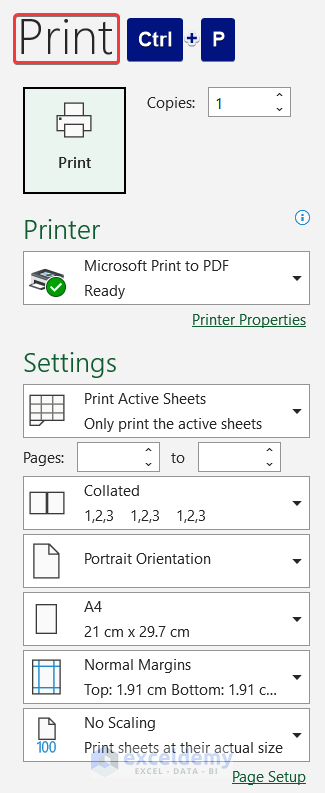
Note: For Mac users, press Command (⌘) + P
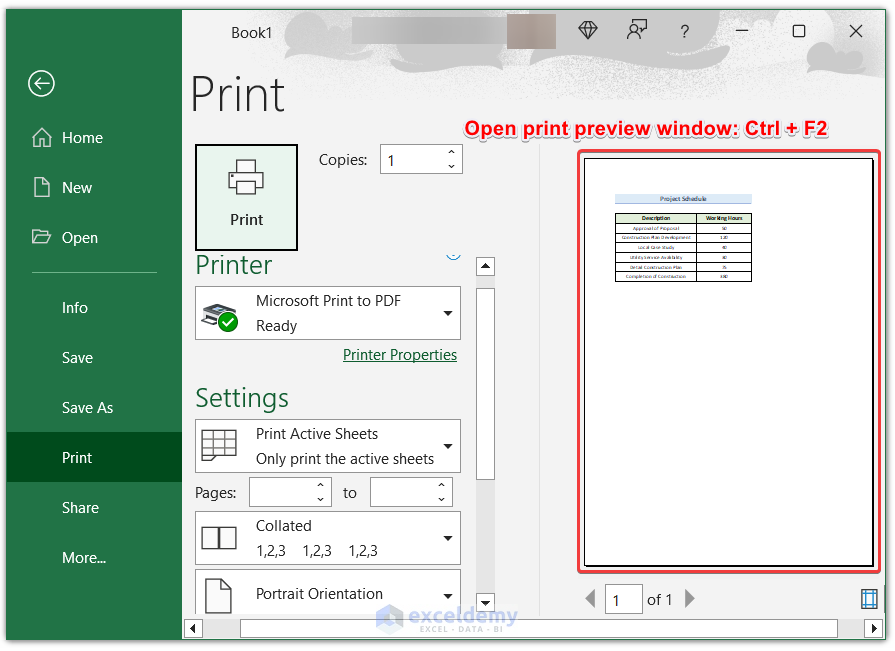
3.11 Open Print Preview Window: Ctrl + F2
If you need to see the output as a preview before the final print, press Ctrl + F2.
3.12 Set Print Area: Alt + P, R, S
To specify the printing area of your worksheet, press Alt + P, R, Sand it will create a grey rectangle surrounding the selected area.
3.13 Clear Print Area: Alt + P, R, C
To omit the specified print area and get back to normal mode, apply the shortcut: Alt + P, R, C.
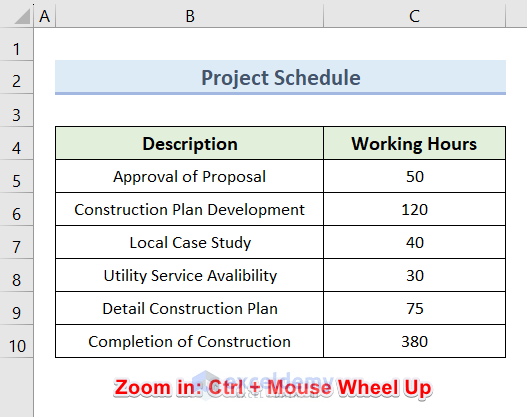
3.14 Zoom In: Ctrl + Mouse Wheel Up
Press the Ctrl button and scroll the wheel up of the mouse to get a larger view of the worksheet.
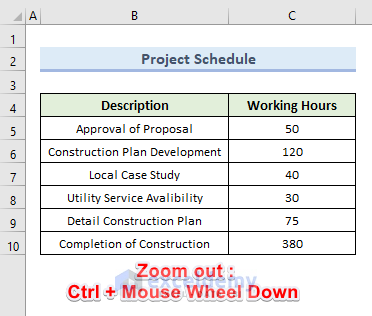
3.15 Zoom Out: Ctrl + Mouse Wheel Down
Press the Ctrl button and scroll the wheel down of the mouse to get a smaller view of the worksheet.
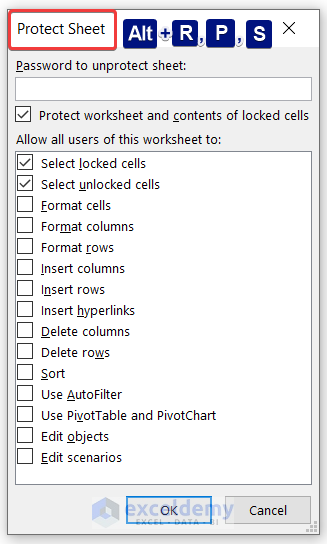
3.16 Protect Sheet: Alt + R, P, S
To open the Protect Sheet dialogue box, press the buttons Alt + R, P, S. You can apply a password to protect the sheet. You can also choose multiple options for viewers’ access to this worksheet.
4. Excel Ribbon Shortcuts
| Actions | Windows Shortcut |
|---|---|
| Expand or collapse ribbon | Ctrl + F1 |
| Activate access keys | Alt |
| Move through Ribbon tabs and groups | → ← ↑ ↓ or Tab |
4.1 Expand or Collapse Ribbon: Ctrl + F1
To expand or collapse the Excel ribbon bar, press Ctrl + F1.

Note: For Mac users, press Command (⌘) + Option/Alt (⌥) + R
4.2 Activate Access Keys: Alt
Press Alt to turn on the access keys for the whole ribbon. It will show alphabetical shortcuts to apply further.

4.3 Move Through Ribbon Tabs and Groups: Alt + → ← ↑ ↓
To move through Ribbon tabs and Groups, press the Alt button to turn on the access keys.

Press the side arrow (→) once. This will take you to the Insert tab from the previous Home tab.

Press the side arrow (→). This will take you to the Page Layout tab from the Insert tab.

You can use the left-side arrow (←) to come back to the previous tabs. Use the upper and lower arrows (↑, ↓) to navigate through different groups
Note: For Mac users, press Tab.
5. Drag and Drop Shortcuts
The drag-and-drop keyboard shortcuts are used after selecting any single cell or multiple cells in the worksheet. Drag is a four-headed arrow icon.
| Actions | Windows Shortcut |
|---|---|
| Drag and cut | Drag |
| Drag and copy | Ctrl + Drag |
| Drag and insert | Shift + Drag |
| Drag and insert copy | Ctrl + Shift + Drag |
| Drag to worksheet | Alt + Drag |
| Drag to duplicate worksheet | Ctrl + Drag |
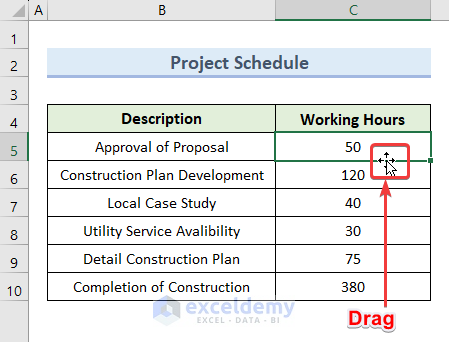
5.1 Drag and Cut: Drag
If you want to cut and paste any cell value select the cell and place the cursor on the cell’s edge. It will show the Drag icon. Holding it, move to anywhere on the worksheet where you want to paste the value and release the mouse click.
Note: For Mac users, press Drag.
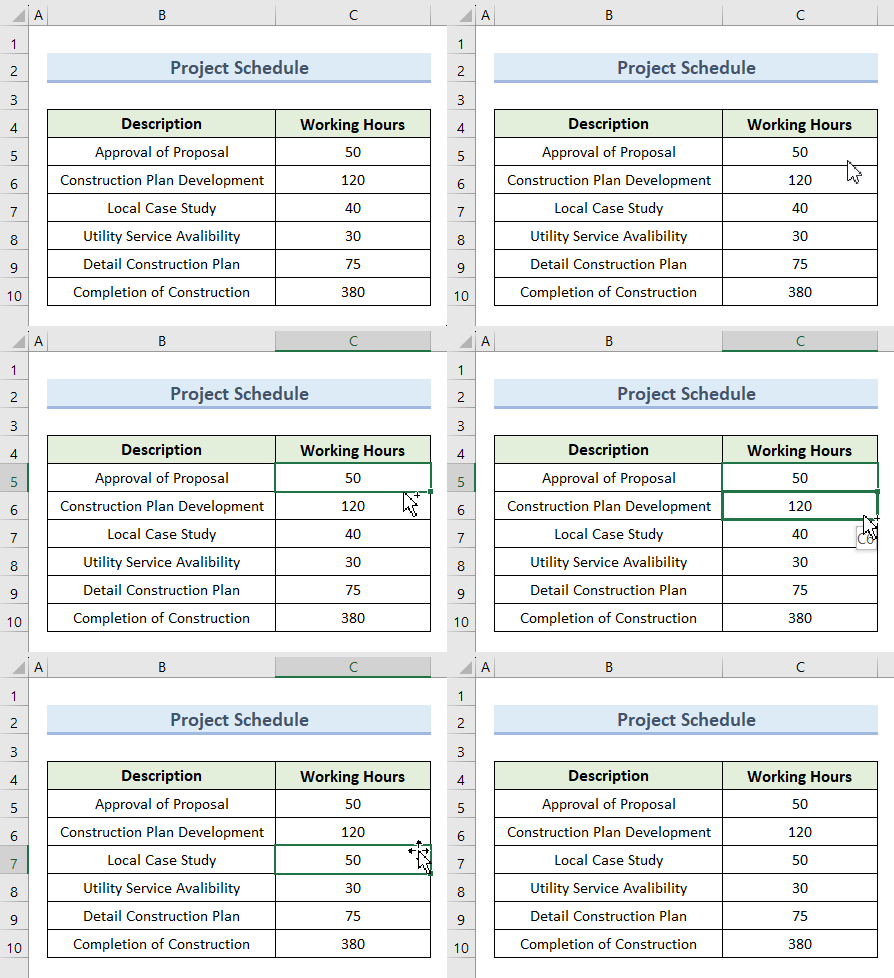
5.2 Drag and Copy: Ctrl + Drag
To keep the original cell value and copy it somewhere else, apply the shortcut Ctrl + Drag.
Note: For Mac users, press Control (^) + Drag.
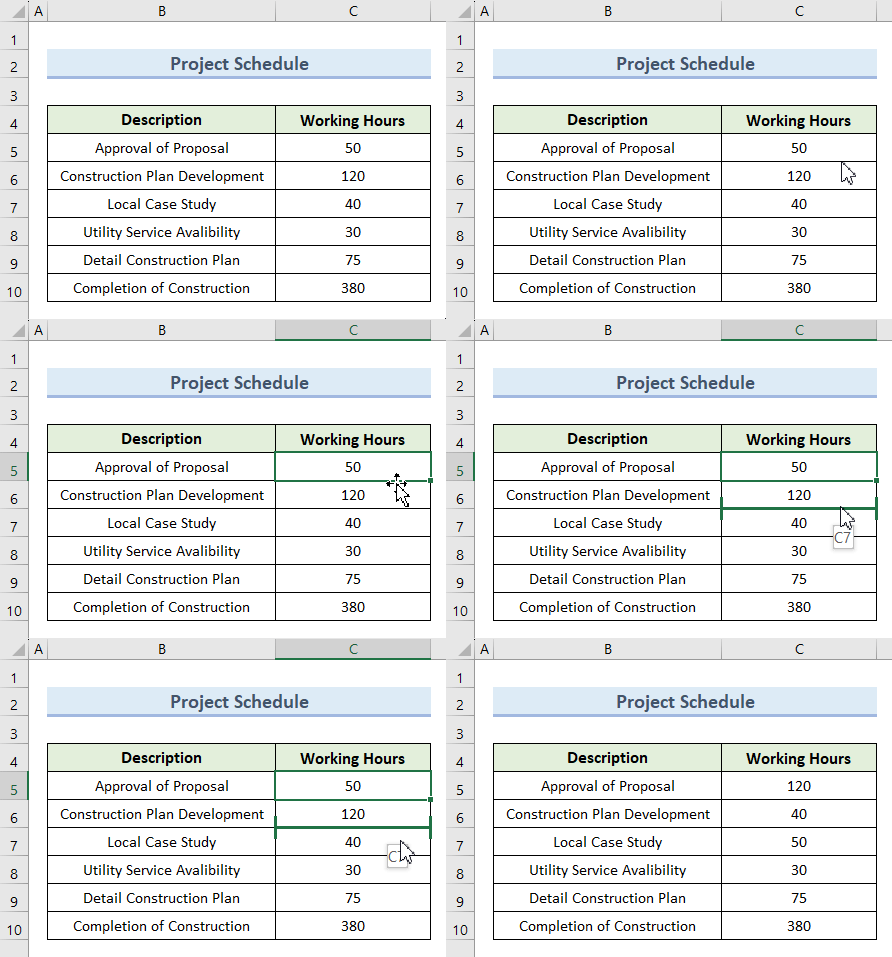
5.3 Drag and Insert: Shift + Drag
If you need to exchange and insert cell values, press Shift + Drag to do the action.
Note: For Mac users, press Shift (⇧) + Drag.
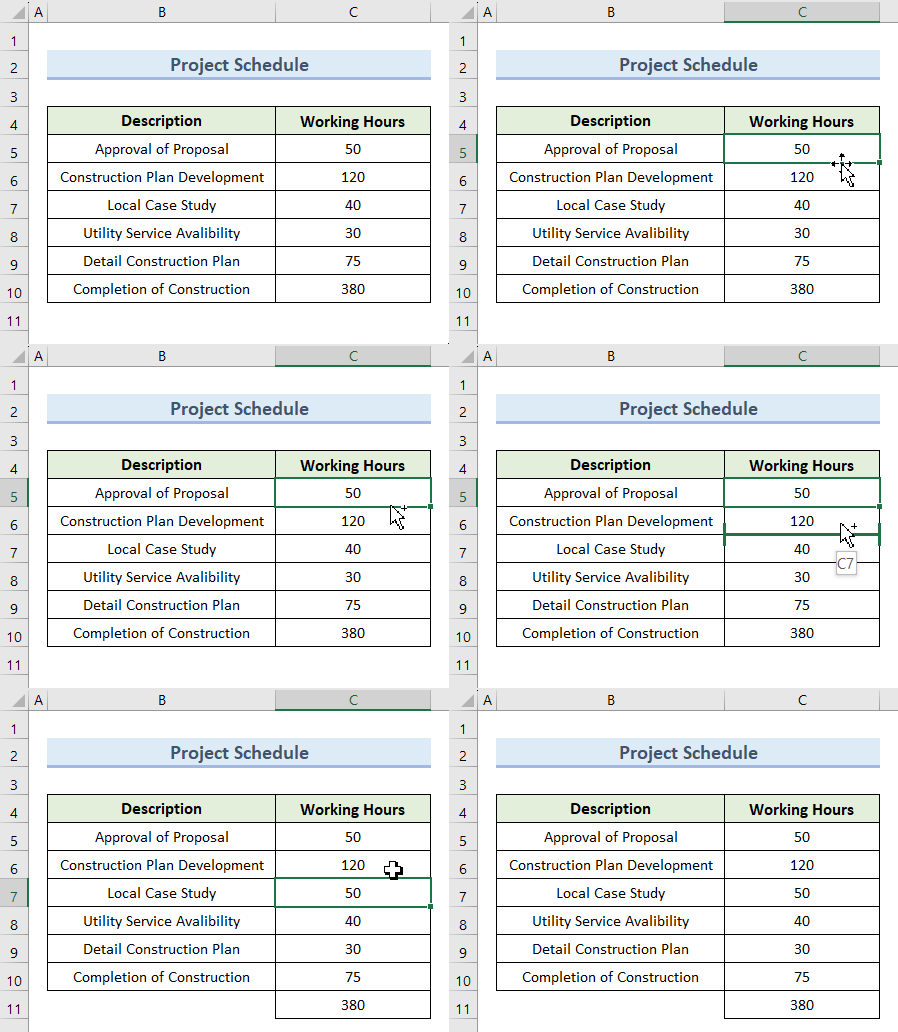
5.4 Drag and Insert Copy: Ctrl + Shift + Drag
When you press Ctrl + Shift + Drag to select any cell, it will be placed in the specified location, dragging the rest of the cell values downward.
Note: For Mac users, press Control (^) + Shift (⇧) + Drag.
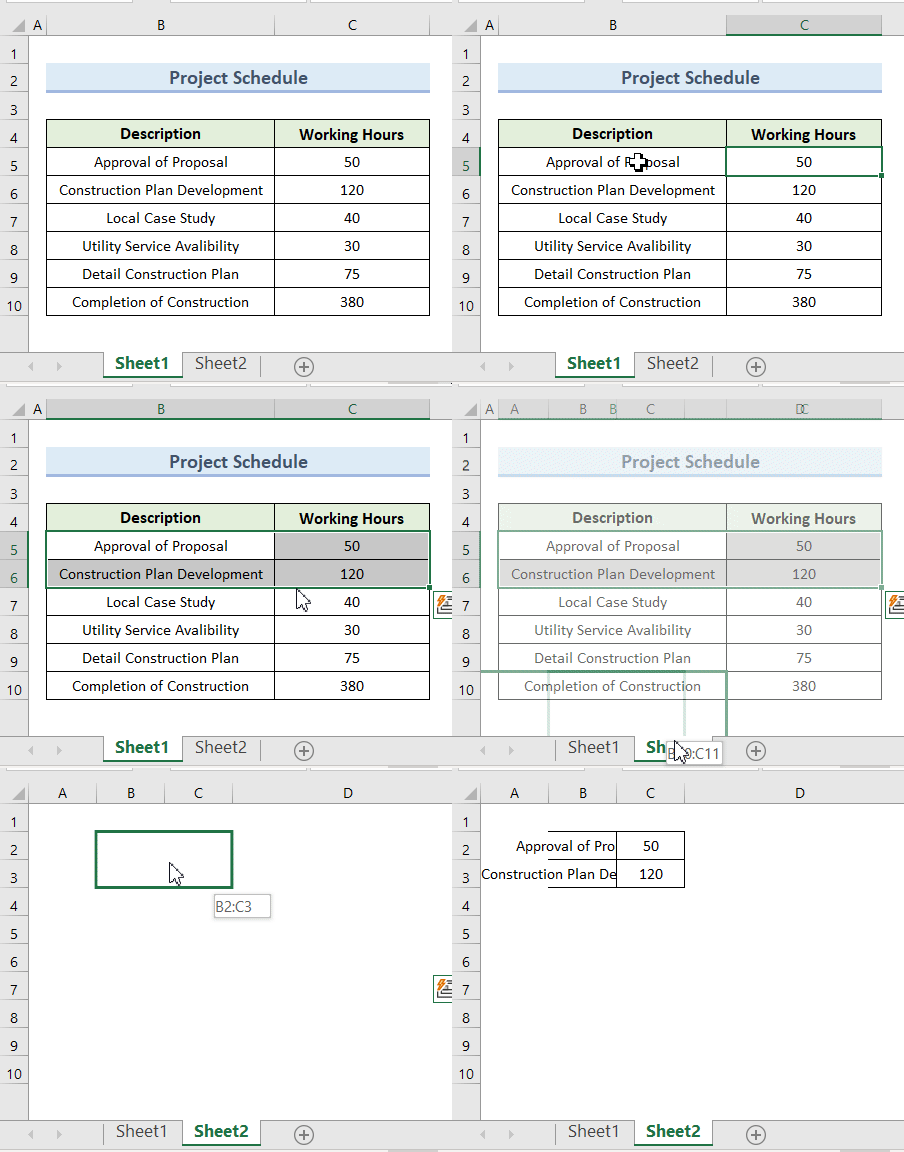
5.5 Drag to Worksheet: Alt + Drag
To drag a cell value to another worksheet, apply the shortcut Alt + Drag.
Note: For Mac users, press Command (⌘) + Drag.
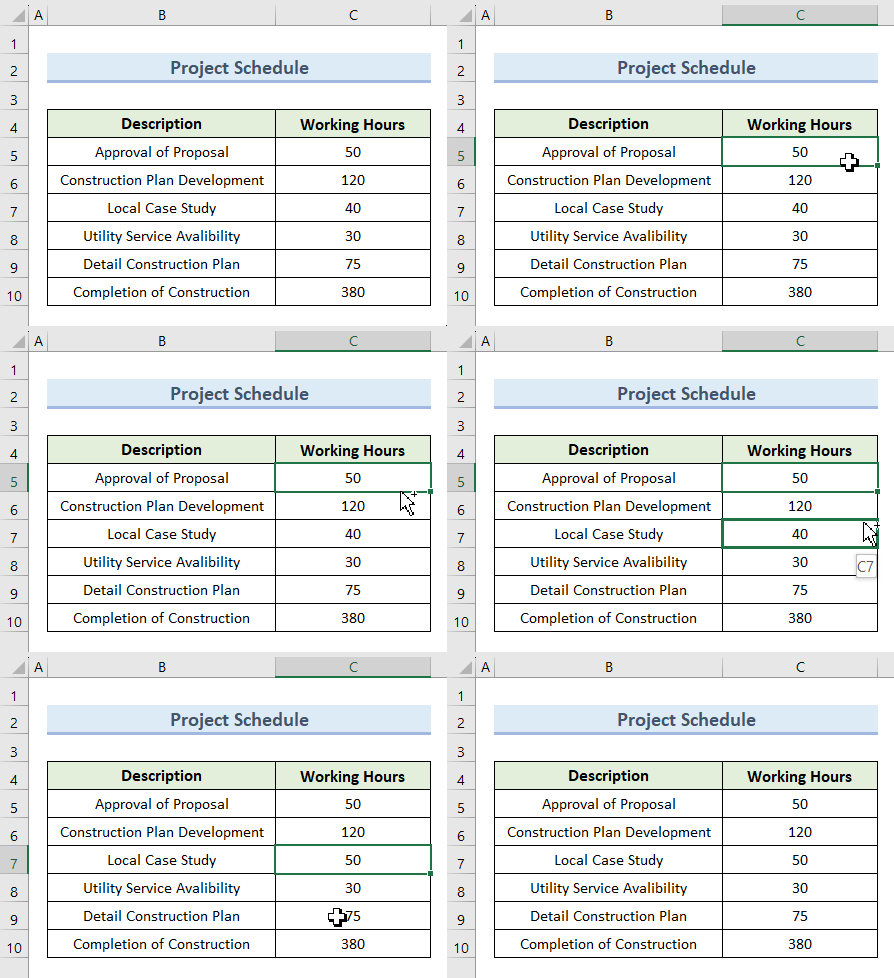
5.6 Drag to Duplicate Worksheet: Ctrl + Drag
To drag value to a duplicate worksheet, press Ctrl + Drag to perform the action.
Note: For Mac users, press Option/Alt (⌥) + Drag.
6. Navigation Shortcuts
| Actions | Windows Shortcut |
|---|---|
| Move one cell right | → |
| Move one cell left | ← |
| Move one cell up | ↑ |
| Move one cell down | ↓ |
| Move one screen right | Alt + PgDn |
| Move one screen left | Alt + PgUp |
| Move one screen up | PgUp |
| Move one screen down | PgDn |
| Move to the right edge of data region | Ctrl + → |
| Move to the left edge of data region | Ctrl + ← |
| Move to the top edge of data region | Ctrl + ↑ |
| Move to the bottom edge of data region | Ctrl + ↓ |
| Move to the beginning of row | Home |
| Move to last cell in worksheet that contains data | Ctrl + End |
| Move to the first cell in worksheet | Ctrl + Home |
| Turn End mode on | End |
6.1 Move One Cell Right: →
Press the Right Arrow (→) button to move one cell right.

Note: For Mac users, press →
6.2 Move One Cell Left: ←
Press the Left Arrow (←) button to move one cell left.

Note: For Mac users, press ←
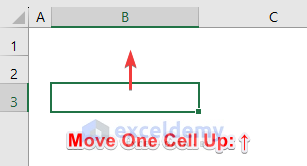
6.3 Move One Cell Up: ↑
Press the Up Arrow (↑) button to move one cell up.
Note: For Mac users, press ↑
6.4 Move One Cell Down: ↓
Press the Down Arrow (↓) button to move one cell up.
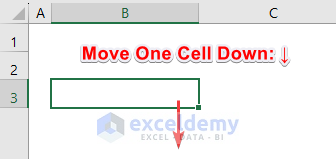
Note: For Mac users, press ↓.
6.5 Move One Screen Right: Alt + PgDn
To swipe through each screen of your workbook to the right way, press Alt + PgDn.
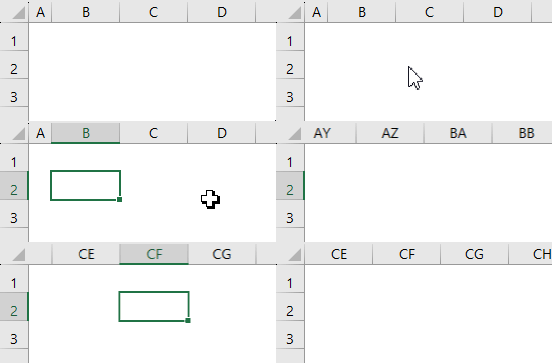
Note: For Mac users, press Function (Fn) + Option/Alt (⌥) + ↓
6.6 Move One Screen Left: Alt + PgUp
To swipe through each screen of your workbook to the left way, press Alt + PgUp.
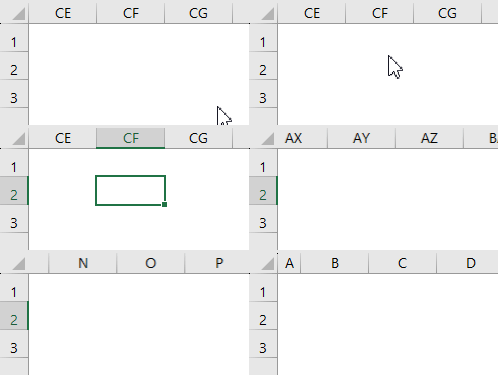
Note: For Mac users, press Function (Fn) + Option/Alt (⌥) + ↑
6.7 Move One Screen Up: PgUp
To swipe upward through each screen of your workbook, press PgUp.
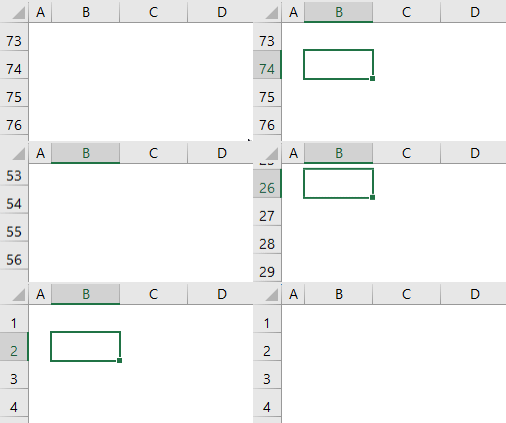
Note: For Mac users, press Function (Fn) + ↑
6.8 Move One Screen Down: PgDn
To swipe downward through each screen of your workbook, press PgDn.
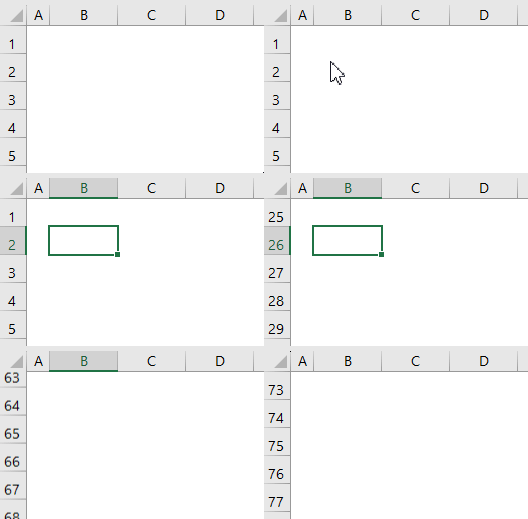
Note: For Mac users, press Function (Fn) + ↓
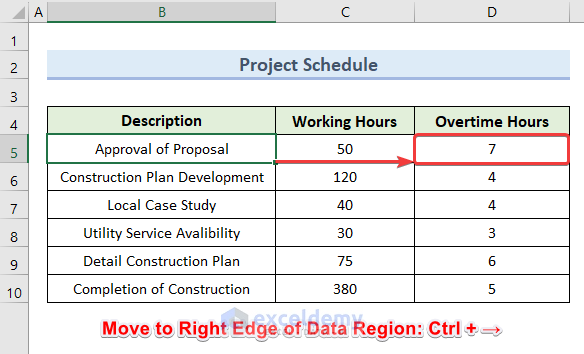
6.9 Move to Right Edge of Data Region: Ctrl + →
To move to the rightmost cell of your dataset of the same row, press Ctrl + →.
Note: For Mac users, press Control (^) + →
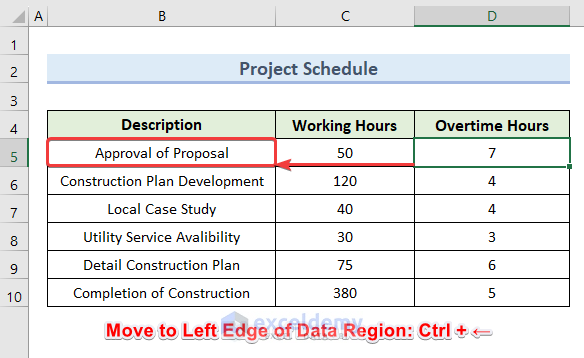
6.10 Move to Left Edge of Data Region: Ctrl + ←
To move to the leftmost cell of your dataset of the same row, press Ctrl + ←.
Note: For Mac users, press Control (^) + ←
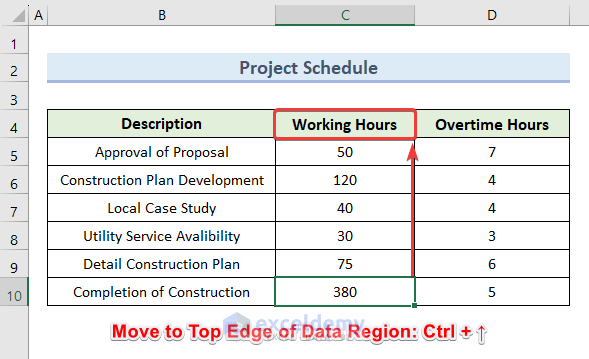
6.11 Move to Top Edge of Data Region: Ctrl + ↑
To move to the topmost cell of your dataset of the same column, press Ctrl + ↑.
Note: For Mac users, press Control (^) + ↑
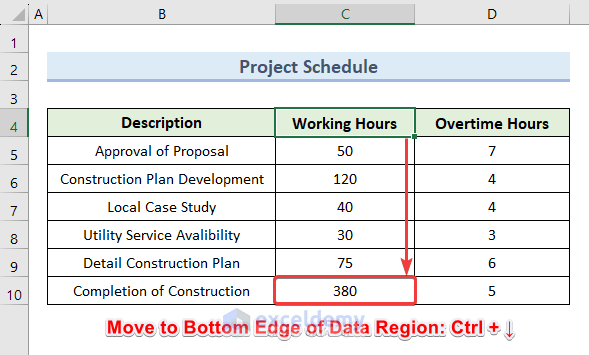
6.12 Move to Bottom Edge of Data Region: Ctrl + ↓
To move to the bottom edge cell of your dataset of the same column, press Ctrl + ↓.
Note: For Mac users, press Control (^) + ↓
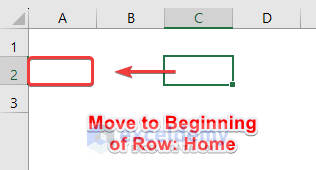
6.13 Move to Beginning of Row: Home
To move to the beginning of the same row, press Home.
Note: For Mac users, press Function (Fn) + ←
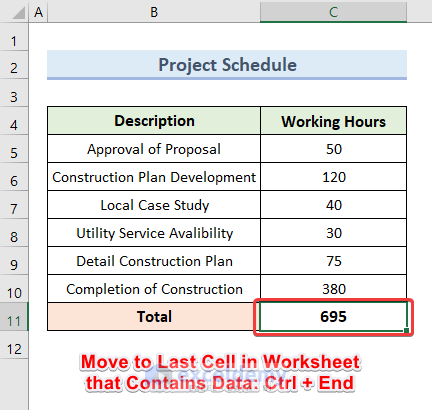
6.14 Move to Last Cell in Worksheet that Contains Data: Ctrl + End
Press Ctrl + End to jump to the last cell of data in your worksheet. It’s mostly helpful for large datasets.
Note: For Mac users, press Function (Fn) + Control (^) + →
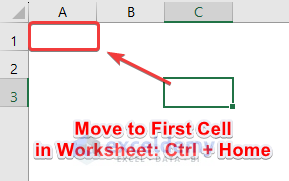
6.15 Move to First Cell in Worksheet: Ctrl + Home
To move to the first cell from any cell inside the worksheet, press Ctrl + Home.
Note: For Mac users, press Function (Fn) + Control (^) + ←
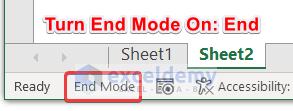
6.16 Turn End Mode On: End
Press the End button on your keyboard to turn the End Mode on.
Note: For Mac users, press Function (Fn) + →
7. Selection Shortcuts
| Actions | Windows Shortcut |
|---|---|
| Select entire row | Shift + Space |
| Select entire column | Ctrl + Space |
| Select entire worksheet | Ctrl + A |
| Add adjacent cells to selection | Shift + Click |
| Add non-adjacent cells to selection | Ctrl + Click |
| Move right between non-adjacent selections | Ctrl + Alt + → |
| Move left between non-adjacent selections | Ctrl + Alt + ← |
| Toggle add to selection mode | Shift + F8 |
| Cancel selection | Esc |
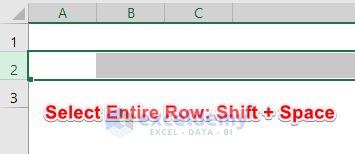
7.1 Select Entire Row: Shift + Space
Press Shift + Space to select the entire row of the active cell.
Note: For Mac users, press Shift (⇧) + Space
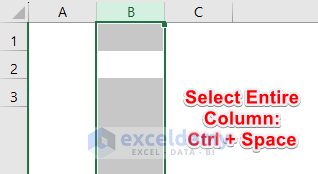
7.2 Select Entire Column: Ctrl + Space
Select the entire column of the active cell by pressing Ctrl + Space.
Note: For Mac users, press Control (^) + Space
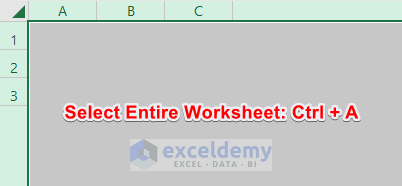
7.3 Select Entire Worksheet: Ctrl + A
To apply any settings for every cell of the worksheet, press Ctrl + A to select the whole worksheet and apply your preference settings.
Note: For Mac users, press Command (⌘) + Space
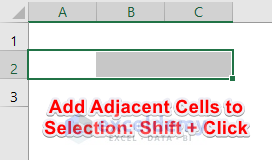
7.4 Add Adjacent Cells to Selection: Shift + Click
Press Shift + Click to select cells that are adjacent to each other.
Note: For Mac users, press Shift (⇧) + Space
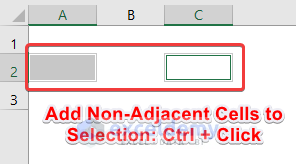
7.5 Add Non-Adjacent Cells to Selection: Ctrl + Click
To select non-adjacent cells, press Ctrl + Click for each cell and apply your action.
Note: For Mac users, press Control (^) + Space
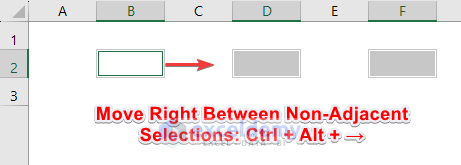
7.6 Move Right Between Non-Adjacent Selections: Ctrl + Alt + →
Suppose you have 3 randomly selected non-adjacent cells in B2, D2, and F2, where B2 is an active cell. To move from B2 to F2, use Ctrl + Alt + →
Note: For Mac users, press Control (^) + Option/Alt (⌥) + →
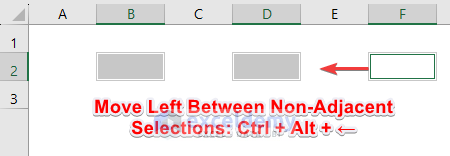
7.7 Move Left Between Non-Adjacent Selections: Ctrl + Alt + ←
When you have selected non-adjacent cells in B2, D2, and F2, where the active cell is F2. To move from F2 to B2, use Ctrl + Alt + ←
Note: For Mac users, press Control (^) + Option/Alt (⌥) + ←
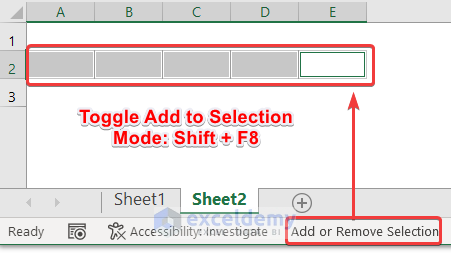
7.8 Toggle Add to Selection Mode: Shift + F8
Turn on the Add or Remove Selection mode for your worksheet by pressing Shift + F8. You can then select other cells randomly.
Note: For Mac users, press Shift (⇧) + Function (Fn) + F8
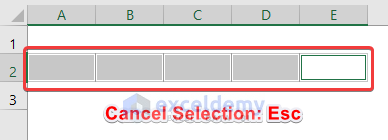
7.9 Cancel Selection: Esc
Press Esc to cancel the selection of cells.
Note: For Mac users, press Esc.
8. Extend Selection Shortcuts
| Actions | Windows Shortcut |
|---|---|
| Extend selection right | Shift + → |
| Extend selection left | Shift + ← |
| Extend selection up | Shift + ↑ |
| Extend selection down | Shift + ↓ |
| Extend the Selection to the Last Cell Right | Ctrl + Shift + → |
| Extend the Selection to the Last Cell Left | Ctrl + Shift + ← |
| Extend the Selection to the Last Cell Up | Ctrl + Shift + ↑ |
| Extend the Selection to the Last Cell Down | Ctrl + Shift + ↓ |
| Extend selection up one screen | Shift + PgUp |
| Extend selection down one screen | Shift + PgDn |
| Extend selection right one screen | Alt + Shift + PgDn |
| Extend selection left one screen | Alt + Shift + PgUp |
| Extend selection to start of row(s) | Shift + Home |
| Extend selection to first cell in worksheet | Ctrl + Shift + Home |
| Extend selection to last cell in worksheet | Ctrl + Shift + End |
| Toggle ‘Extend Selection’ mode | F8 |
| Cancel ‘Extend Selection’ mode | Esc |
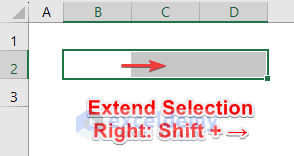
8.1 Extend Selection Right: Shift + →
To extend cell selection to the right side, press Shift + →
Note: For Mac users, press Shift (⇧) + →
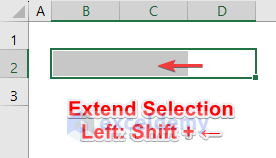
8.2 Extend Selection Left: Shift + ←
To extend cell selection to the left side, press Shift + ←
Note: For Mac users, press Shift (⇧) + ←
8.3 Extend Selection Up: Shift + ↑
To extend cell selection to upward, press Shift + ↑
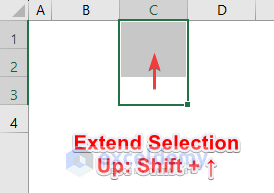
Note: For Mac users, press Shift (⇧) + ↑
8.4 Extend Selection Down: Shift + ↓
To extend cell selection to upward, press Shift + ↓
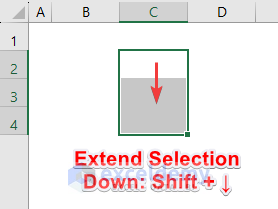
Note: For Mac Users, press Shift (⇧) + ↓
8.5 Extend Selection to Last Cell Right: Ctrl + Shift + →
To extend cell selection to the rightmost last cell, press Ctrl + Shift + →
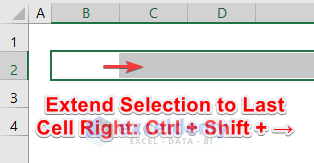
Note: For Mac users, press Control (^) + Shift (⇧) + →
8.6 Extend Selection to Last Cell Left: Ctrl + Shift + ←
To extend cell selection to the leftmost last cell, press Ctrl + Shift + ←
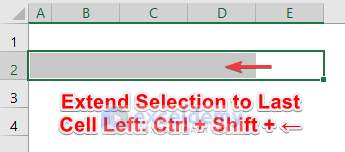
Note: For Mac users, press Control (^) + Shift (⇧) + ←
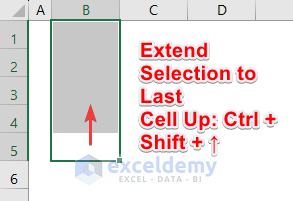
8.7 Extend Selection to Last Cell Up: Ctrl + Shift + ↑
To extend cell selection to the last cell upward, press Ctrl + Shift + ↑
Note: For Mac users, press Control (^) + Shift (⇧) + ↑
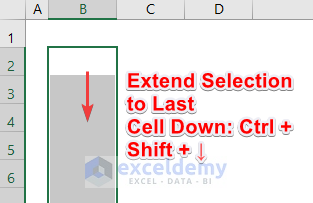
8.8 Extend Selection to Last Cell Down: Ctrl + Shift + ↓
To extend cell selection to the last cell downward, press Ctrl + Shift + ↓
Note: For Mac users, press Control (^) + Shift (⇧) + ↓
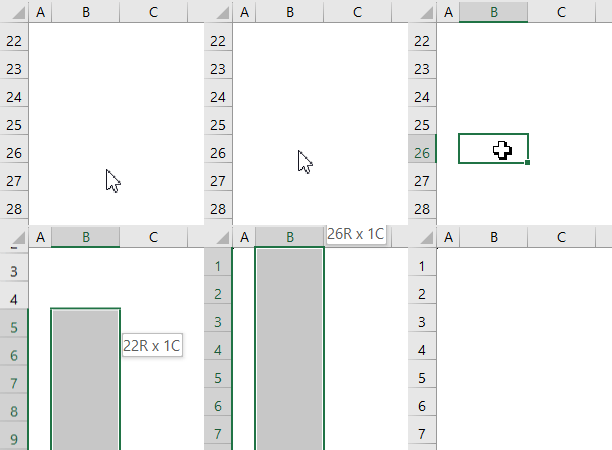
8.9 Extend Selection Up One Screen: Shift + PgUp
To extend cell selection upward once per screen, press Shift + PgUp on the keyboard.
Note: For Mac users, press Shift (⇧) + Function (Fn) + ↑
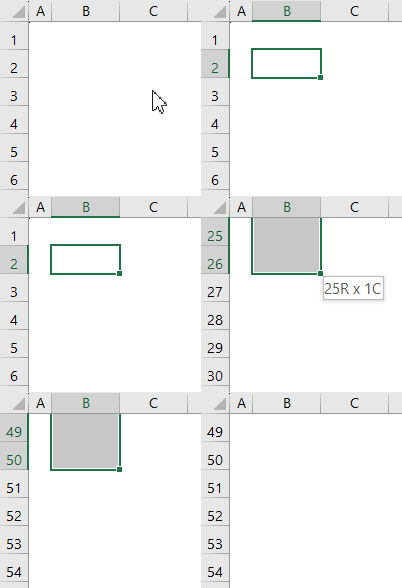
8.10 Extend Selection Down One Screen: Shift + PgDn
To extend cell selection downward once per screen, press Shift + PgDn on the keyboard.
Note: For Mac users, press Shift (⇧) + Function (Fn) + ↓
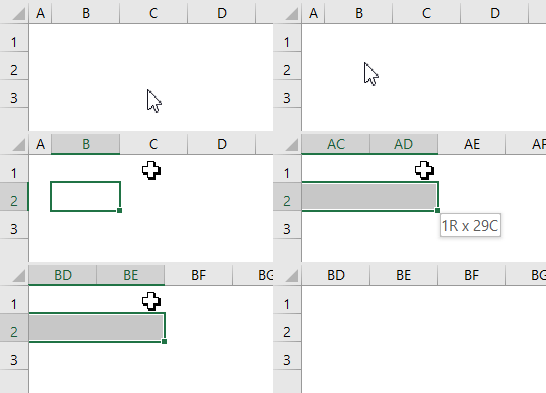
8.11 Extend Selection Right One Screen: Alt + Shift + PgDn
To extend cell selection the right way once per screen, press Alt + Shift + PgDn on the keyboard.
Note: For Mac users, press Function (Fn) + Shift (⇧) + Option/Alt (⌥) + ↓
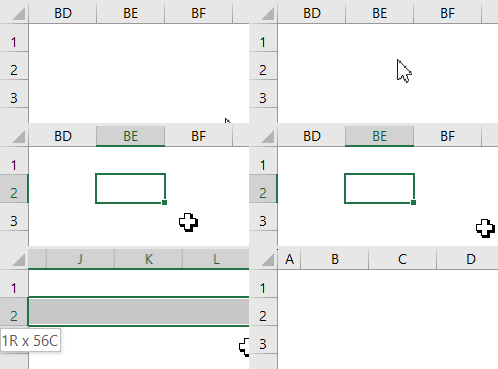
8.12 Extend Selection Left One Screen: Alt + Shift + PgUp
To extend cell selection the left way once per screen, press Alt + Shift + PgUp on the keyboard.
Note: For Mac users, press Function (Fn) + Shift (⇧) + Option/Alt (⌥) + ↑
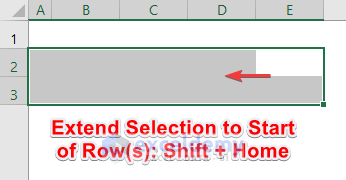
8.13 Extend Selection to Start of Row(s): Shift + Home
To extend cell selection to the start of active cell(s) rows, press Shift + Home on the keyboard.
Note: For Mac users, press Shift (⇧) + Function (Fn) + ←
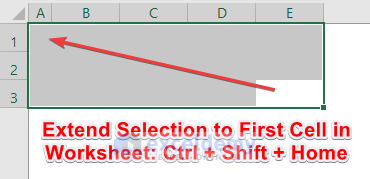
8.14 Extend Selection to First Cell in Worksheet: Ctrl + Shift + Home
To extend cell selection to the first cell from the active cell in your worksheet, press Ctrl + Shift + Home on the keyboard.
Note: For Mac users, press Control (^) + Shift (⇧) + Function (Fn) + ←
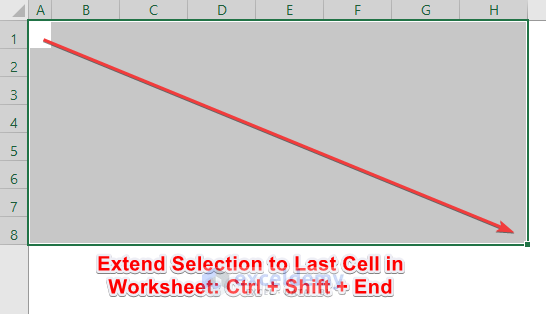
8.15 Extend Selection to Last Cell in Worksheet: Ctrl + Shift + End
To extend cell selection to the last cell from the active cell in your worksheet, press Ctrl + Shift + End on the keyboard.
Note: For Mac users, press Control (^) + Shift (⇧) + Function (Fn) + →
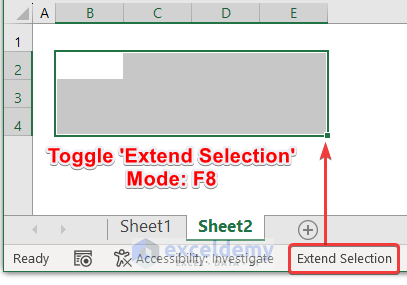
8.16 Toggle ‘Extend Selection’ Mode: F8
Press F8 to toggle Extend Selection mode and select multiple cells at a time in the same worksheet.
Note: For Mac users, press Function (Fn) + F8
8.17 Cancel ‘Extend Selection’ Mode: Esc
Press Esc to cancel the Extend Selection mode.
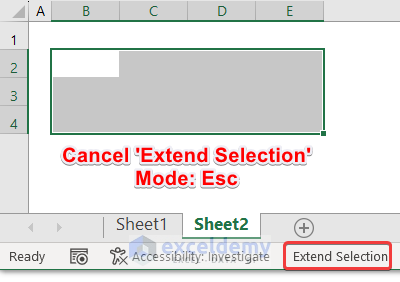
You can also use the F8 shortcut.
Note: For Mac users, press Esc
9. Active Cell Shortcuts
| Actions | Windows Shortcut |
|---|---|
| Select the active cell (when multiple cells are already selected) | Shift + Backspace |
| Show the active cell on the worksheet | Ctrl + Backspace |
| Move active cell clockwise to corners of the selection | Ctrl + . |
| Move active cell down in selection | Enter |
| Move active cell up in selection | Shift + Enter |
| Move active cell right in a selection | Tab |
| Move active cell left in a selection | Shift + Tab |
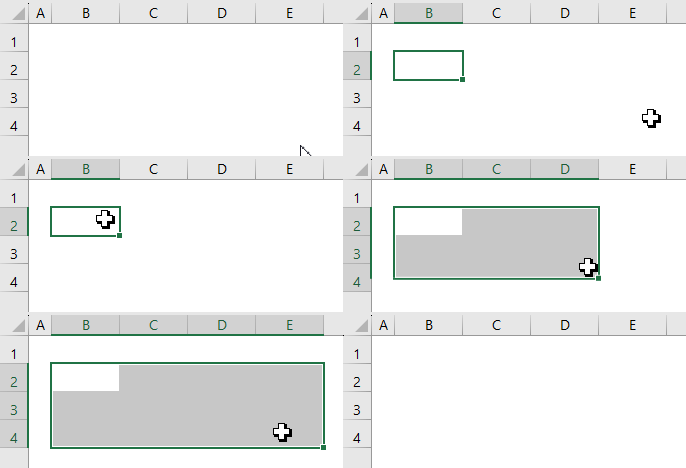
9.1 Select Active Cell (when multiple cells are already selected): Shift + Backspace
To select the active cell while multiple cells are selected, press Shift + Backspace on your keyboard.
Note: For Mac users, press Shift (⇧) + Delete
9.2 Show Active Cell on Worksheet: Ctrl + Backspace
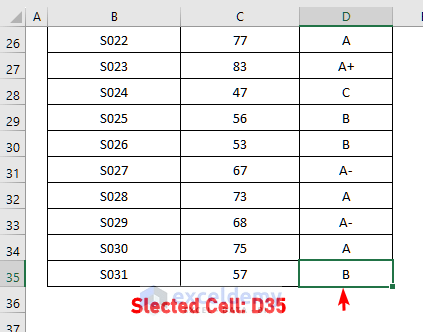
Suppose you have a large dataset of student records. You scrolled up after selecting the cell D35 with the value B. To find the selected/active cell, use the keyboard shortcut Ctrl + Backspace.
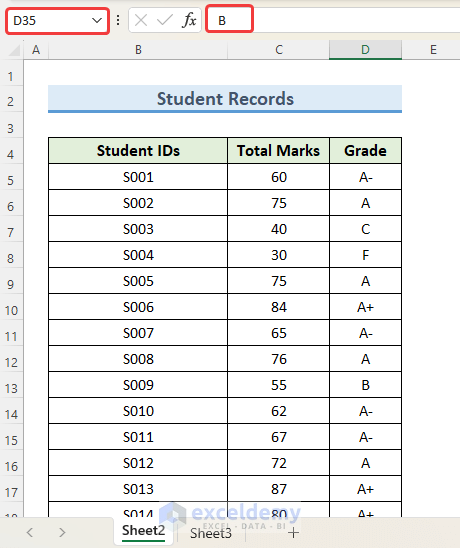
The shortcut will take you to the selected cell D35, as shown in the following image.
Note: For Mac users, press Command (⌘) + Delete
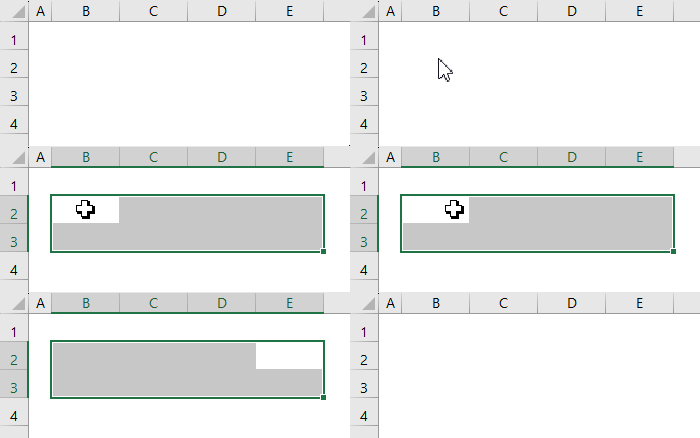
9.3 Move Active Cell Clockwise to Corners of Selection: Ctrl + .
Press Ctrl + . to move the active cell in a clockwise direction to the corners of selected cells.
Note: For Mac users, press Control (^) + .
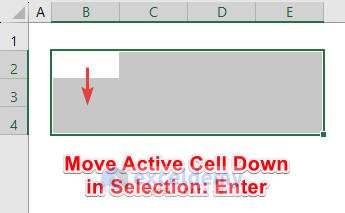
9.4 Move Active Cell Down in Selection: Enter
While selecting multiple cells, press Enter to move the active cell downwards.
Note: For Mac users, press Return
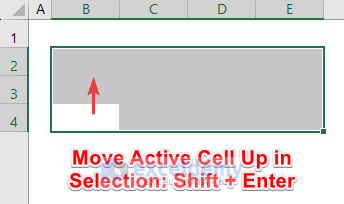
9.5 Move Active Cell Up in Selection: Shift + Enter
While selecting multiple cells, press Shift + Enter to move the active cell upwards.
Note: For Mac users, press Shift (⇧) + Return.
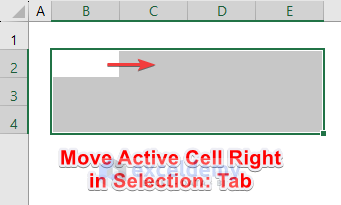
9.6 Move Active Cell Right in Selection: Tab
While selecting multiple cells, press Tab to move the active cell on the right side.
Note: For Mac users, press Tab.
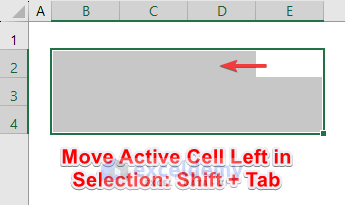
9.7 Move Active Cell Left in Selection: Shift + Tab
While selecting multiple cells, press Shift + Tab to move the active cell on the left side.
Note: For Mac users, press Shift (⇧) + Tab.
10. Select Special Shortcuts
| Actions | Windows Shortcut |
|---|---|
| Display ‘Go To’ dialog box | Ctrl + G or F5 |
| Select cells with Notes | Ctrl + Shift + O |
| Select current region around active cell | Ctrl + Shift + * |
| Select current region | Ctrl + A |
| Select Row Differences | Ctrl + Shift + | |
| Select Column Differences | Ctrl + \ |
| Select direct precedents | Ctrl + [ |
| Select all precedents | Ctrl + Shift + { |
| Select direct dependents | Ctrl + ] |
| Select all dependents | Ctrl + Shift + } |
| Select visible cells only | Alt + ; |
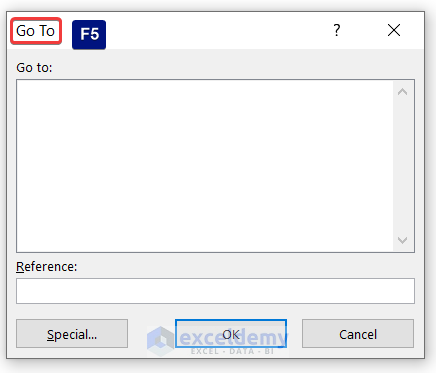
10.1 Display ‘Go To’ Dialog Box: Ctrl + G or F5
To open the Go To dialogue box, press Ctrl + G or F5 on your keyboard.
Note: For Mac users, press Control (^) + G.
10.2 Select Cells with Notes: Ctrl + Shift + O
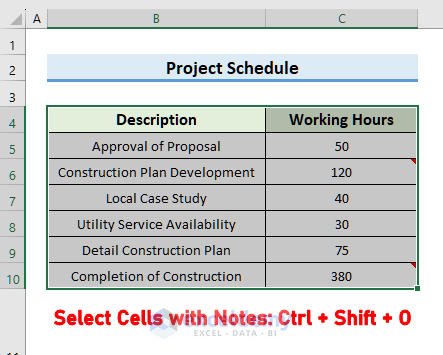
The following dataset has 2 notes in cells C6 and C10.
Select the whole data range B4:C10 >> use the shortcut: Ctrl + Shift + O.
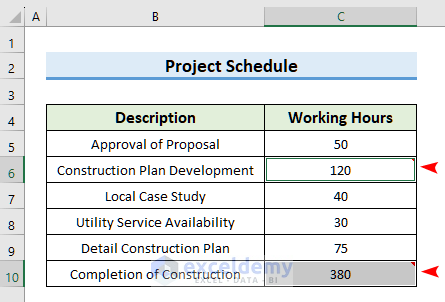
As you can see in the following image, this shortcut selects the cells with notes.
Note: For Mac users, press Function (Fn) + Control (^) + Shift (⇧) + O.
10.3 Select Current Region Around Active Cell: Ctrl + Shift + *
Press Ctrl + Shift + * to select the current region around the active cell among multiple selections.
Note: For Mac users, press Shift (⇧) + Control (^) + Space.
10.4 Select Current Region: Ctrl + A
If the active cell is within or between ranges, press Ctrl+A to select the current region in the worksheet.
>> Press CTRL + A again to select the entire worksheet.
Note: For Mac users, press Command (⌘) + A.
10.5 Select Row Differences: Ctrl + Shift + |
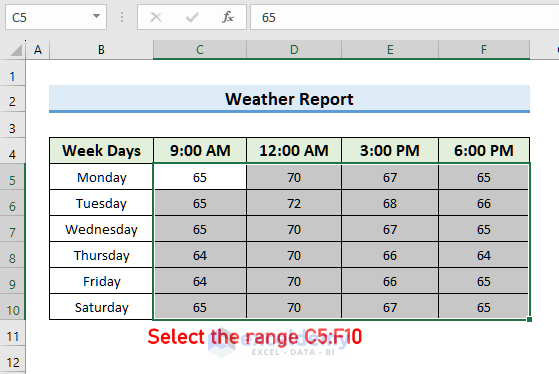
The following dataset has a Weather Report for a particular week. The temperature for each day is recorded in oF. Let’s find which rows differ from the first row.
Select the data range C5:F10 such that C5 is the active cell.
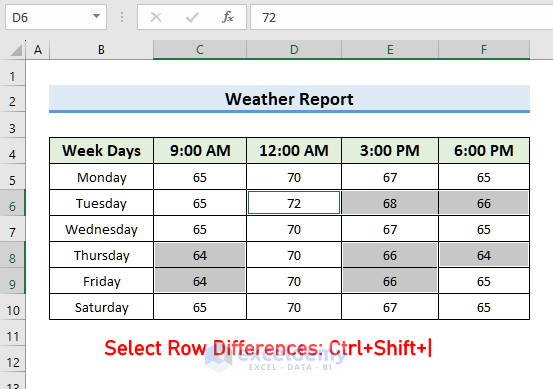
Use the keyboard shortcut Ctrl + Shift + |.
You get the row differences with selected cells, as shown in the following image.
Note: For Mac users, press Control (^) + Shift(⇧) + \
10.6 Select Column Differences: Ctrl + \
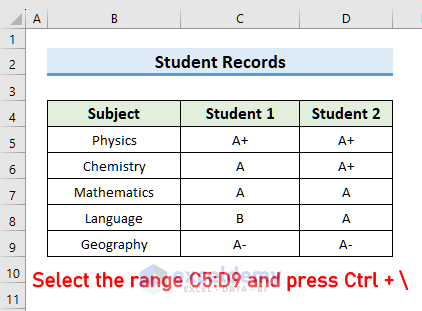
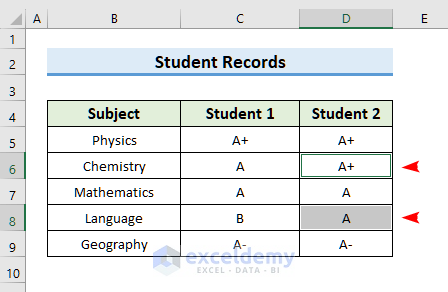
In the following dataset, columns C and D contain the different grades of 2 students for several subjects. Here, the grades of Chemistry and Language are different from each other.
Select the data range C5:D9 and use the shortcut Ctrl + \.
The column differences are selected as shown in the following image.
10.7 Select Direct Precedents: Ctrl + [
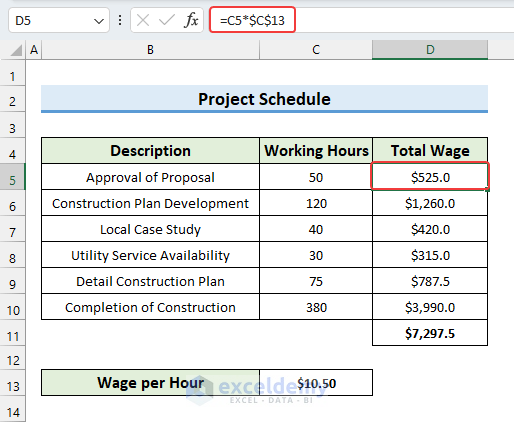
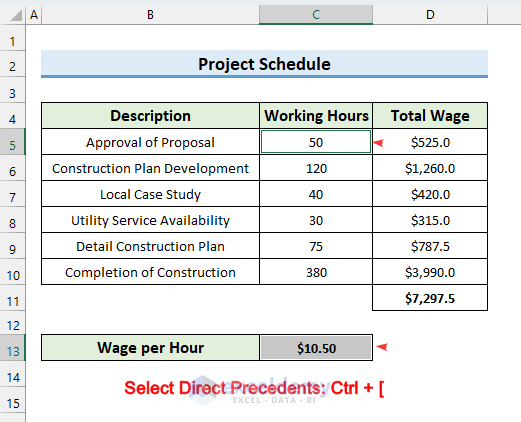
In our dataset, the direct precedents of cell D5 are C5 and $C$13.
To select the direct precedents of the D5 cell, select the D5 cell and use the keyboard shortcut Ctrl + [.
Note: For Mac users, press Control (^) + [
10.8 Select All Precedents: Ctrl + Shift + {
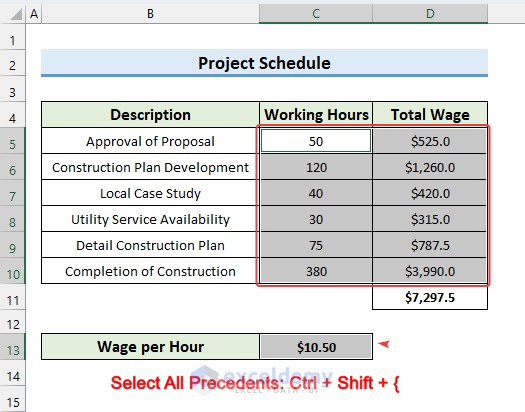
The formula in the D11 cell depends on the data range D5:D10 which is also dependent on the data range C5:C10 and cell $C$13.
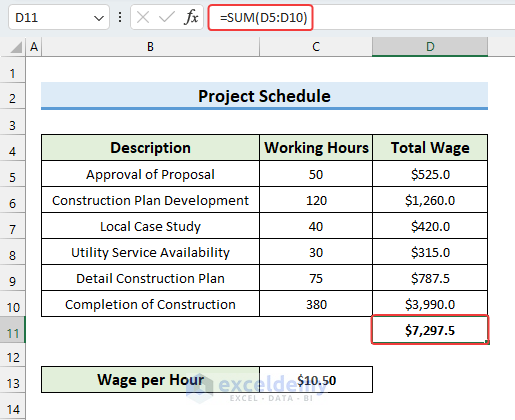
To select all these precedents, select the D11 cell and use the keyboard shortcut Ctrl + Shift + {.
Note: For Mac users, press Control (^) + Shift (⇧) + {
10.9 Select Direct Dependents: Ctrl + ]
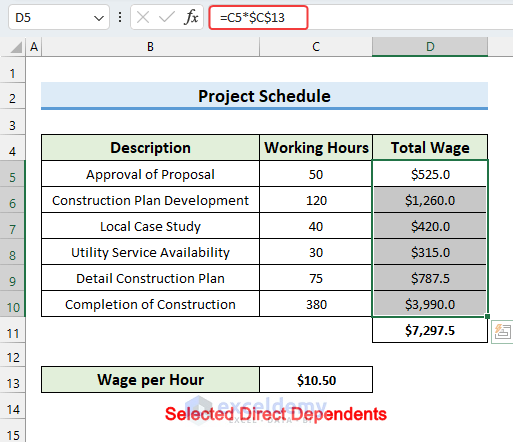
The direct dependents of range C5:C10 are range D5:D10. To select these direct dependents, select the range C5:C10 and use the shortcut Ctrl + ].
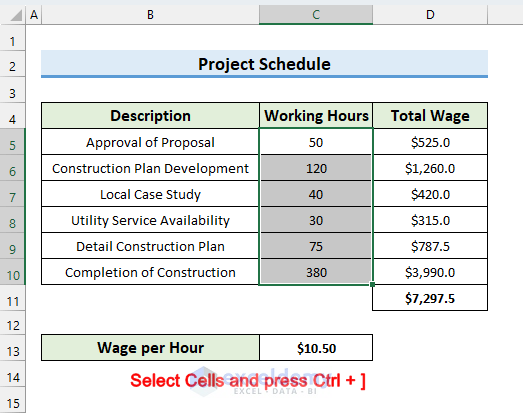
This shortcut selects the direct dependents of the range C5:C10 as shown in the following image.
Note: For Mac users, press Control (^) + ]
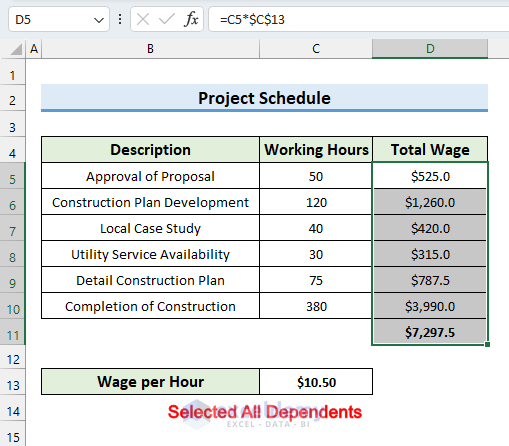
10.10 Select All Dependents: Ctrl + Shift + }
To select all dependents of range C5:C10, select range C5:C10 and use the keyboard shortcut Ctrl + Shift + }.
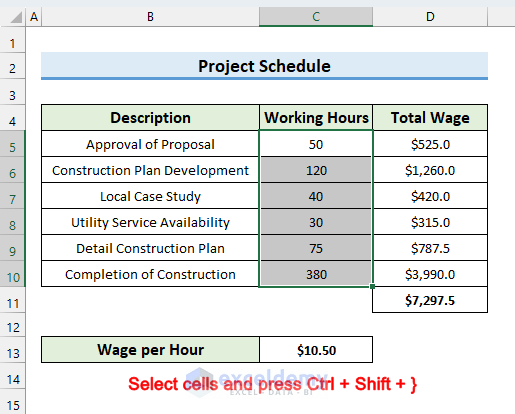
This shortcut selects all the dependents of the range C5:C10 as shown in the following image.
Note: For Mac users, press Control (^) + Shift (⇧) + }
10.11 Select Visible Cells Only: Alt + ;
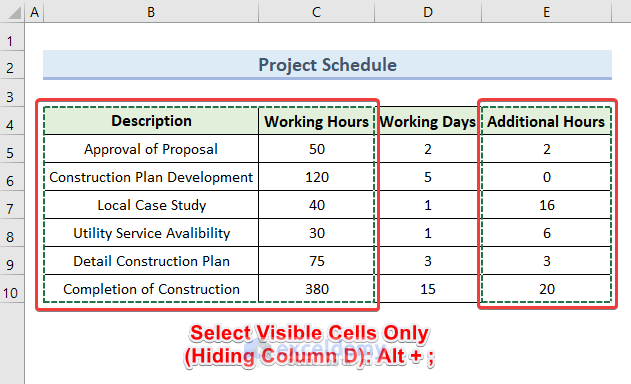
Within a large dataset, after hiding specific columns that you don’t need to copy when you select the dataset afterward, it will, either way, paste the whole dataset with the hidden column.
To solve this, after hiding the column, select the whole dataset and press Alt + ; to select visible cells only >> unhide the column and you will see that the selected cells are bordered with a dotted line >> copy-paste it wherever you need and it will not paste the data of the hidden column.
Note: For Mac users, press Command (⌘) + Shift (⇧) + Z.
11. Cell Edit Shortcuts
| Actions | Windows Shortcut |
|---|---|
| Edit active cell | F2 |
| Insert or edit Notes | Shift + F2 |
| Delete comment | Shift + F10, M |
| Cancel editing | Esc |
| Select one character right | Shift + → |
| Select one character left | Shift + ← |
| Move one word right | Ctrl + → |
| Move one word left | Ctrl + ← |
| Select one word right | Ctrl + Shift + → |
| Select one word left | Ctrl + Shift + ← |
| Select to the beginning of cell | Shift + Home |
| Select to end of cell | Shift + End |
| Delete to end of line | Ctrl + Delete |
| Delete character to left of cursor | Backspace |
| Delete character to the right of cursor | Delete |
| Start a new line in the same cell | Alt + Enter |
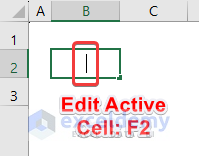
11.1 Edit Active Cell: F2
Press F2 to edit any active cell.
Note: For Mac users, press Control (^) + U
11.2 Insert or Edit Notes: Shift + F2
To insert or edit any previous notes inside a cell, press Shift + F2 on your keyboard.
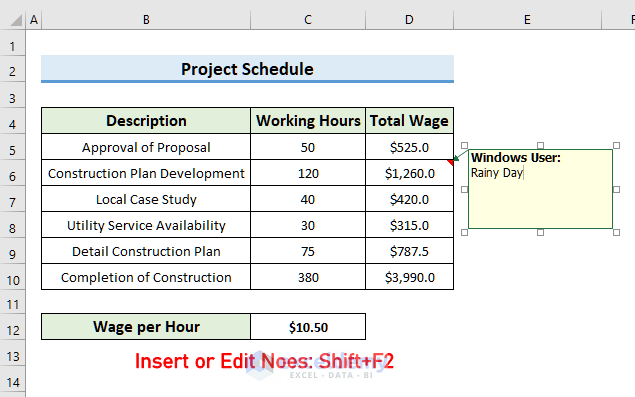
Note: For Mac users, press Shift (⇧) + Function (Fn) + F2.
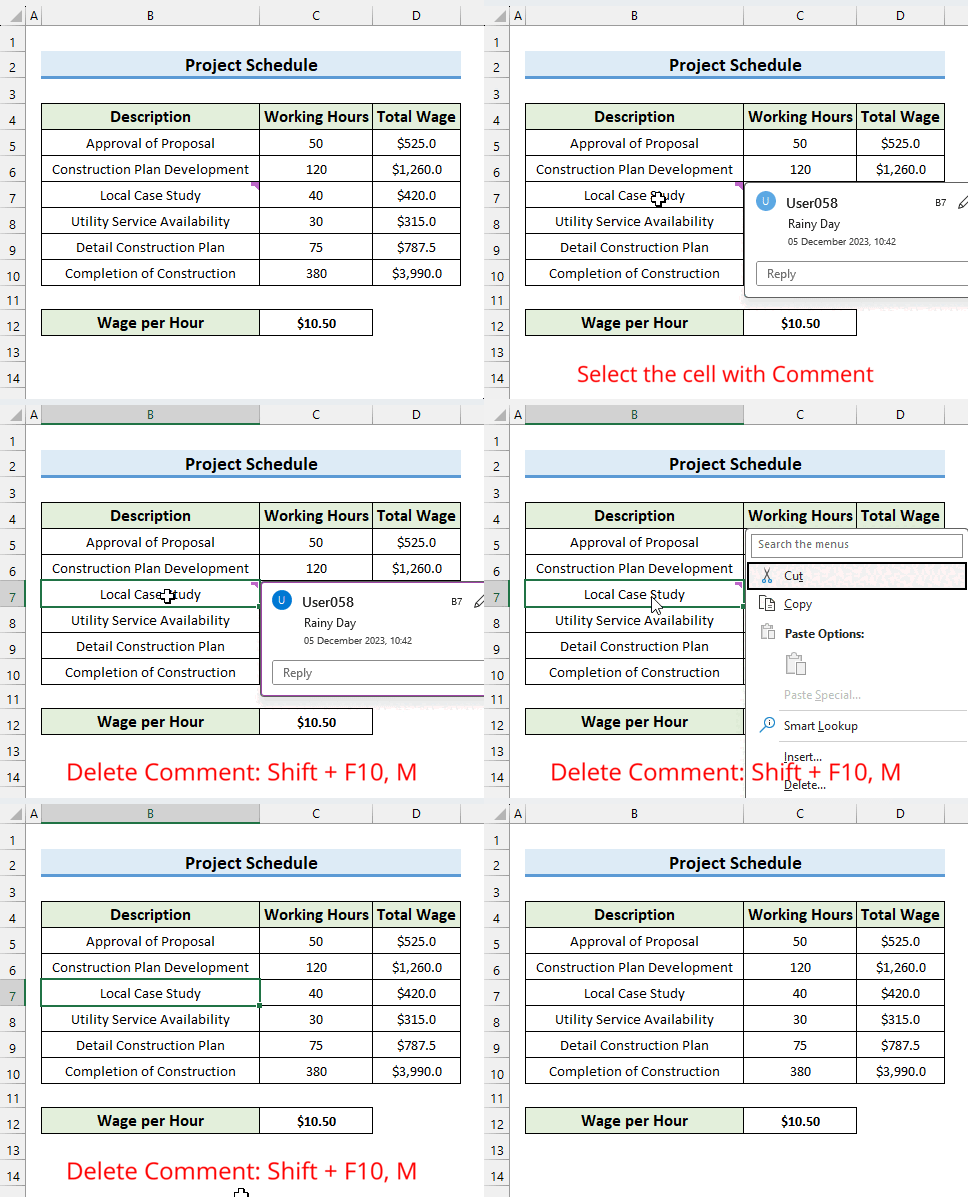
11.3 Delete Comment: Shift + F10, M
Insert a comment in your desired cell.
To delete the comment, select the cell with the commet >> use the keyboard shortcut Shift + F10, M.
The following GIF shows the method in detail.
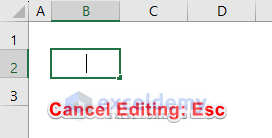
11.4 Cancel Editing: Esc
Press Esc to cancel any sort of editing inside an active cell.
Note: For Mac users, press Esc
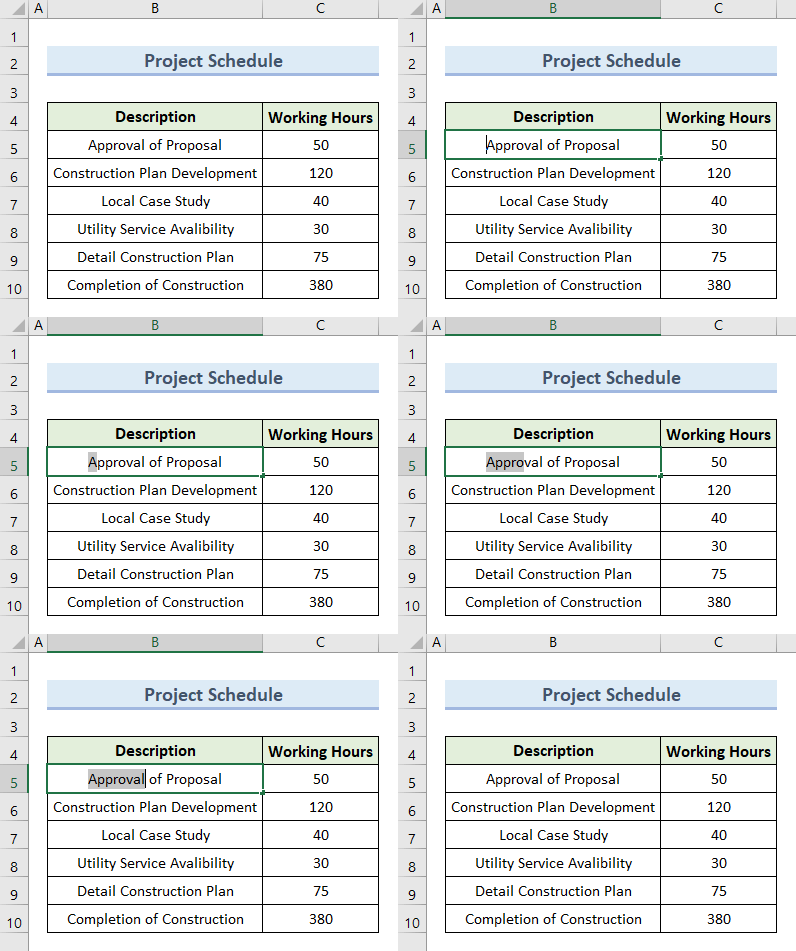
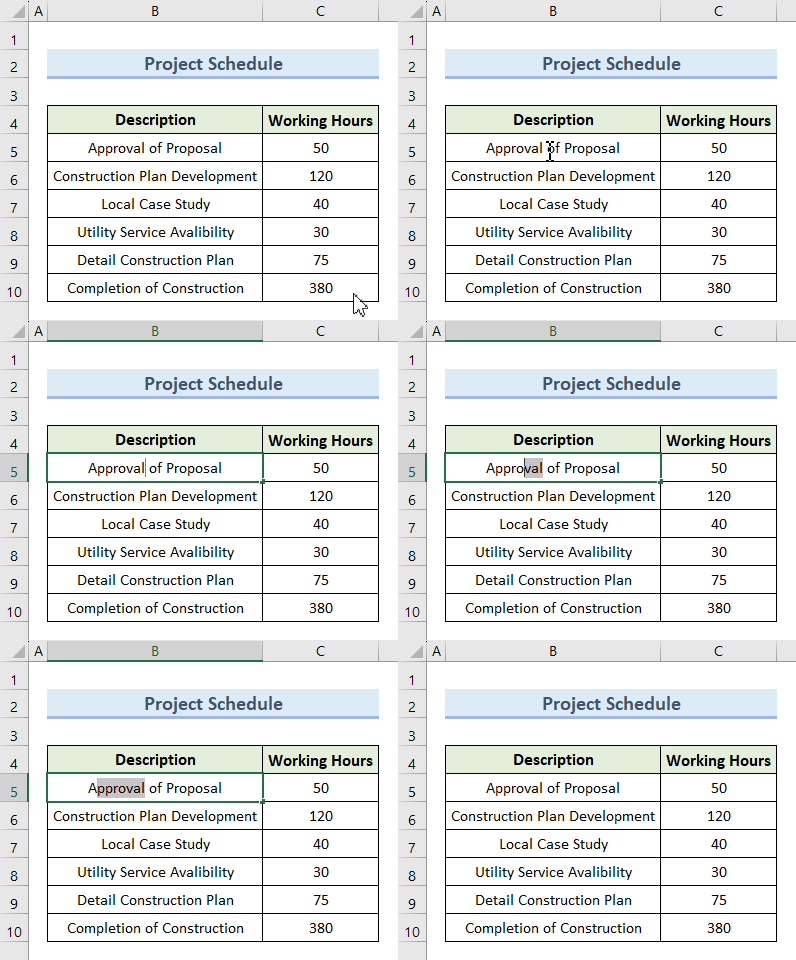
11.5 Select One Character Right: Shift + →
Press Shift + → to select one single character at a time in the right way.
Note: For Mac users, press Shift (⇧) + →
11.6 Select One Character Left: Shift + ←
Press Shift + ← to select one single character at a time in a left way.
Note: For Mac users, press Shift (⇧) + ←
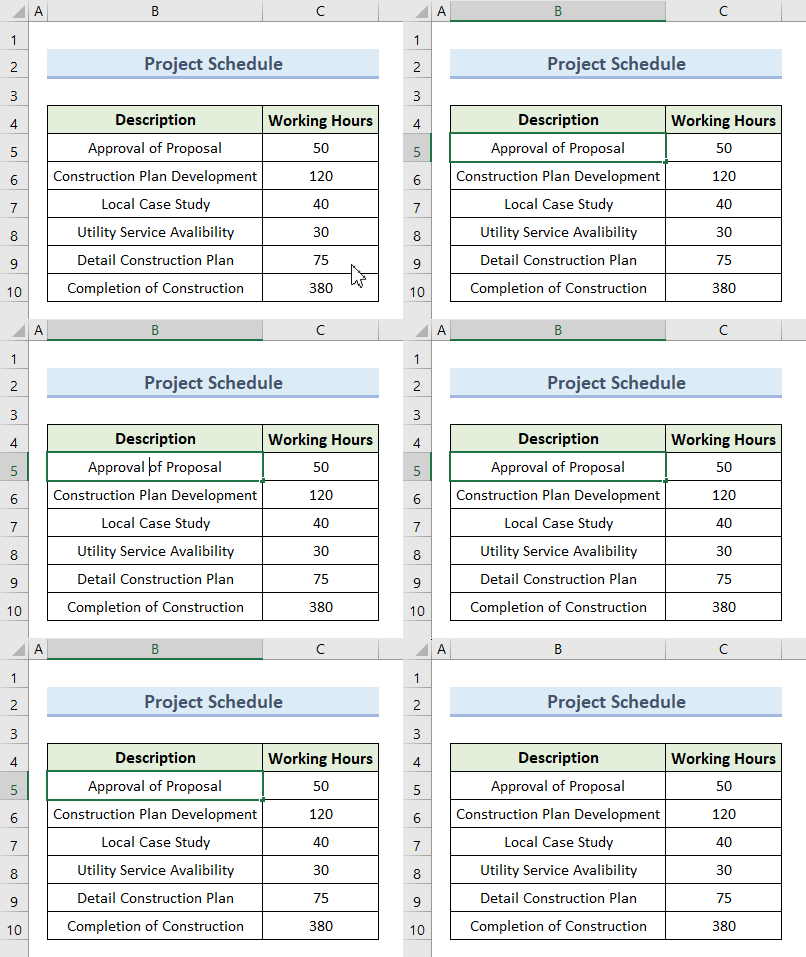
11.7 Move One Word Right: Ctrl + →
In an active cell, move one word to the right way every time by pressing Ctrl + →
Note: For Mac users, press Control (^) + →
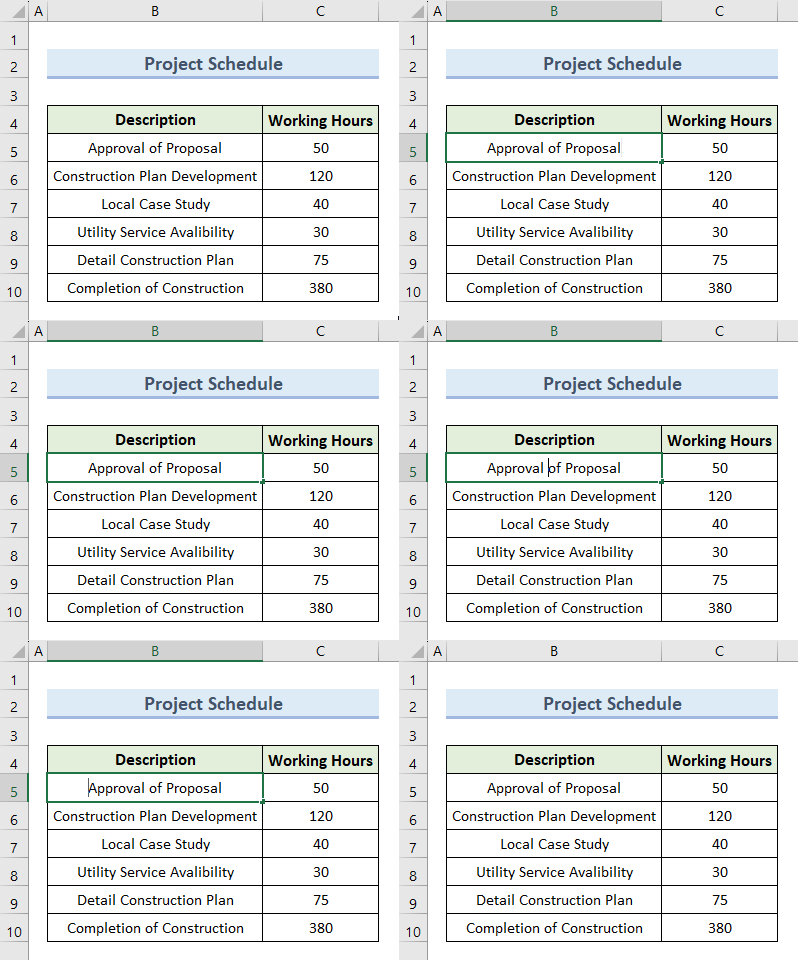
11.8 Move One Word Left: Ctrl + ←
In an active cell, move one word to the left way every time by pressing Ctrl + ←
Note: For Mac users, press Control (^) + ←
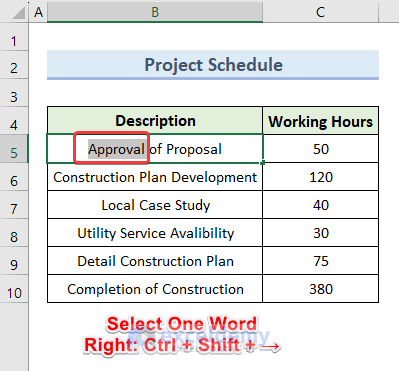
11.9 Select One Word Right: Ctrl + Shift + →
In an active cell, select one word to the right way every time by pressing Ctrl + Shift + →
Note: For Mac users, press Control (^) + Shift (⇧) + →
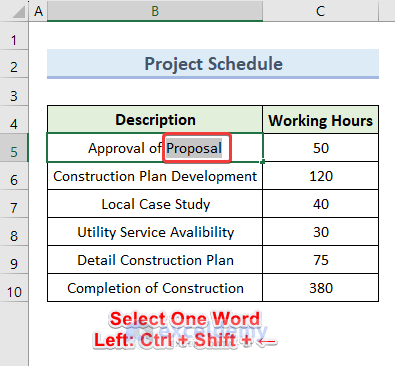
11.10 Select One Word Left: Ctrl + Shift + ←
In an active cell, select one word to the right way every time by pressing Ctrl + Shift + ←
Note: For Mac users, press Control (^) + Shift (⇧) + ←
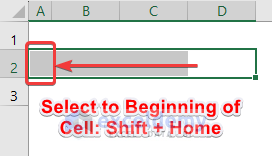
11.11 Select to Beginning of Cell: Shift + Home
From any active cell, press Shift + Home to select up to the beginning of the cell on the same row.
Note: For Mac users, press Shift (⇧) + Function (Fn) + ←
11.12 Select End of Cell: Shift + End
From any active cell, press Shift + End to select the end of the cell
Note: For Mac users, press Shift (⇧) + Function (Fn) + →
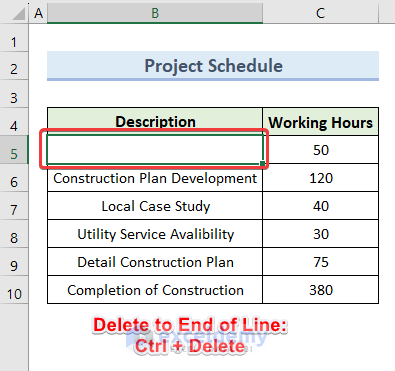
11.13 Delete to End of Line: Ctrl + Delete
Click inside any cell and press Ctrl + Delete to delete to the end of the line erasing all data inside it.
Note: For Mac users, press Control (^) + Delete
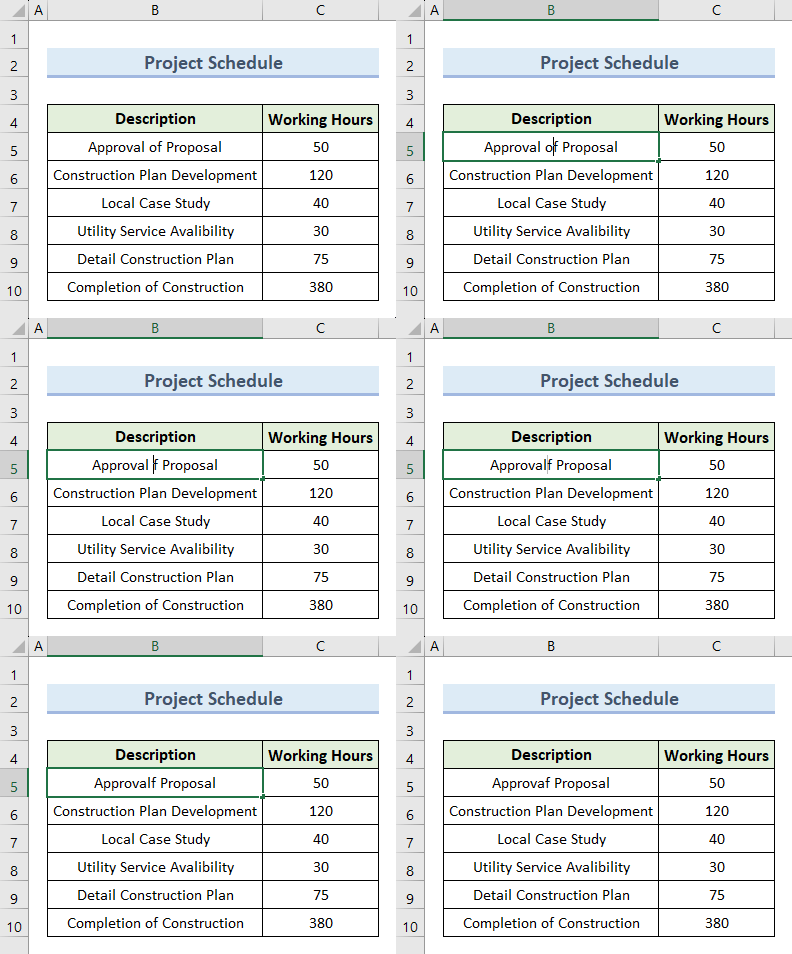
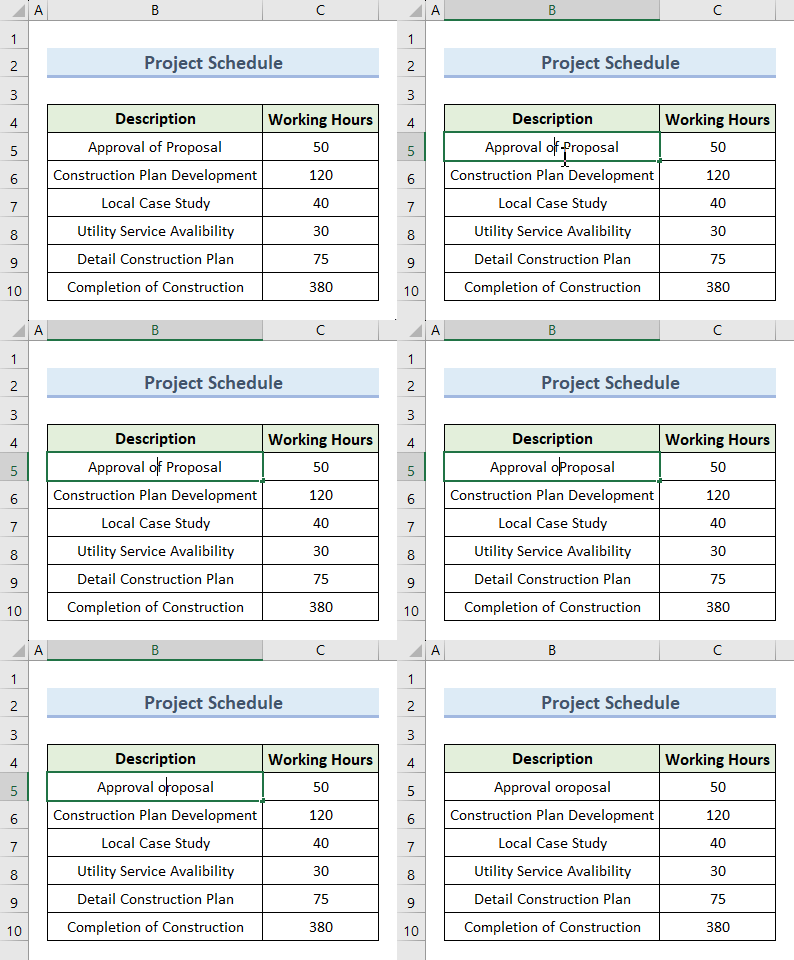
11.14 Delete Character to Left of Cursor: Backspace
Inside an active cell, press Backspace to erase one by one character to the left of the cursor.
Note: For Mac users, press Delete
11.15 Delete Character to Right of Cursor: Delete
Inside an active cell, press Delete to erase one by one character to the right of the cursor.
Note: For Mac users, press Function (Fn) + Delete
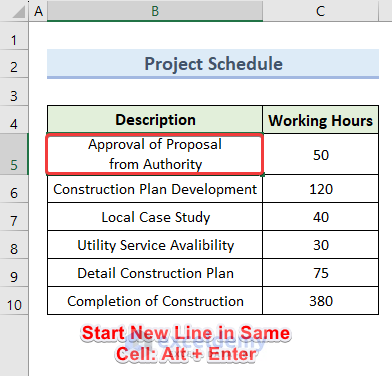
11.16 Start New Line in Same Cell: Alt + Enter
Select your cell and press F2 to turn on the edit mode. Press Alt + Enter to start a new line in the same cell.
Note: For Mac users, press Control (^) + Option/Alt (⌥) + Return
12. Entering Data Shortcuts
| Actions | Windows Shortcut |
|---|---|
| Enter data and move down | Enter |
| Enter data and move up | Shift + Enter |
| Enter data and move right | Tab |
| Enter data and move left | Shift + Tab |
| Enter data and stay in same cell | Ctrl + Enter |
| Insert current date | Ctrl + ; |
| Insert current time | Ctrl + Shift + : |
| Fill down from cell above | Ctrl + D |
| Fill right from the cell on left | Ctrl + R |
| Copy formula from the cell above when the formula is an exact copy | Ctrl + ‘ |
| Copy value from the cell above | Ctrl + Shift + “ |
| Insert hyperlink | Ctrl + K |
| Display AutoComplete list | Alt + ↓ |
| Flash Fill | Ctrl + E |
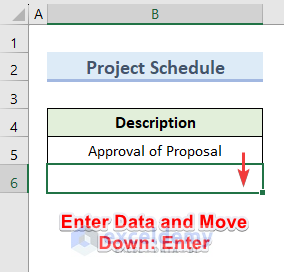
12.1 Enter Data and Move Down: Enter
Press Enter to move down after inserting any data inside a cell.
Note: For Mac users, press Return
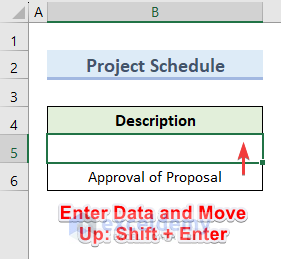
12.2 Enter Data and Move Up: Shift + Enter
Press Shift +Enter to move up after inserting any data inside a cell.
Note: For Mac users, press Shift (⇧) + Return
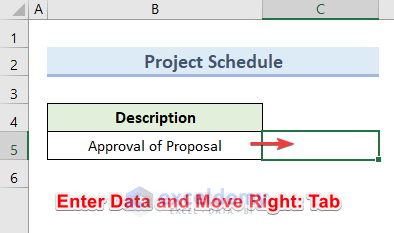
12.3 Enter Data and Move Right: Tab
Press Tab to move right after inserting any data inside a cell.
Note: For Mac users, press Tab.
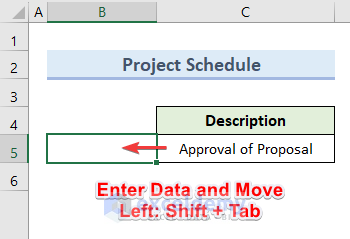
12.4 Enter Data and Move Left: Shift + Tab
Press Shift + Tab to move right after inserting any data inside a cell.
Note: For Mac users, press Shift (⇧) + Tab.
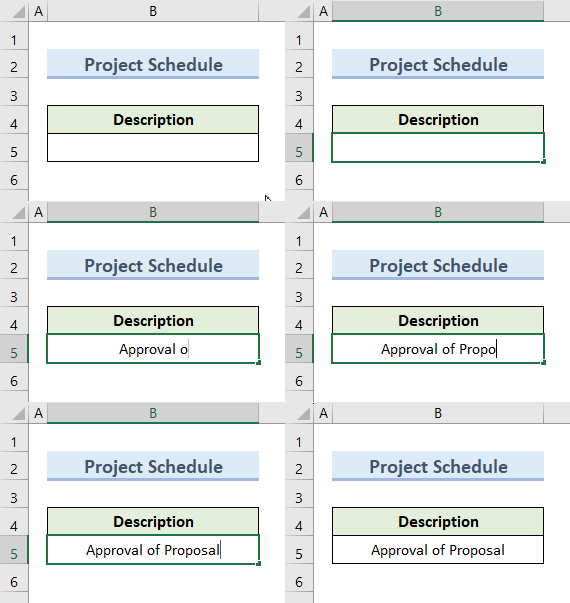
12.5 Enter Data and Stay in Same Cell: Ctrl + Enter
Press Ctrl + Enter to stay in the same cell after inserting any data there.
Note: For Mac users, press Control (^) + Return
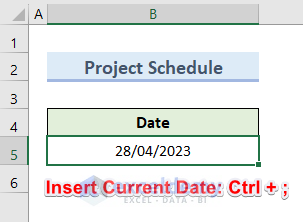
12.6 Insert Current Date: Ctrl + ;
Press Ctrl + ; to insert current date.
Note: For Mac users, press Control (^) + ;
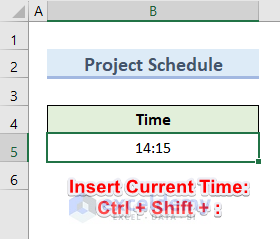
12.7 Insert Current Time: Ctrl + Shift + :
Press Ctrl + Shift + : to insert current time.
Note: For Mac users, press Control (^) + Shift (⇧) + :
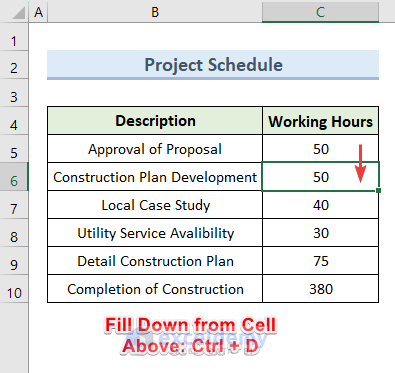
12.8 Fill Down from Cell Above: Ctrl + D
To fill down the value from the cell above, press Ctrl + D on your keyboard.
Note: For Mac users, press Control (^) + D
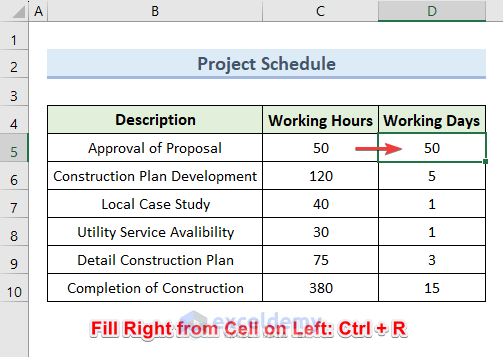
12.9 Fill Right from Cell on Left: Ctrl + R
To fill down the value from a cell on left, press Ctrl + R on your keyboard.
Note: For Mac users, press Control (^) + R
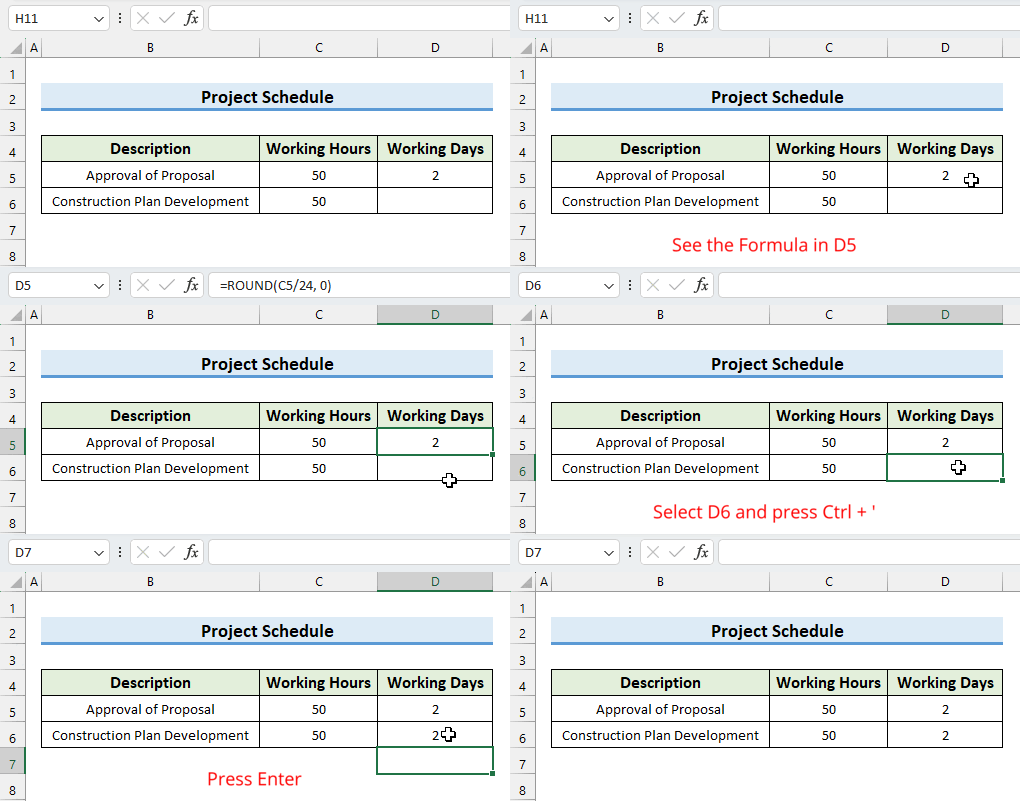
12.10 Copy Formula from Cell above when Formula is Exact Copy: Ctrl + ‘
This shortcut copies the exact formula from the cell above.
Select the below cell and press Ctrl + ‘.
This shortcut copies the formula from the above cell. Press Enter to get the result.
Note: For Mac users, press Control (^) + ‘
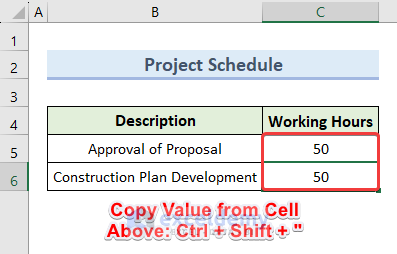
12.11 Copy Value from Cell Above: Ctrl + Shift + “
To copy value from cell above, press Ctrl + Shift + “ or on Ctrl + ” your keyboard.
Note: For Mac users, press Control (^) + “
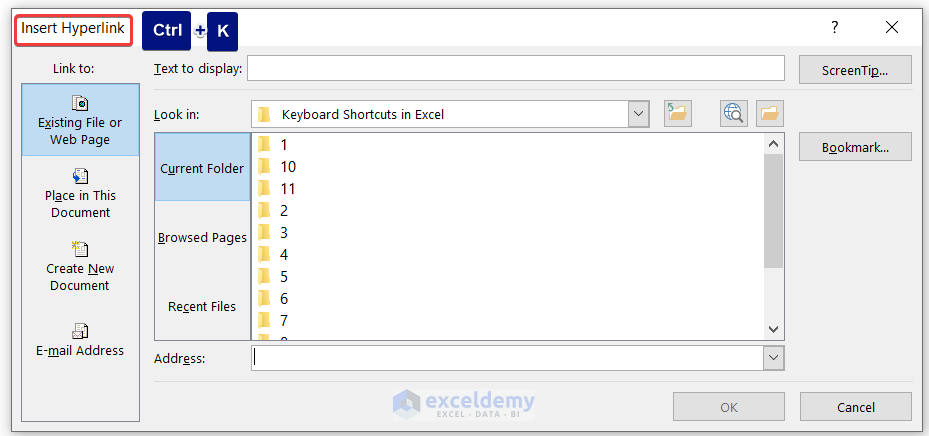
12.12 Insert Hyperlink: Ctrl + K
To open the Insert Hyperlink window, press Ctrl + K on your keyboard.
Note: For Mac users, press Command (⌘) + K
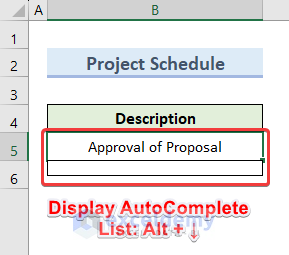
12.13 Display AutoComplete List: Alt + ↓
To display the autocomplete cell downward, press Alt + ↓ on the keyboard.
Note: For Mac users, press Option/Alt (⌥) + ↓
12.14 Flash Fill: Ctrl + E
Flash Fill identifies patterns and fills the relevant cells very quickly.
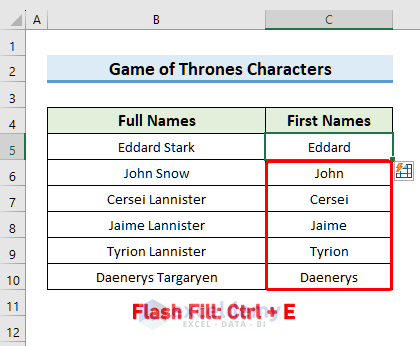
We have the Full Names in column B and want to Flash Fill the First Names in column C. Add Eddard in cell C5.
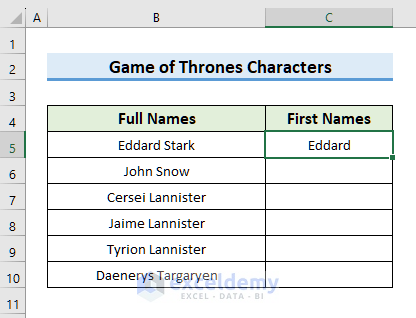
Then use the keyboard shortcut Ctrl + E. This shortcut fills all the First Names in column C.
Note: For Mac users, press Control (^) + E
13. Number Formatting Shortcuts
| Actions | Windows Shortcut |
|---|---|
| Apply general format | Ctrl + Shift + ~ |
| Apply number format | Ctrl + Shift + ! |
| Apply time format | Ctrl + Shift + @ |
| Apply date format | Ctrl + Shift + # |
| Apply currency format | Ctrl + Shift + $ |
| Apply percentage format | Ctrl + Shift + % |
| Apply scientific format | Ctrl + Shift + ^ |
13.1 Apply General Format: Ctrl + Shift + ~
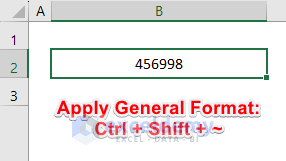
Press Ctrl + Shift + ~ to apply a general format in the cell.
Note: For Mac users, press Control (^) + Shift (⇧) + ~
13.2 Apply Number Format: Ctrl + Shift + !
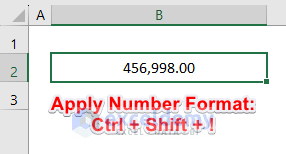
Press Ctrl + Shift + ! to apply the number format in the cell.
Note: For Mac users, press Control (^) + Shift (⇧) + !
13.3 Apply Time Format: Ctrl + Shift + @
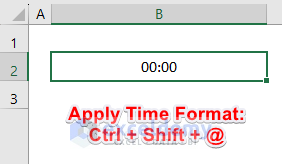
Press Ctrl + Shift + @ to apply the time format in the cell.
Note: For Mac users, press Control (^) + Shift (⇧) + @
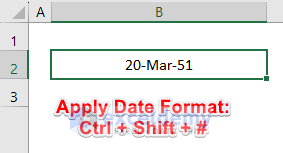
13.4 Apply Date Format: Ctrl + Shift + #
Press Ctrl + Shift + # to apply the date format in the cell.
Note: For Mac users, press Control (^) + Shift (⇧) + #
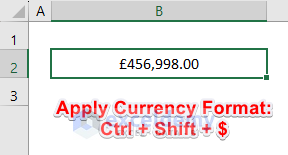
13.5 Apply Currency Format: Ctrl + Shift + $
Press Ctrl + Shift + $ to apply currency format in the cell.
Note: For Mac users, press Control (^) + Shift (⇧) + $
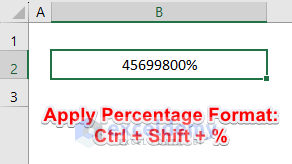
13.6 Apply Percentage Format: Ctrl + Shift + %
Press Ctrl + Shift + % to apply the percentage format in the cell.
Note: For Mac users, press Control (^) + Shift (⇧) + %
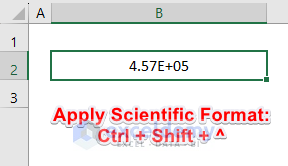
13.7 Apply Scientific Format: Ctrl + Shift + ^
Press Ctrl + Shift + ^ to apply a scientific format in the cell.
Note: For Mac users, press Control (^) + Shift (⇧) + ^
14. Formatting Shortcuts
| Actions | Windows Shortcut |
|---|---|
| Format cells | Ctrl + 1 |
| Display Format Cells with Font tab selected | Ctrl + Shift + F |
| Apply or remove bold | Ctrl + B |
| Apply or remove Italics | Ctrl + I |
| Apply or remove underline | Ctrl + U |
| Apply or remove strikethrough | Ctrl + 5 |
| Align center | Alt + H, A, C |
| Align left | Alt + H, A, L |
| Align right | Alt + H, A, R |
| Indent | Alt + H, 6 |
| Remove indent | Alt + H, 5 |
| Wrap text | Alt + H, W |
| Align top | Alt + H, A, T |
| Align middle | Alt + H, A, M |
| Align bottom | Alt + H, A, B |
| Increase font size one step | Alt + H, F, G |
| Decrease font size one step | Alt + H, F, K |
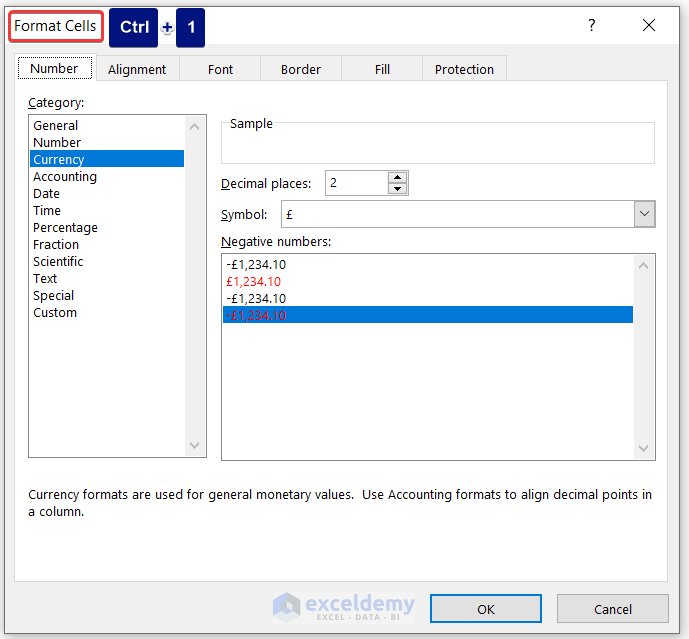
14.1 Format Cells: Ctrl + 1
Press Ctrl + 1 to open the Format Cells window.
Note: For Mac users, press Command (⌘) + 1
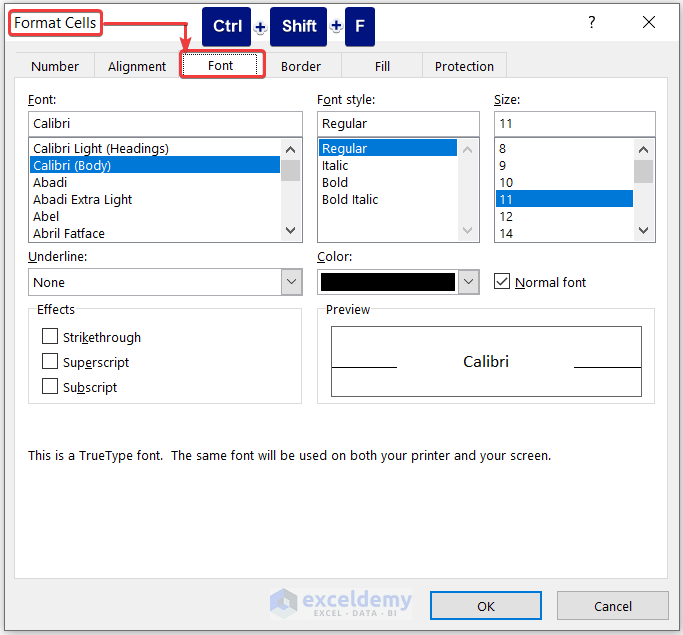
14.2 Display Format Cells with Font Tab Selected: Ctrl + Shift + F
Press Ctrl + Shift + F to open the Format Cells window with Font tab selected.
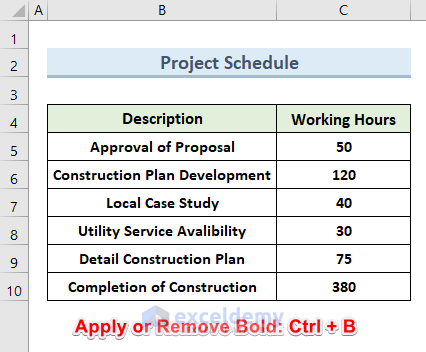
14.3 Apply or Remove Bold: Ctrl + B
Press Ctrl + B to apply or remove Bold format in selected cells.
Note: For Mac users, press Command (⌘) + B
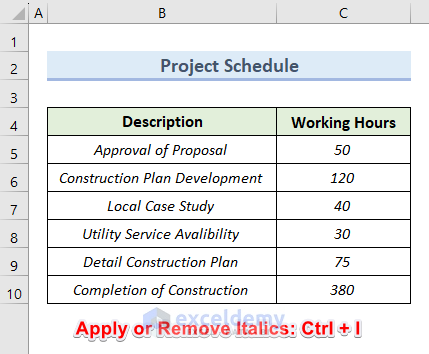
14.4 Apply or Remove Italics: Ctrl + I
Press Ctrl + I to apply or remove Italics format in selected cells.
Note: For Mac users, press Command (⌘) + I
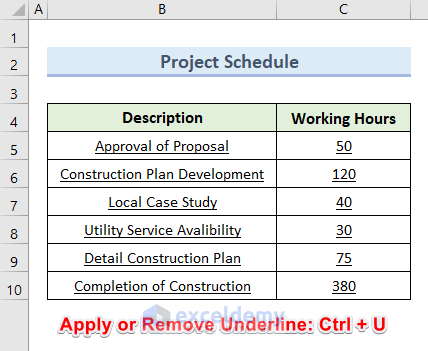
14.5 Apply or Remove Underline: Ctrl + U
Press Ctrl + U to apply or remove Underline format in selected cells.
Note: For Mac users, press Command (⌘) + U
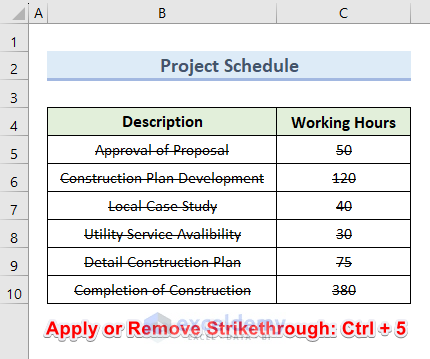
14.6 Apply or Remove Strikethrough: Ctrl + 5
Press Ctrl + 5 to apply or remove Strikethrough format in selected cells.
Note: For Mac users, press Command (⌘) + Shift (⇧) + X
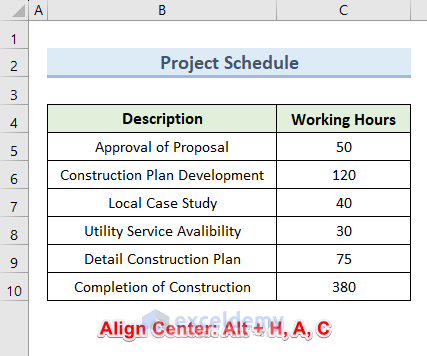
14.7 Align Center: Alt + H, A, C
Press Alt + H, A, C to align texts in the center in selected cells.
Note: For Mac users, press Command (⌘) + E
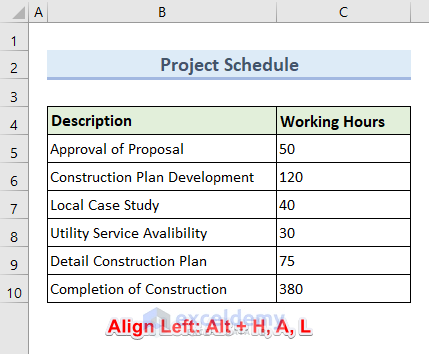
14.8 Align Left: Alt + H, A, L
Press Alt + H, A, L to align texts on the left in selected cells.
Note: For Mac users, press Command (⌘) + L
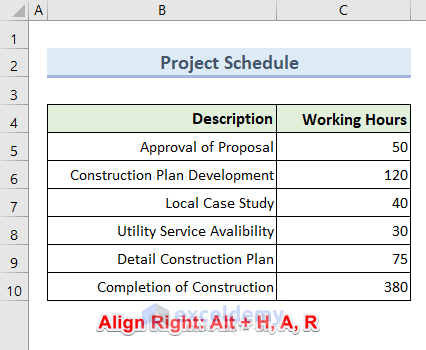
14.9 Align Right: Alt + H, A, R
Press Alt + H, A, R to align texts in the right in selected cells.
Note: For Mac users, press Command (⌘) + R
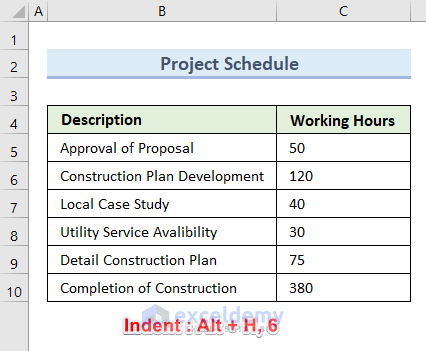
14.10 Indent: Alt + H, 6
Press Alt + H, 6 to indent texts in selected cells.
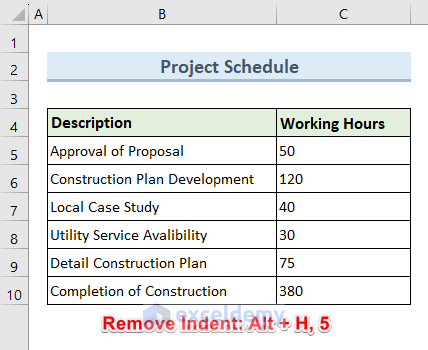
14.11 Remove Indent: Alt + H, 5
Press Alt + H, 5 to remove indent from texts in selected cells.
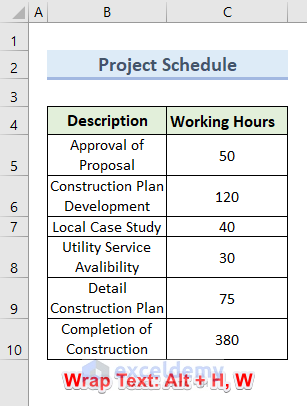
14.12 Wrap Text: Alt + H, W
Press Alt + H, W to apply the Wrap Text feature in selected cells.
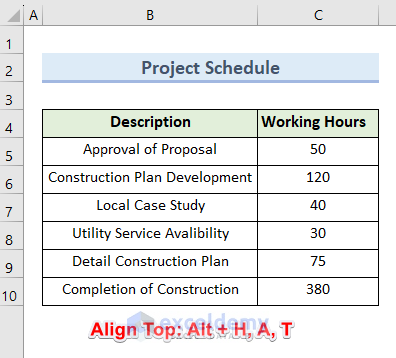
14.13 Align Top: Alt + H, A, T
Press Alt + H, A, T to align texts on top in selected cells.
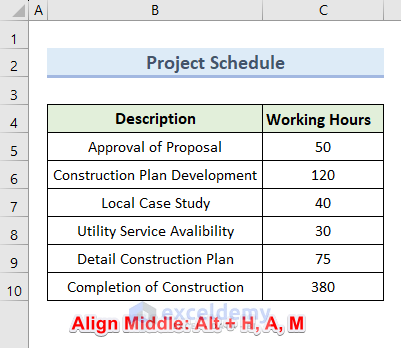
14.14 Align Middle: Alt + H, A, M
Press Alt + H, A, M to align texts in the middle in selected cells.
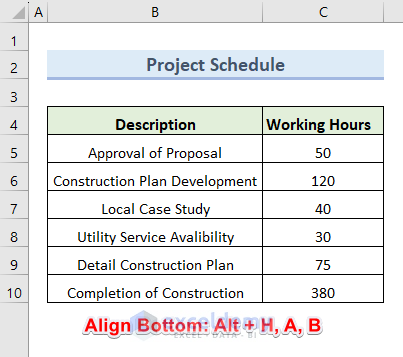
14.15 Align Bottom: Alt + H, A, B
Press Alt + H, A, B to align texts in the bottom in selected cells.
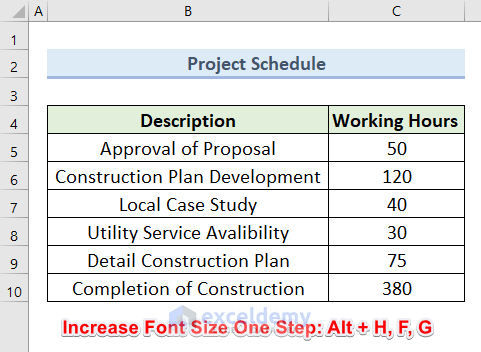
14.16 Increase Font Size One Step: Alt + H, F, G
Press Alt + H, F, G to increase font size one step in selected cells.
Note: For Mac users, press Command (⌘) + Shift (⇧) + >
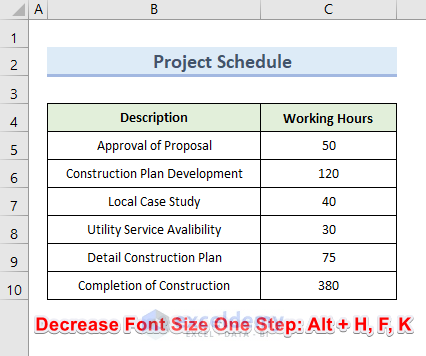
14.17 Decrease Font Size One Step: Alt + H, F, K
Press Alt + H, F, K to decrease font size one step in selected cells.
Note: For Mac users, press Command (⌘) + Shift (⇧) + <
15. Border Shortcuts
| Actions | Windows Shortcut |
|---|---|
| Open list of border styles from Ribbon | Alt + H, B |
| Add border around selected cells | Ctrl + Shift + & |
| Add right border | Alt + H, B, R |
| Add left border | Alt + H, B, L |
| Add top border | Alt + H, B, P |
| Add bottom border | Alt + H, B, O |
| Add all borders to all cells in selection | Alt + H, B, A |
| Remove borders | Ctrl + Shift + – |
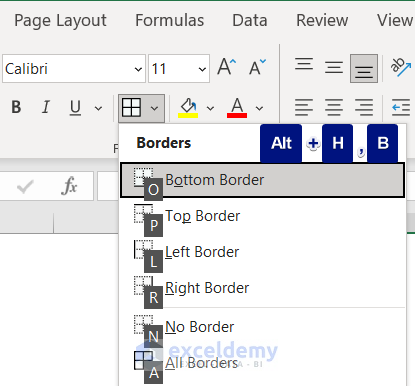
15.1 Open List of Border Styles from Ribbon: Alt + H, B
Press Alt + H, B to open the list of Border styles from Excel Ribbon.
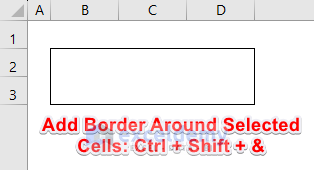
15.2 Add Border Around Selected Cells: Ctrl + Shift + &
Press Ctrl + Shift + & to add a border around selected cells.
Note: For Mac Users, press Command (⌘) + Option/Alt (⌥) + 0
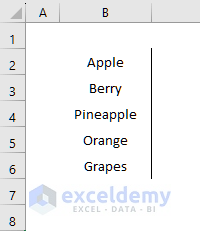
15.3 Add Right Border: Alt + H, B, R
Select your cells or range and use the keyboard shortcut: Alt + H, B, R.
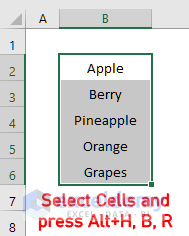
This shortcut adds the right border to the selected cells.
Note: For Mac Users, press Command (⌘) + Option/Alt (⌥) + →
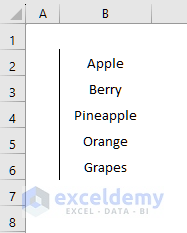
15.4 Add Left Border: Alt + H, B, L
Select your cells or range and use the keyboard shortcut: Alt + H, B, L.
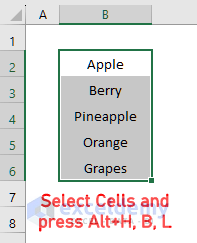
This shortcut adds the left border to the selected cells.
Note: For Mac Users, press Command (⌘) + Option/Alt (⌥) + ←
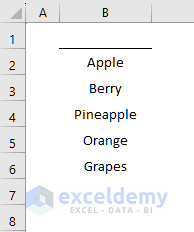
15.5 Add Top Border: Alt + H, B, P
Select your cells or range and use the keyboard shortcut: Alt + H, B, P.
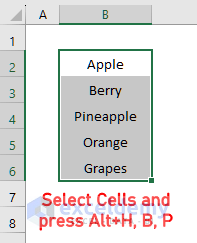
This shortcut adds the top border to the selected cells.
Note: For Mac Users, press Command (⌘) + Option/Alt (⌥) + ↑
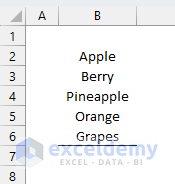
15.6 Add Bottom Border: Alt + H, B, O
Select your cells or range and use the keyboard shortcut: Alt + H, B, O.
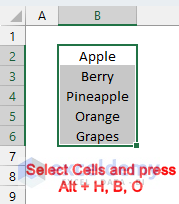
This shortcut adds the bottom border to the selected cells.
Note: For Mac users, press Command (⌘) + Option/Alt (⌥) + ↓
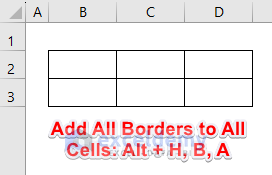
15.7 Add All Borders to All Cells in Selection: Alt + H, B, A
Press Alt + H, B, A to add all borders in selected cells.
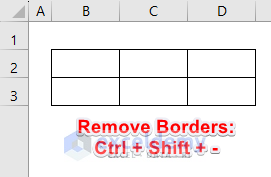
15.8 Remove Borders: Ctrl + Shift + –
Press Ctrl + Shift + – to remove borders.
Note: For Mac users, press Command (⌘) + Option/Alt (⌥) + –
16. Formula Shortcuts
| Actions | Windows Shortcut |
|---|---|
| Toggle absolute and relative references | F4 |
| Open the Insert Function Dialog Box | Shift + F3 |
| Autosum | Alt + = |
| Toggle displaying formulas on and off | Ctrl + ‘ |
| Insert function arguments | Ctrl + Shift + A |
| Enter array formula | Ctrl + Shift + Enter |
| Force calculate active worksheet | Shift + F9 |
| Force calculate all worksheets | Ctrl + Alt + F9 |
| Expand or collapse the formula bar | Ctrl + Shift + U |
| Display function arguments dialog box | Ctrl + A |
| Open Name Manager | Ctrl + F3 |
| Create name from values in a row(s)/column(s) | Ctrl + Shift + F3 |
| Paste name into formula | F3 |
| Accept function with auto-complete | Tab |
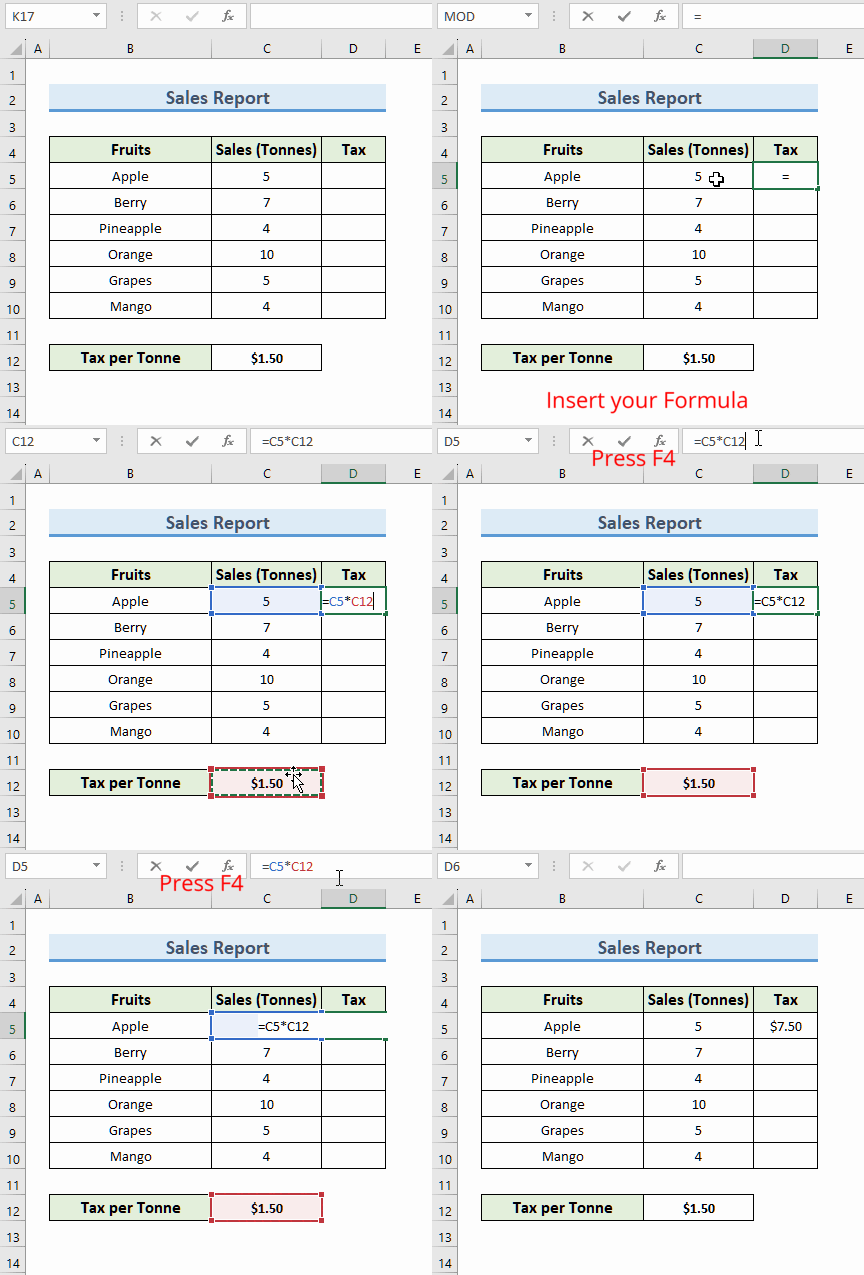
16.1 Toggle Absolute and Relative References: F4
To toggle between absolute and relative cell reference in a formula, press F4 on your keyboard. This helps to work easily with cell references rather than typing Dollar Sign ($) before each cell number every time in the formula.
Note: For Mac users, press Command (⌘) + T
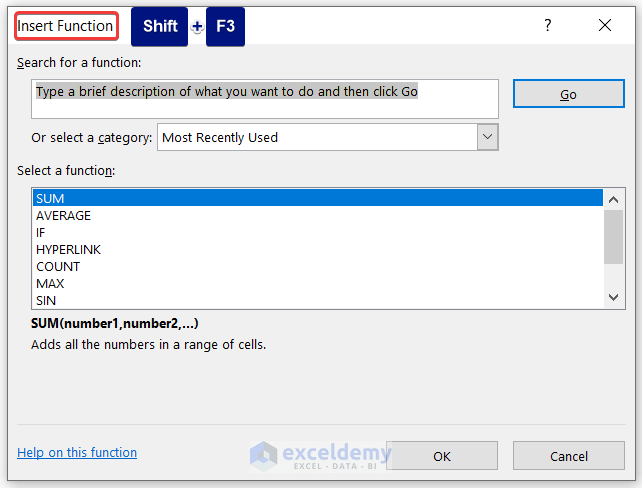
16.2 Open Insert Function Dialog Box: Shift + F3
Press Shift + F3 on the keyboard to open the Insert Function dialogue box.
Note: For Mac users, press Function (Fn) + Shift (⇧) + F3
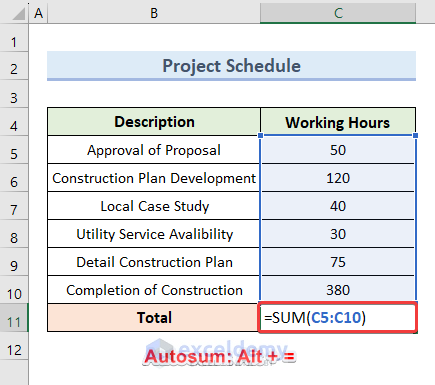
16.3 Autosum: Alt + =
To auto-sum selected cells’ values, press Alt + = on your keyboard.
Note: For Mac users, press Command (⌘) + Shift (⇧) + T
16.4 Toggle Displaying Formulas On and Off: Ctrl + ‘
To show or hide the formula in a cell, press Ctrl + ‘ on your keyboard for ease of visualization. The Total Wage column has formulas in all cells.
Select any cell(D6) within the Total Wage column.
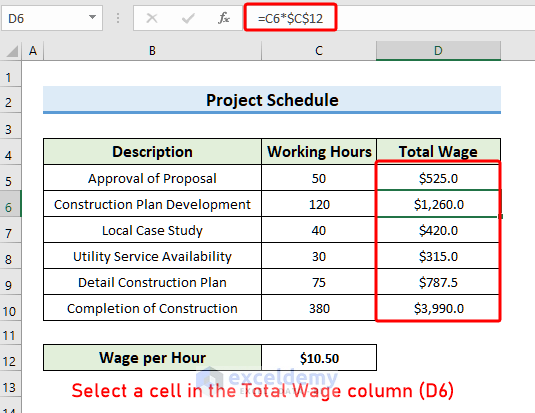
Press Ctrl + ‘ to see the formulas.
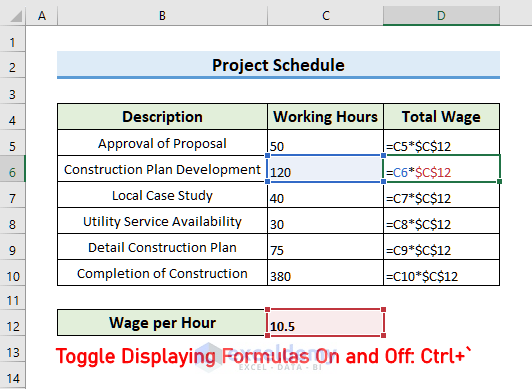
Note: For Mac users, press Control (^) + ‘
16.5 Insert Function Arguments: Ctrl + Shift + A
To show the arguments of any function inside a cell, press Ctrl + Shift + A after typing the function name.
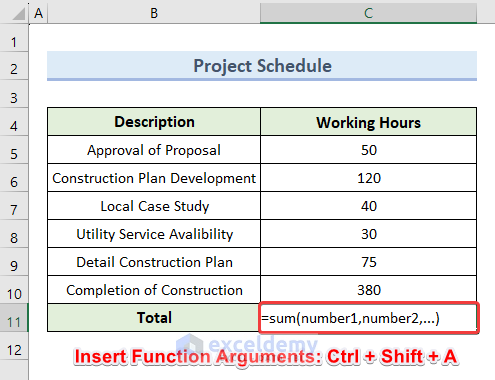
Note: For Mac users, press Control (^) + Shift (⇧) + A
16.6 Enter Array Formula: Ctrl + Shift + Enter
When we need to process several values for a single calculation, we use them as an array formula rather than a regular one. For this, insert Curly Brackets ({}) on the front and back of the formula to make it an array, and then press Ctrl + Shift + Enter to enter the array formula.
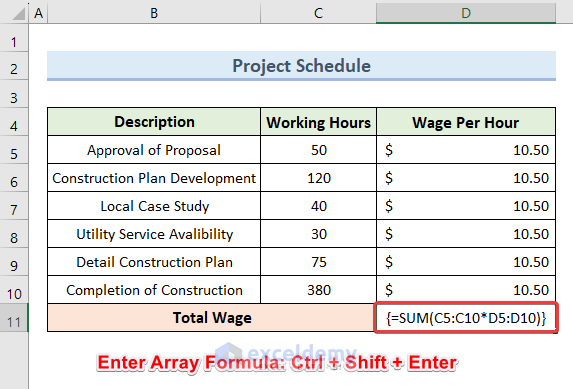
Note: For Mac users, press Control (^) + Shift (⇧) + Return
16.7 Force Calculation in Active Worksheet: Shift + F9
This shortcut is useful while calculating in Manual mode.
We have used the SUM formula in cell C11 to calculate the Total Sales($).
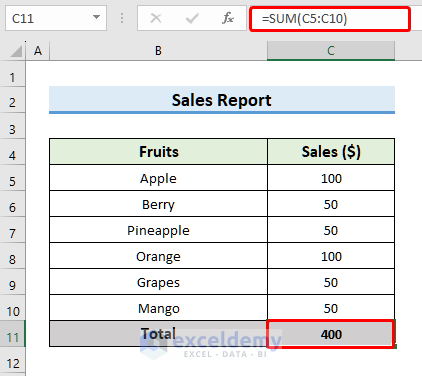
Go to the Formulas tab >> Calculation Options. Select the Manual option.

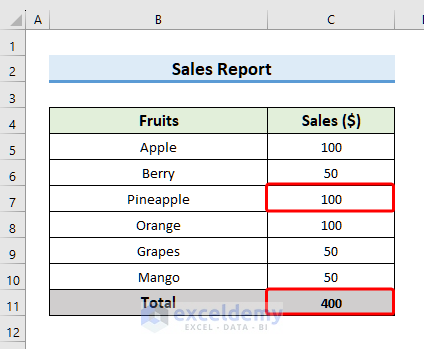
Return to your dataset and change any cell value in C7 from 50 to 100. The Total remains the same.
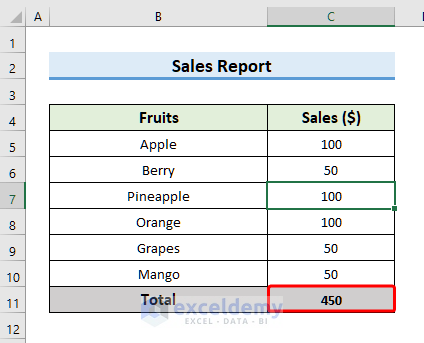
To update the Total value, use the shortcut Shift + F9. And the Total value updates to 450.
Note: For Mac users, press Function (Fn) + Shift (⇧) + F9
16.8 Force Calculate All Worksheets: Ctrl + Alt + F9
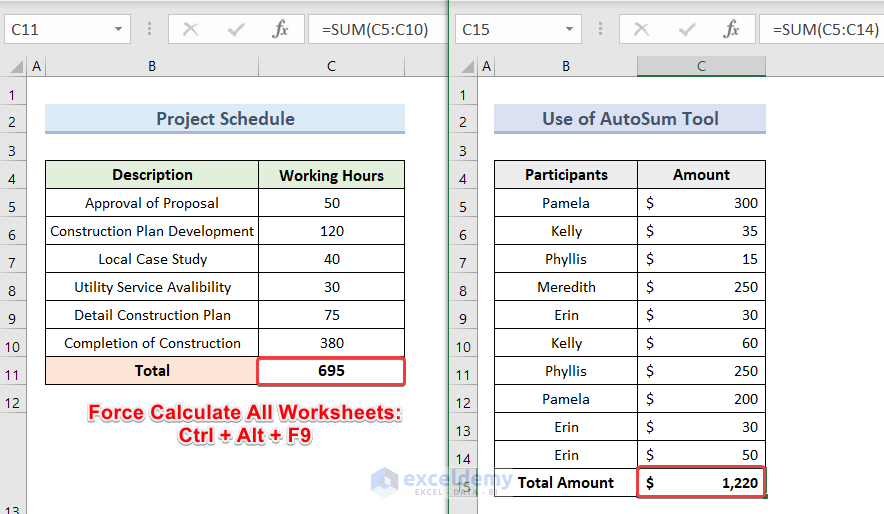
To force calculation in all worksheets of all opened workbooks, press Ctrl + Alt + F9 on the keyboard.
16.9 Expand or Collapse Formula Bar: Ctrl + Shift + U
Press Ctrl + Shift + U to expand or collapse the Formula Bar in the worksheet.

Note: For Mac users, press Control (^) + Shift (⇧) + U
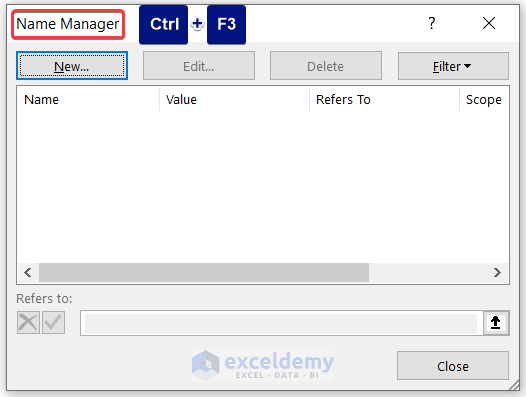
16.10 Open Name Manager: Ctrl + F3
Press Ctrl + F3 to display the Name Manager dialogue box.
Note: For Mac users, press Control (^) + L
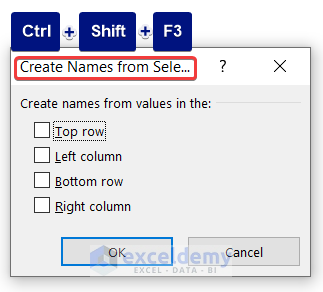
16.11 Create Name from Values in Row(s)/Column(s): Ctrl + Shift + F3
After selecting certain rows or columns, press Ctrl + Shift + F3 to open the Create Names from Selection dialogue box. Choose your preference from the list below and create a name for that specific selection.
Note: For Mac users, press Function (Fn) + Control (^) + F3
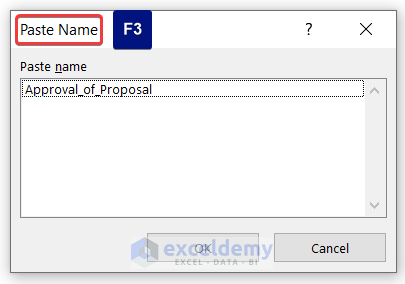
16.12 Paste Name into Formula: F3
After selecting a cell with a formula, press F3 to the Paste Name window and insert any named range to associate with the formula.
Note: For Mac users, press F3
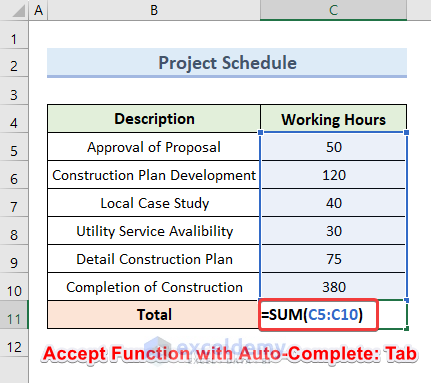
16.13 Accept Function with Auto-Complete: Tab
Press Tab to accept any function with its auto-complete suggestion.
Note: For Mac users, press Tab
17. Grid Operation Shortcuts
| Actions | Windows Shortcut |
|---|---|
| Display Insert Dialog box | Ctrl + Shift + + |
| Display Delete dialog box | Ctrl + – |
| Delete contents of selected cells | Delete |
| Hide columns | Ctrl + 0 |
| Hide rows | Ctrl + 9 |
| Unhide rows | Ctrl + Shift + 9 |
| Unhide columns | Ctrl + Shift + 0 |
| Group rows or columns (with rows/columns selected) | Alt + Shift + → |
| Ungroup rows or columns (with rows/columns selected) | Alt + Shift + ← |
| Hide or show outline symbols | Ctrl + 8 |
17.1 Display Insert Dialog Box: Ctrl + Shift + +
Press Ctrl + Shift + + to show the Insert dialogue box. In the box, select your preferred option for grid operation.
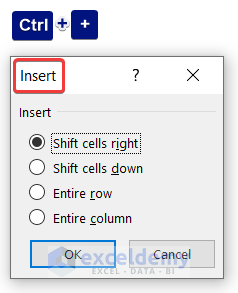
Note: For Mac users, press Command (⌘) + Shift (⇧) + +
17.2 Display Delete Dialog Box: Ctrl + –
Press Ctrl + – to show the Delete dialogue box. In the box, select your preferred option for grid operation.
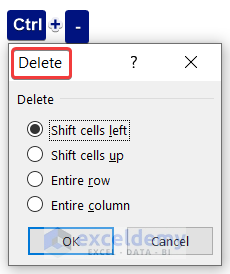
Note: For Mac users, press Command (⌘) + –
17.3 Delete Contents of Selected Cells: Delete
Select cell(s) and press Delete to remove contents.
Note: For Mac users, press Function (Fn) + Delete
17.4 Hide Columns: Ctrl + 0
Press Ctrl + 0 to hide selected columns.
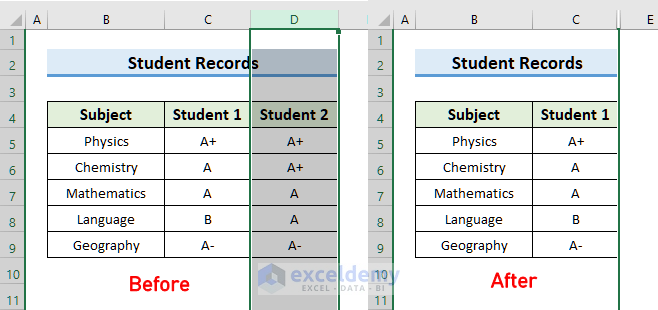
Note: For Mac users, press Control (^) + 0
17.5 Hide Rows: Ctrl + 9
Press Ctrl + 9 to hide selected rows.
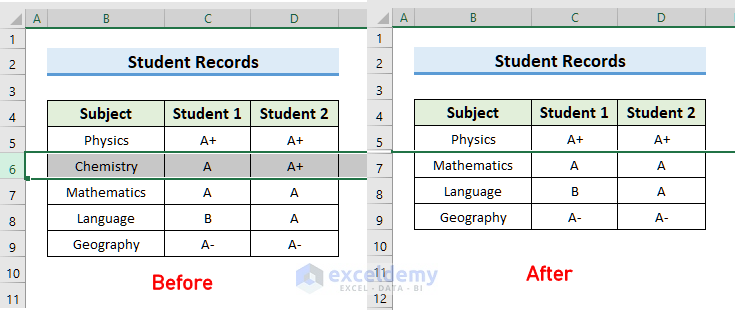
Note: For Mac users, press Control (^) + 9
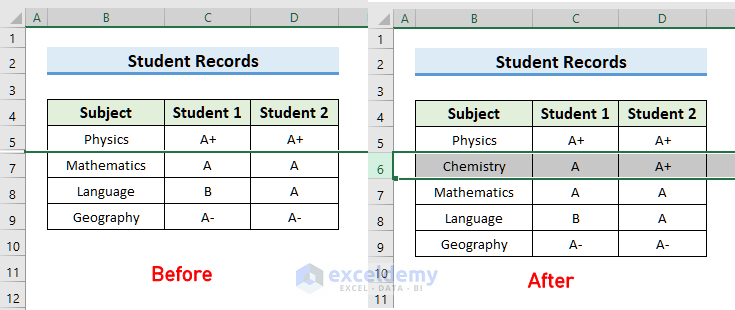
17.6 Unhide Rows: Ctrl + Shift + 9
Press Ctrl + Shift + 9 to unhide the hidden rows.
Note: For Mac users, press Control (^) + Shift (⇧) + 9
17.7 Unhide Columns: Ctrl + Shift + 0
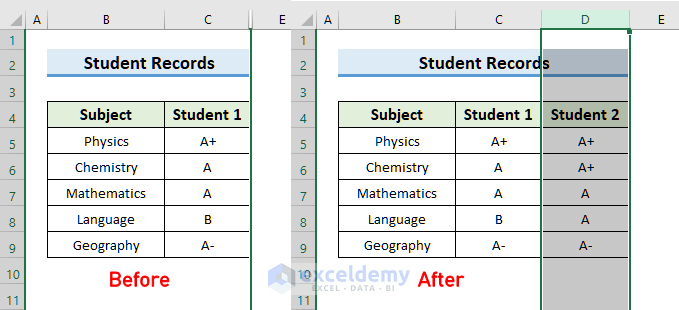
In my dataset, column D is hidden. To unhide the column, press Ctrl + A to select the entire worksheet >> use the keyboard shortcut Ctrl + Shift + 0.
On Windows 8, Windows 10, and later versions, the Ctrl + Shift command is used for Regional/ Language settings. That’s why this shortcut may not work on some systems. You have to change the Keyboard Layout shortcut:
Search for Advanced keyboard settings in the Windows search bar and open it >> select Input language hotkeys >> go to the Advanced Key Settings tab >> click on Change Key Sequence >> mark the radio button for Not Assigned for both Switch Input Language & Switch Keyboard Layout >> press OK.
The shortcut will work again.
For Mac Users, press Control (^) + Shift (⇧) + 0
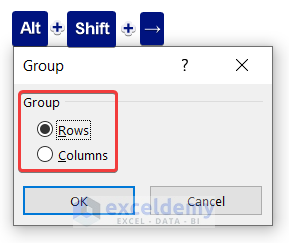
17.8 Group Rows or Columns (with rows/columns selected): Alt + Shift + →
Press Alt + Shift + → to group selected rows or columns. Or, open the Group dialogue box when no rows or columns are selected.
Note: For Mac users, press Command (⌘) + Shift (⇧) + K
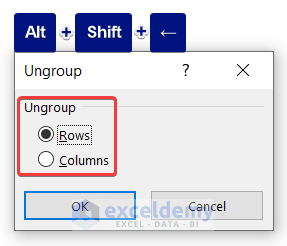
17.9 Ungroup Rows or Columns (with rows/columns selected): Alt + Shift + ←
Press Alt + Shift + ← to ungroup selected rows or columns. Or, open the Ungroup dialogue box when no rows or columns are selected.
Note: For Mac users, press Command (⌘) + Shift (⇧) + J
17.10 Hide or Show Outline Symbols: Ctrl + 8
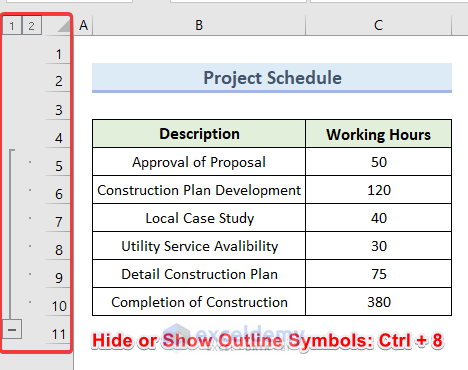
After grouping certain rows or columns, you will notice an outline symbol on the left side of the dataset. To hide or show it, press Ctrl + 8 on your keyboard.
Note: For Mac users, press Control (^) + 8
18. Pivot Table Shortcuts
| Actions | Windows Shortcut |
|---|---|
| Create pivot table | Alt + N, V, T |
| Toggle Pivot Table Field Checkbox | Space |
| Select entire pivot table | Ctrl + A |
| Group pivot table items | Alt + Shift + → |
| Ungroup pivot table items | Alt + Shift + ← |
| Hide (filter out) pivot table item | Ctrl + – |
| Unhide (clear filter on) pivot table item | Alt + H, S, C |
| Open Pivot Chart list | Alt + N, S, Z, C |
| Create Pivot Chart on Same Worksheet | Alt + F1 |
| Create Pivot Chart on New Worksheet | F11 |
18.1 Create Pivot Table: Alt + N, V, T
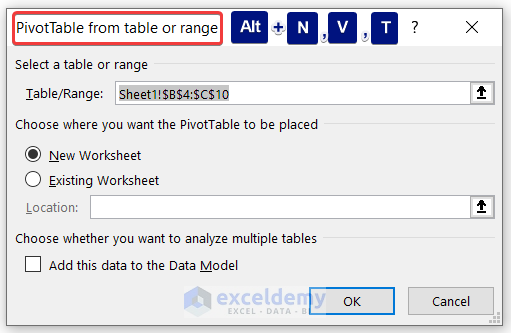
After selecting a data range, press Alt + N, V, T to open the PivotTable from table or range window and create a Pivot Table. Or, press Alt + N, V, E to create it from an external source.
18.2 Toggle Pivot Table Field Checkbox: Space
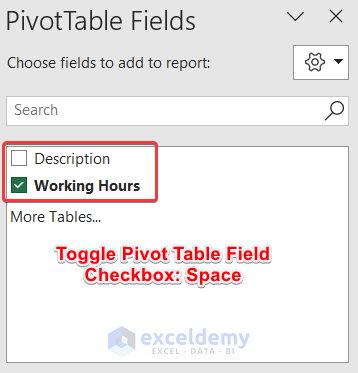
Press Space every time to toggle between the PivotTable Fields checkboxes.
Note: For Mac users, press Space
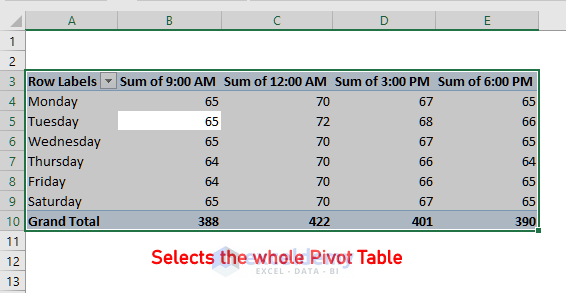
18.3 Select Entire Pivot Table: Ctrl + A
Select any cell within the Pivot Table >> use the keyboard shortcut Ctrl + A.
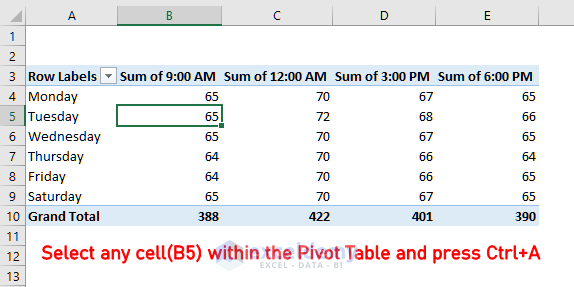
This keyboard shortcut selects the entire Pivot Table.
Note: For Mac users, press Control (^) + A
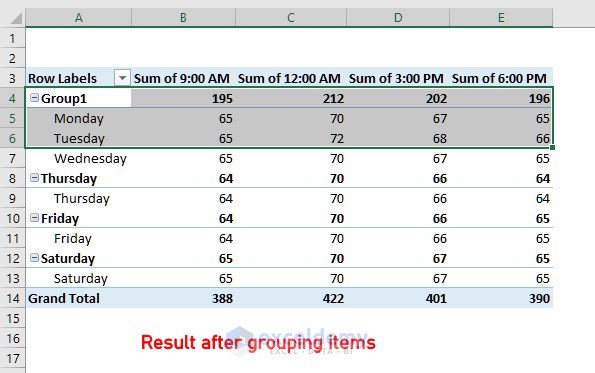
18.4 Group Pivot Table Items: Alt + Shift + →
Select the Pivot Table items. Use the keyboard shortcut Alt + Shift + →.
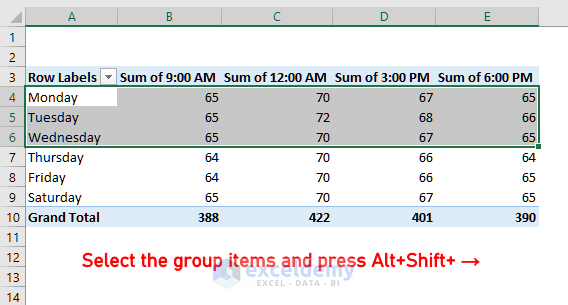
This keyboard shortcut groups Pivot Table items.
Note: For Mac users, press Command (⌘) + Shift (⇧) + K
18.5 Ungroup Pivot Table Items: Alt + Shift + ←
To ungroup the Pivot Table items, select the grouped items. Use the keyboard shortcut Alt + Shift + ←.
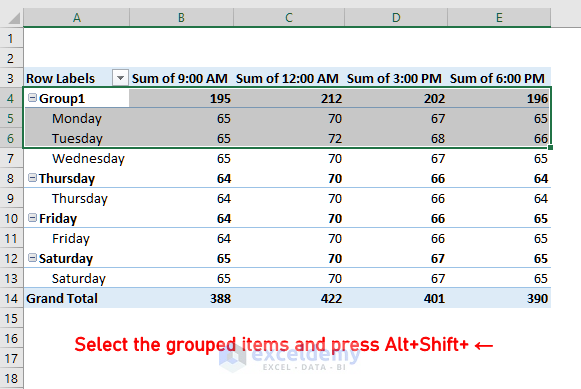
This keyboard shortcut ungroups Pivot Table items.
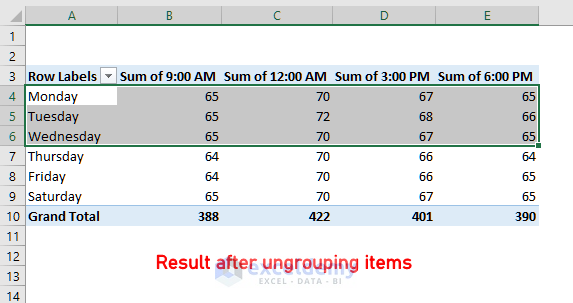
Note: For Mac users, press Command (⌘) + Shift (⇧) + J
18.6 Hide (filter out) Pivot Table Item: Ctrl + –
Select a Pivot Table item (row or column). Use the keyboard shortcut Ctrl + –.
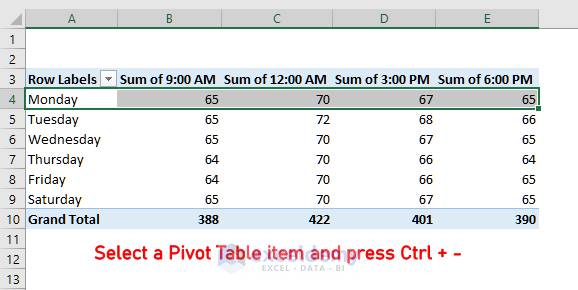
This shortcut hides a Pivot Table item.
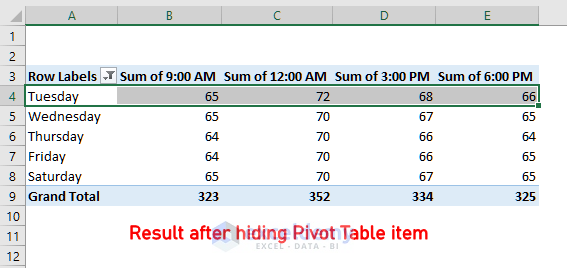
Note: For Mac users, press Ctrl + –
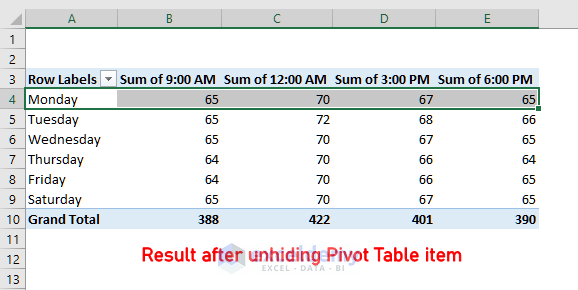
18.7 Unhide (clear filter on) Pivot Table Item: Alt + H, S, C
To unhide the Pivot Table item, select any cell within the Pivot Table. Use the keyboard shortcut: Alt + H, S, C.
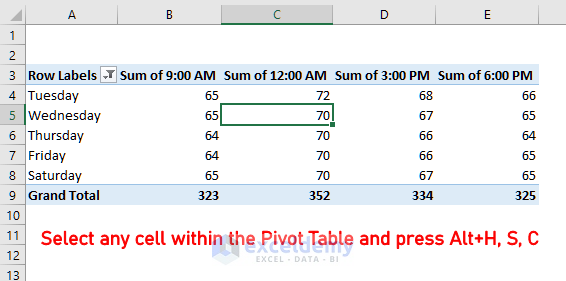
This keyboard shortcut clears the filter and unhides Pivot Table items.
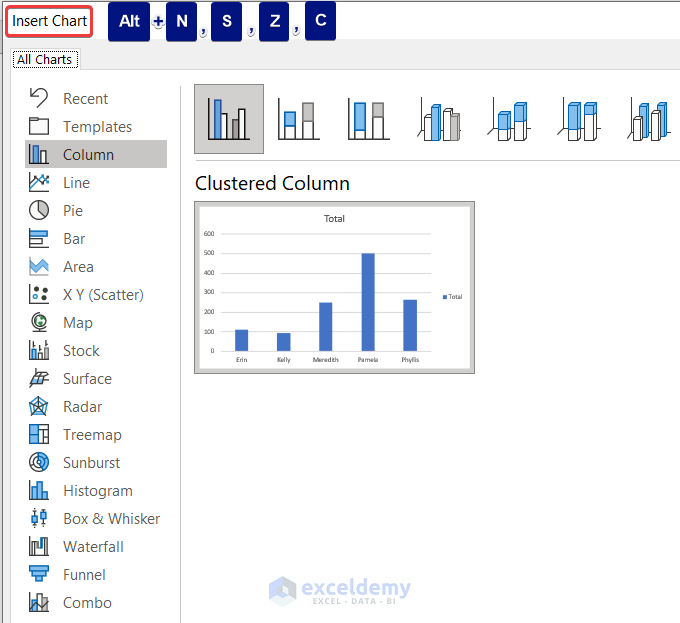
18.8 Open Pivot Chart List: Alt + N, S, Z, C
To create a chart from the Pivot Table, press Alt + N, S, Z, C to get the list of preferences.
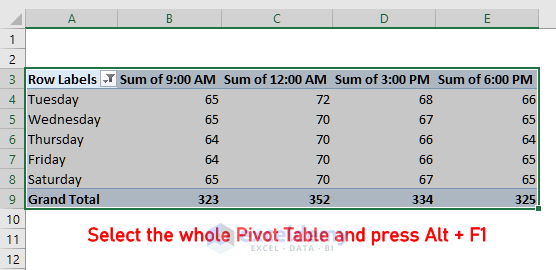
18.9 Create Pivot Chart on the Same Worksheet: Alt + F1
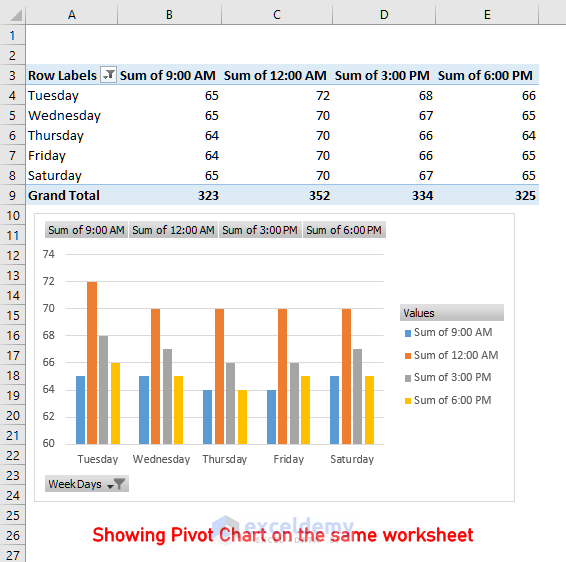
To create a Pivot Chart on the same worksheet, select the whole Pivot Table. Use the keyboard shortcut Alt + F1.
This keyboard shortcut creates a Pivot Chart on the same worksheet as the source Pivot Table.
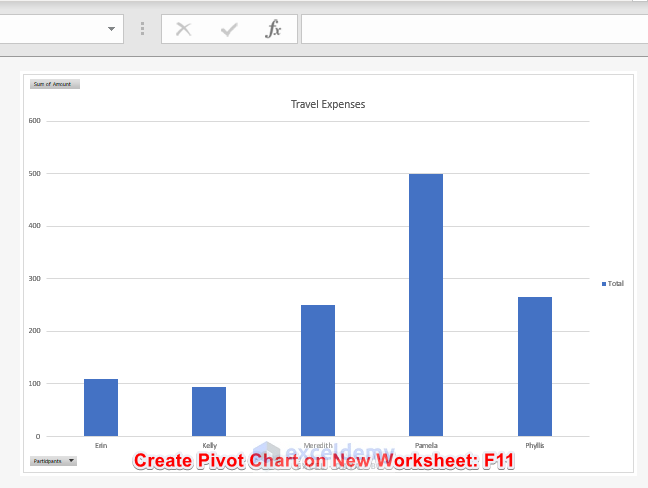
18.10 Create Pivot Chart on New Worksheet: F11
Press F11 to create a Pivot Chart on a new worksheet.
Note: For Mac users, press Function (Fn) + F11
19. Dialog Box Shortcuts
| Actions | Windows Shortcut |
|---|---|
| Move to next control | Tab |
| Move to previous control | Shift + Tab |
| Move to next tab | Ctrl + Tab |
| Move to previous tab | Ctrl + Shift + Tab |
| Accept and apply | Enter |
| Check and uncheck box | Space |
| Cancel and close the dialog box | Esc |
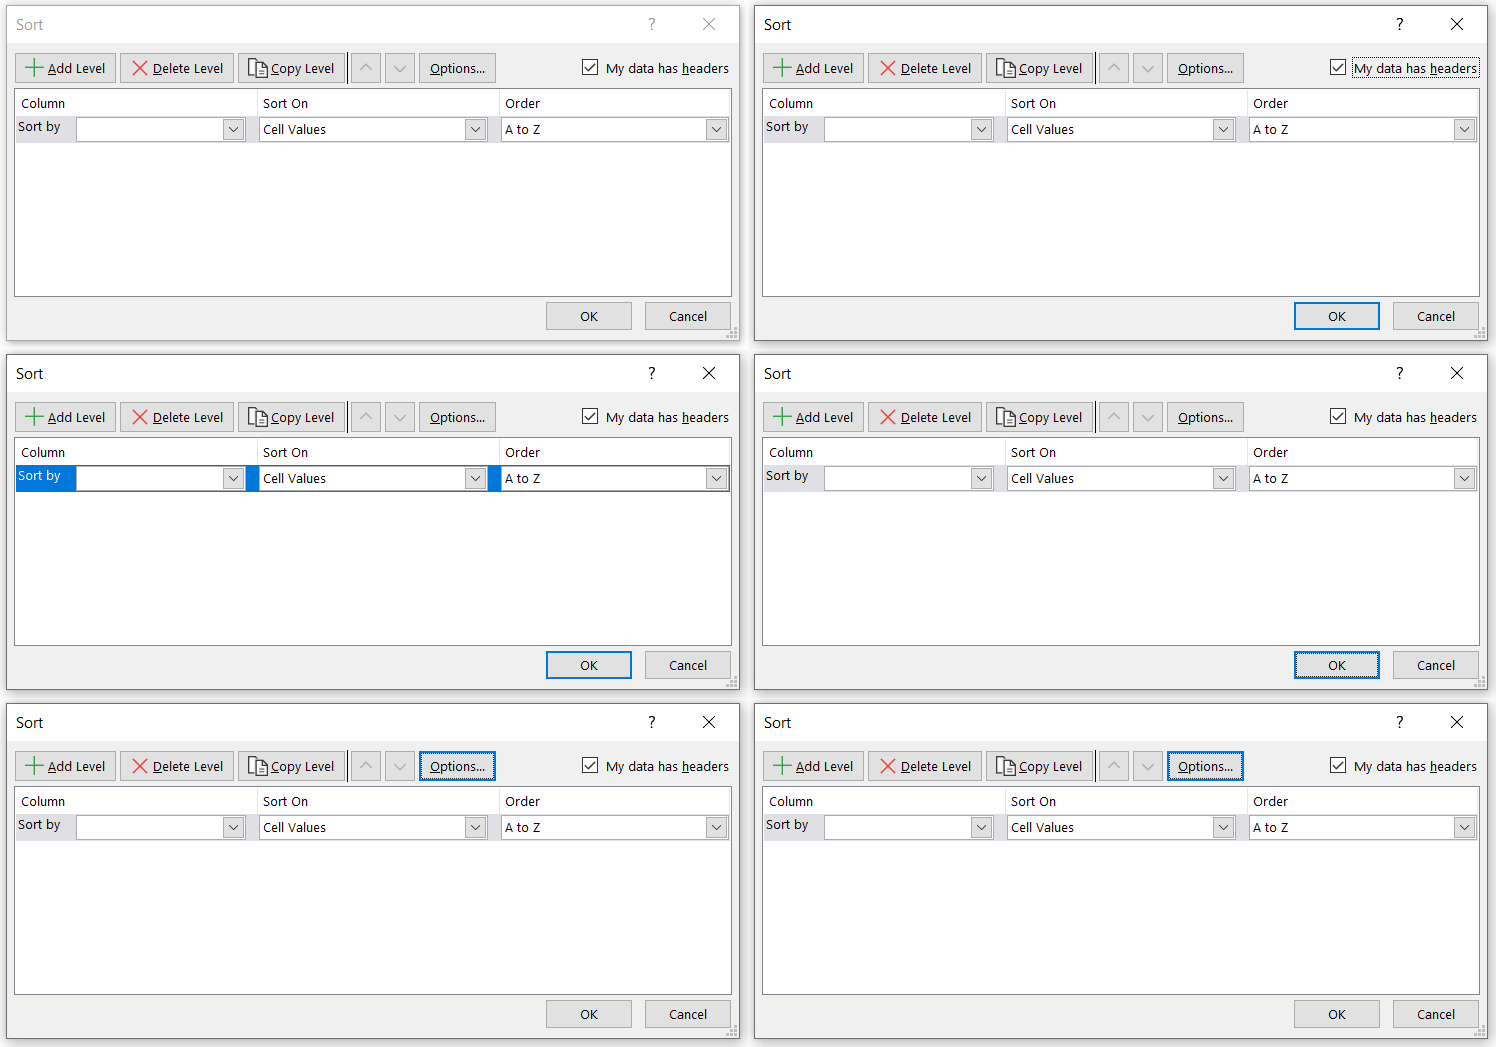
19.1 Move to Next Control: Tab
To move to the next control in a dialogue box, press Tab each time.
Note: For Mac users, press Tab
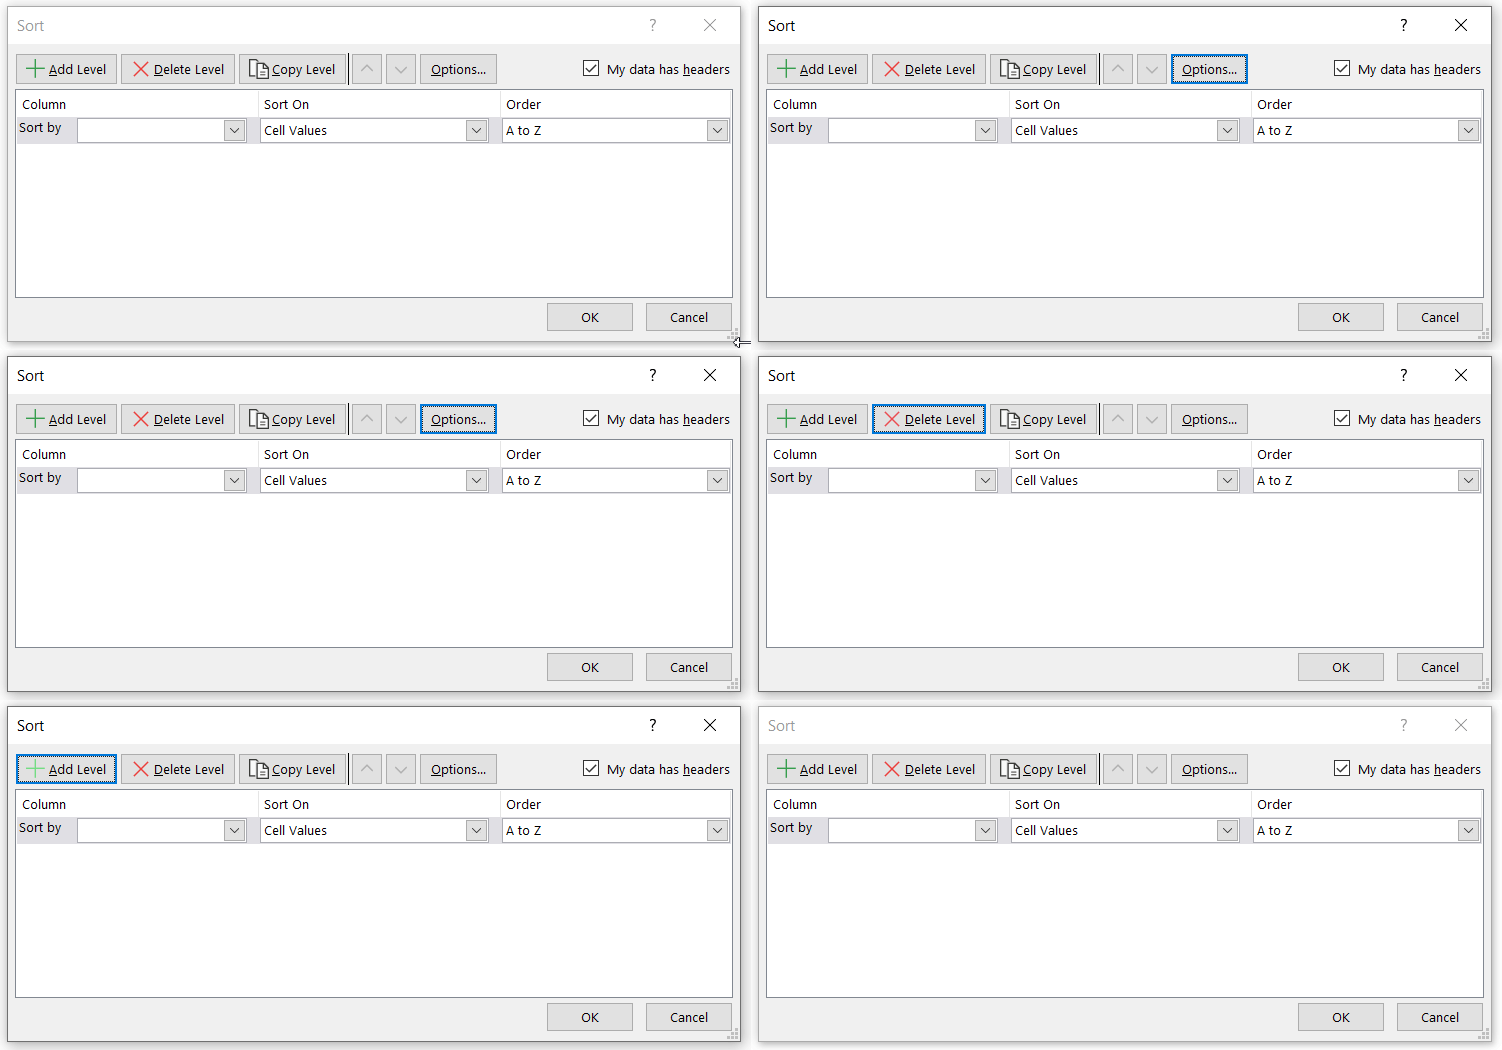
19.2 Move to Previous Control: Shift + Tab
To go back to the previous control, press Shift + Tab on your keyboard.
Note: For Mac users, press Shift (⇧) + Tab
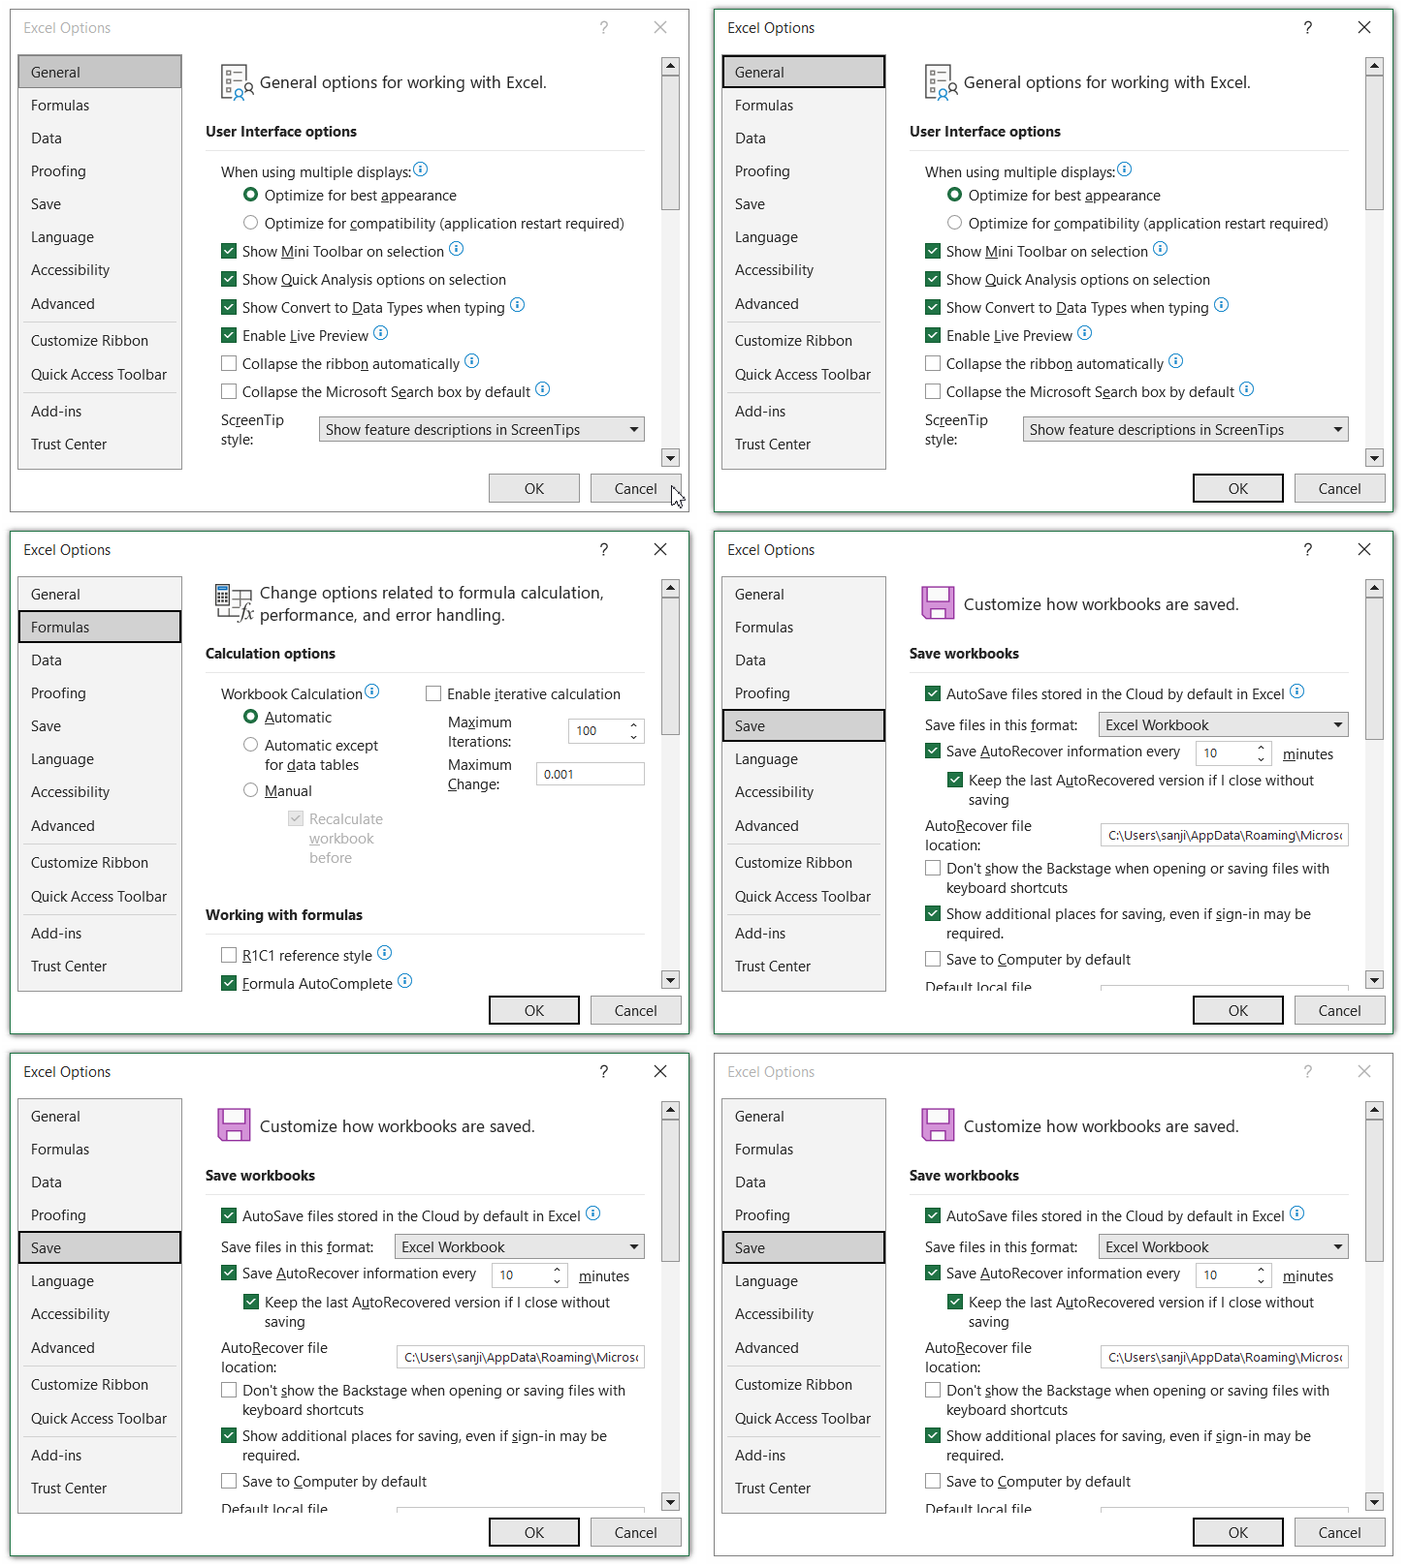
19.3 Move to Next Tab: Ctrl + Tab
In a dialogue box, press Ctrl + Tab to move to the next tab.
Note: For Mac users, press Control (^) + Tab
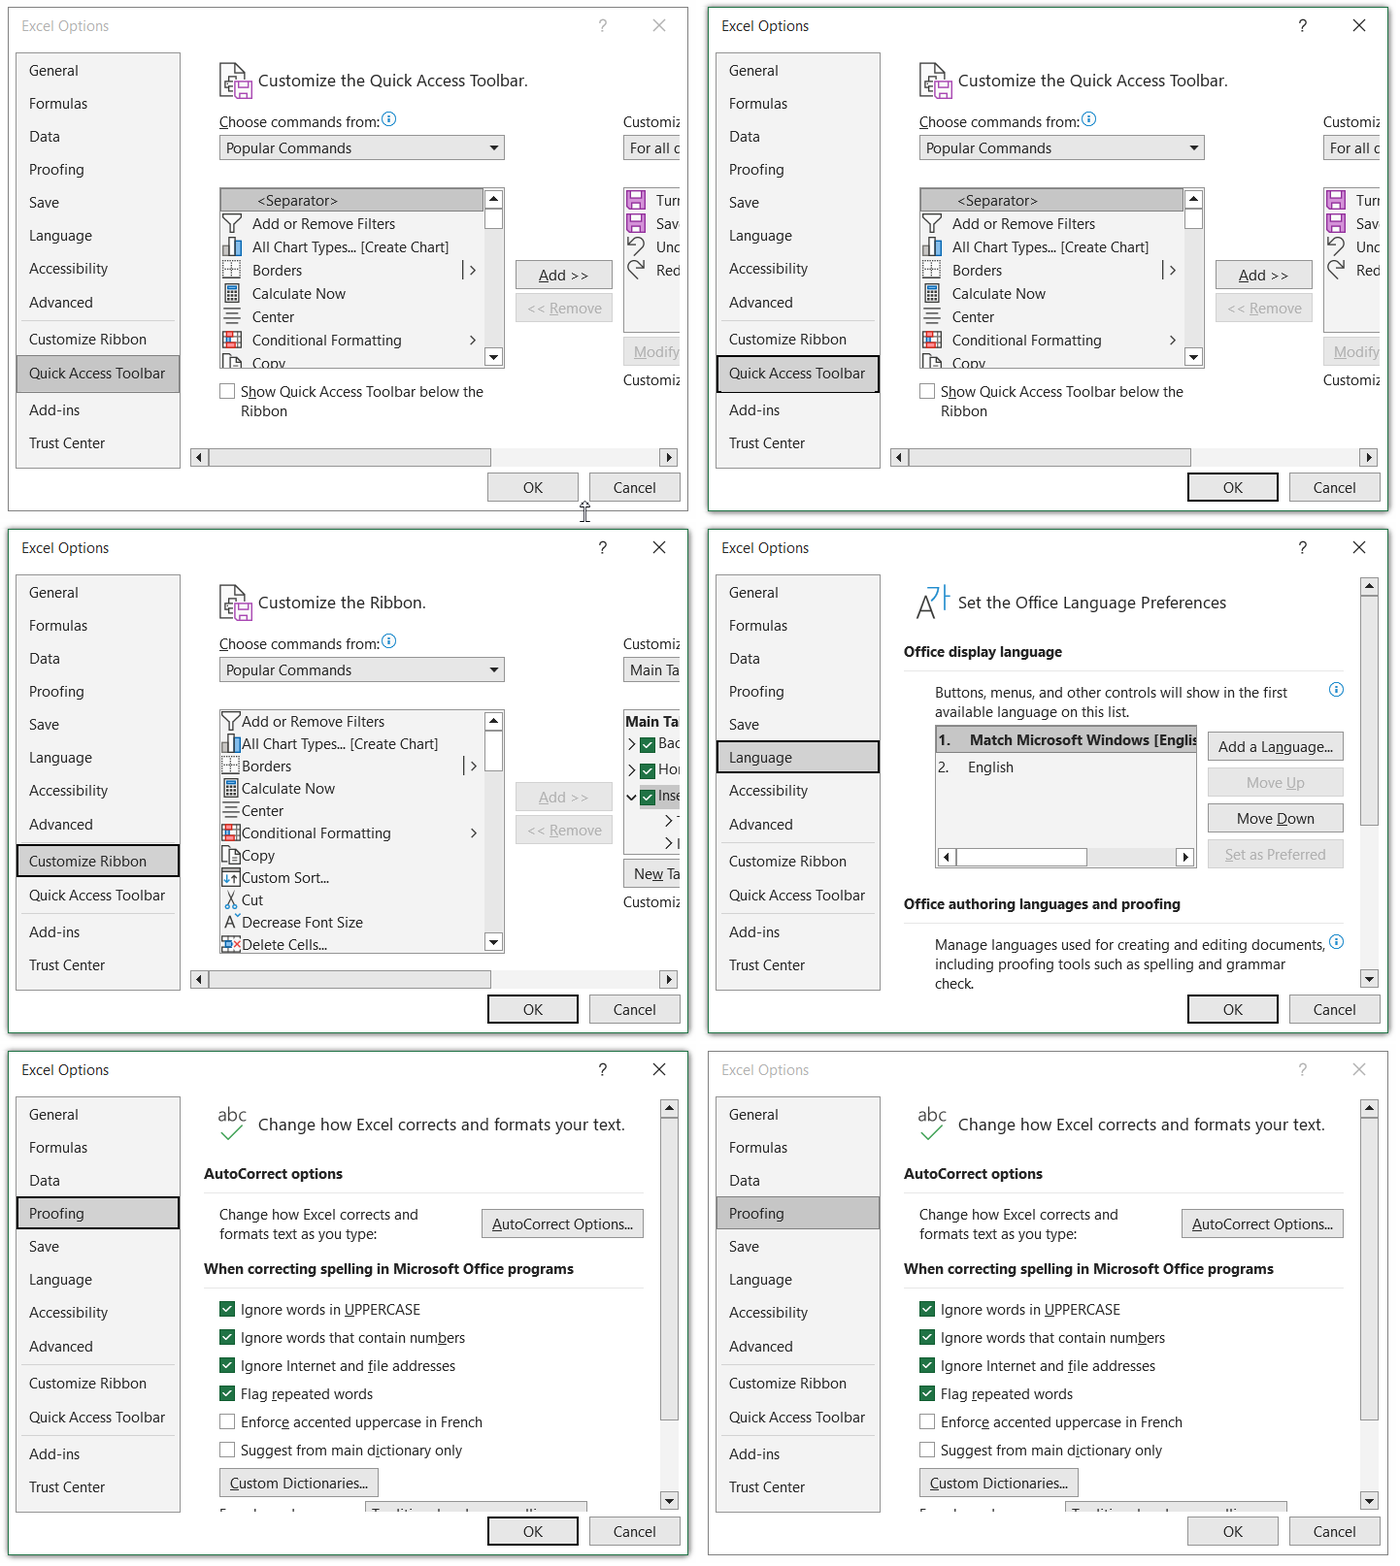
19.4 Move to Previous Tab: Ctrl + Shift + Tab
Go back to the previous tab and press Ctrl + Shift + Tab on your keyboard.
Note: For Mac users, press Control (^) + Shift (⇧) + Tab
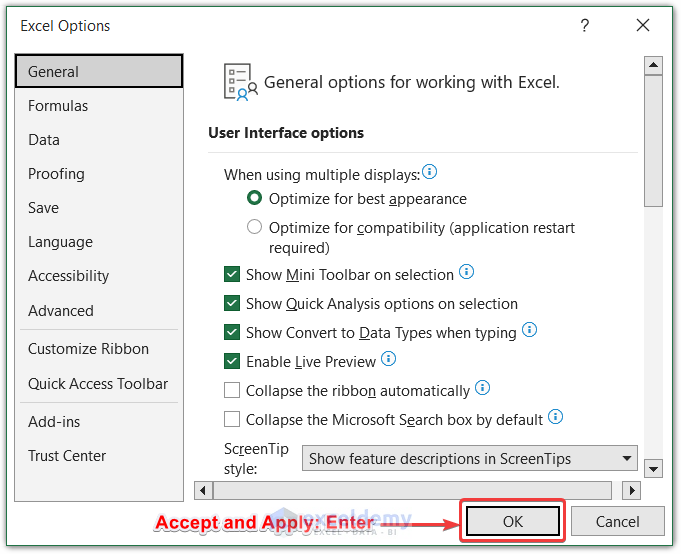
19.5 Accept and Apply: Enter
To accept and apply certain settings in a dialogue box, press Enter, which will work on the OK button as well.
Note: For Mac users, press Enter
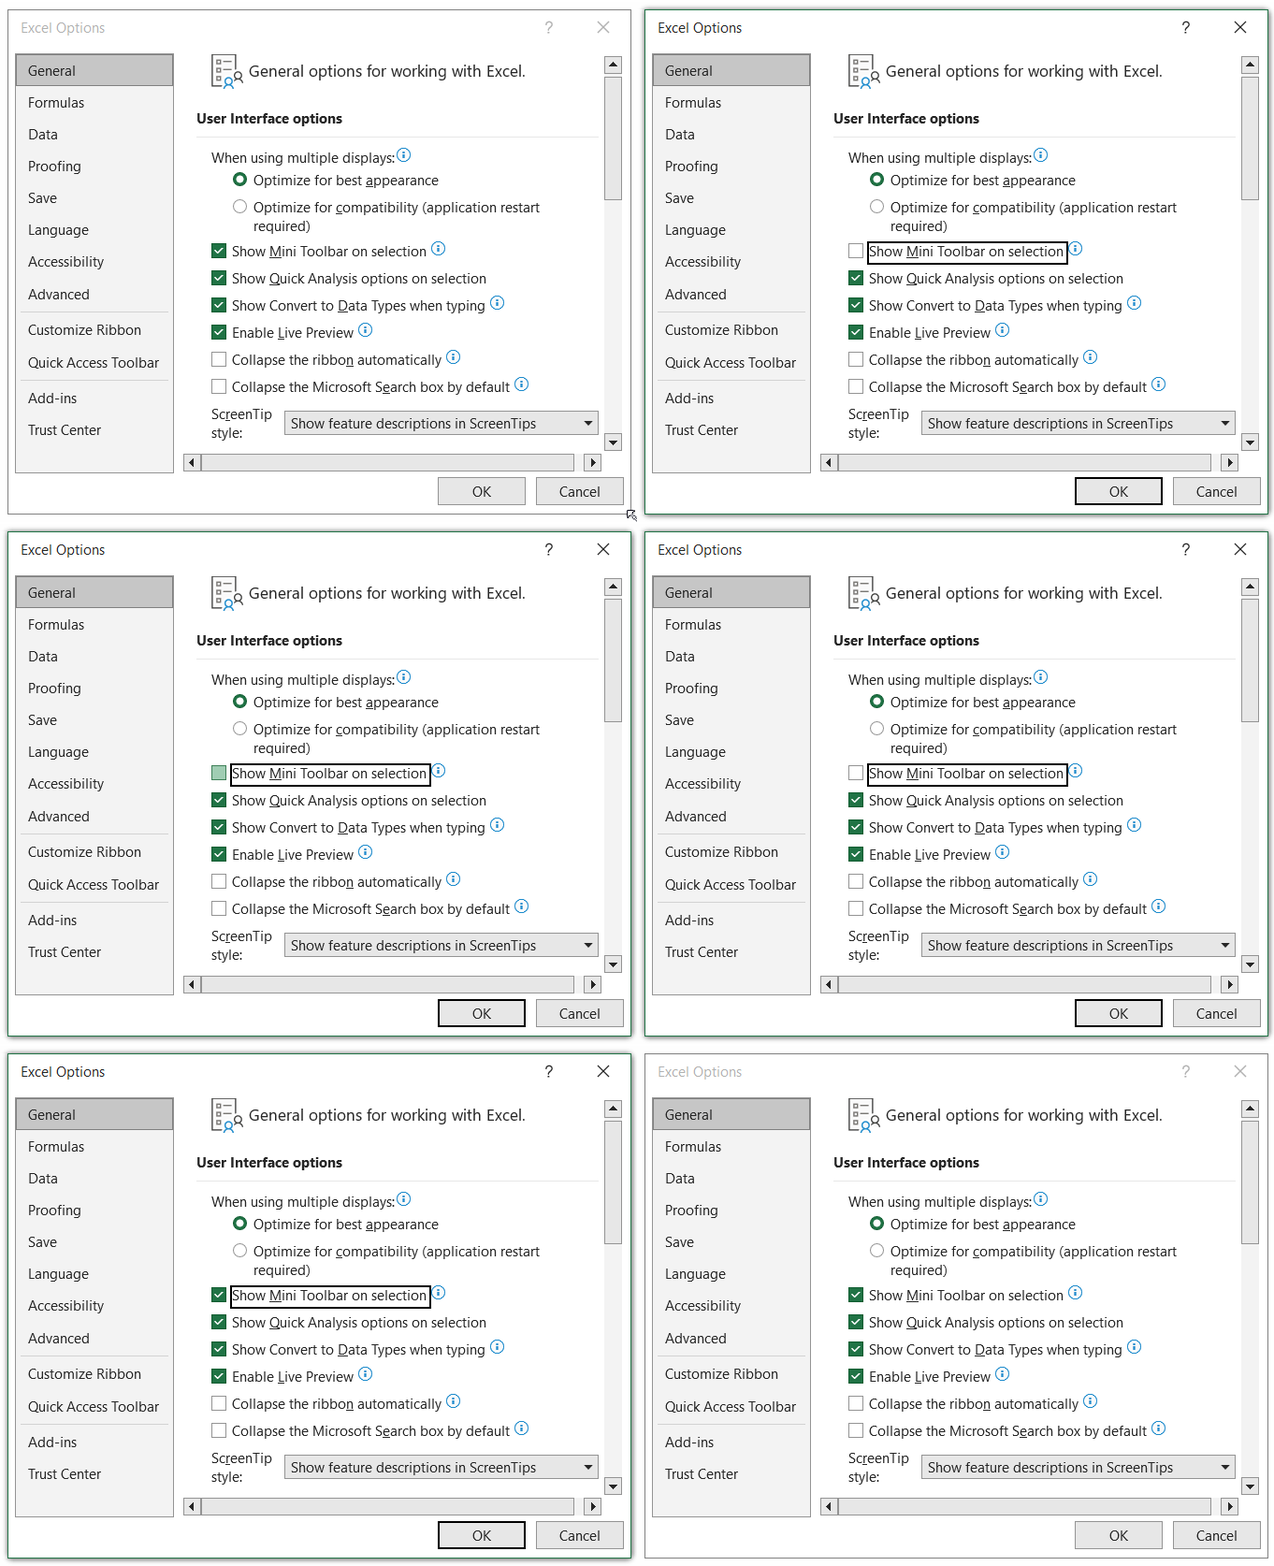
19.6 Check and Uncheck Box: Space
To check and uncheck boxes in a dialogue box, press Space each time for a change of preference.
Note: For Mac users, press Space
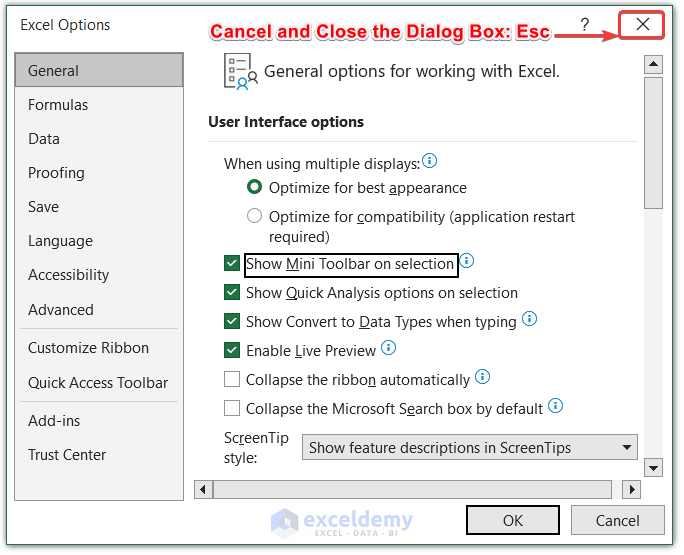
19.7 Cancel and Close the Dialog Box: Esc
Press Esc to cancel and close the dialogue box.
Note: For Mac users, press Esc
20. Other Keyboard Shortcuts
| Actions | Windows Shortcut |
|---|---|
| Run Spellcheck | F7 |
| Open Thesaurus | Shift + F7 |
| Open Macro dialog box | Alt + F8 |
| Open VBA Editor | Alt + F11 |
| Duplicate object | Ctrl + D |
| Snap to the grid (whilst dragging) | Alt |
| Hide or show objects | Ctrl + 6 |
| Open Style dialog box | Alt + ‘ |
| Show right-click menu | Shift + F10 |
| Display control menu | Alt + Space |
20.1 Run Spellcheck: F7
Open the Spelling window by pressing F7 on your keyboard.
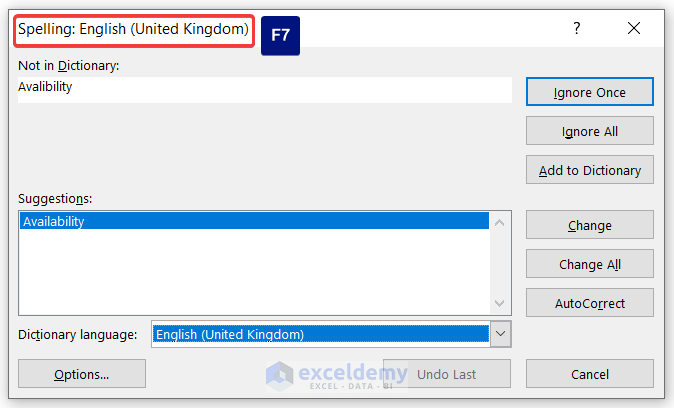
Note: For Mac users, press F7
20.2 Open Thesaurus: Shift + F7
Open the Thesaurus panel on your worksheet by pressing Shift + F7 on the worksheet.
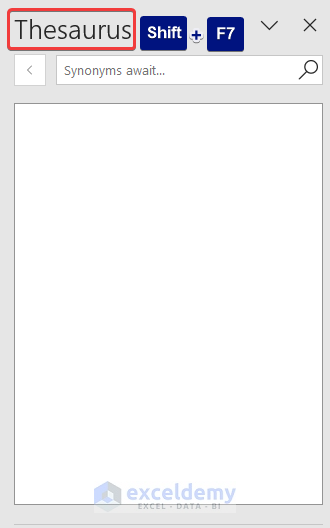
Note: For Mac users, press Shift (⇧) + F7
20.3 Open Macro Dialog Box: Alt + F8
Press Alt + F8 to open the Macro dialogue box.
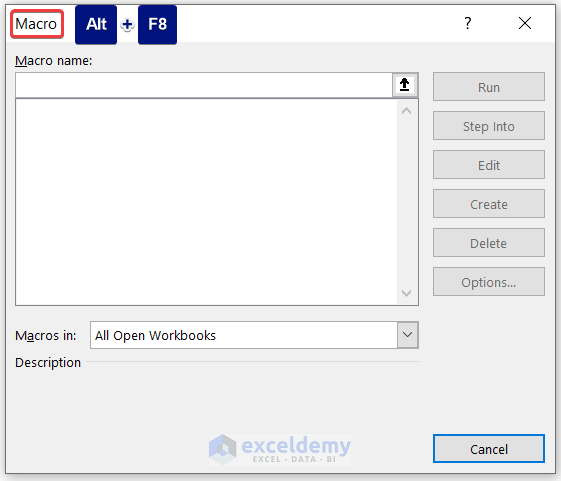
Note: For Mac users, press Option/Alt (⌥) + Function (Fn) + F9 as keyboard shortcuts in Excel.
20.4 Open VBA Editor: Alt + F11
Press Alt + F11 to open the VBA Editor window.
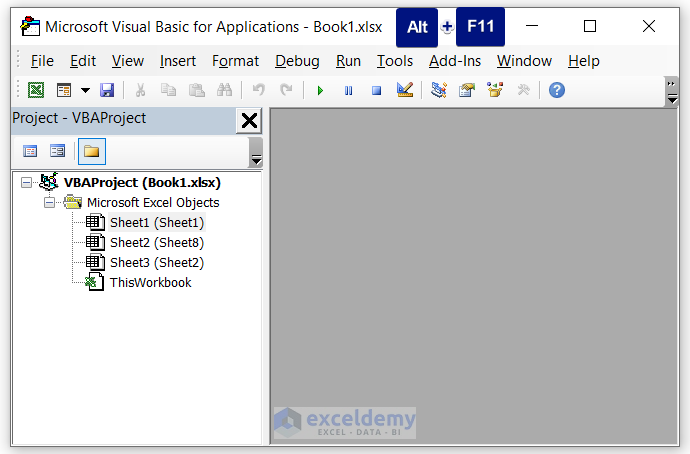
Note: For Mac users, press Option/Alt (⌥) + Function (Fn) + F11 as keyboard shortcuts in Excel.
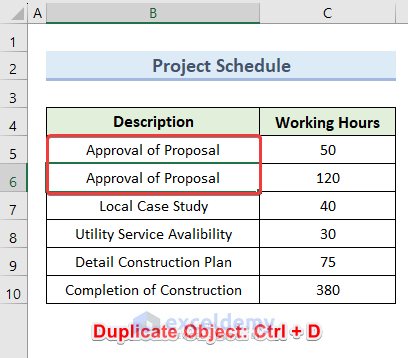
20.5 Duplicate Object: Ctrl + D
To duplicate a value or object in the same worksheet, press Ctrl + D on the keyboard.
Note: For Mac users, press Command (⌘) + D as keyboard shortcuts in Excel.
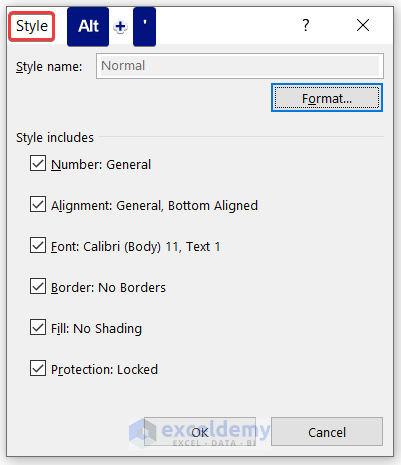
20.6 Open Style Dialog Box: Alt + ‘
Open the Style window by pressing Alt + ‘ to modify cell style.
Note: For Mac users, press Command (⌘) + Shift (⇧) + L as keyboard shortcuts in Excel.
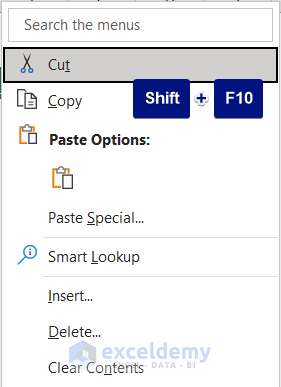
20.7 Show Right-Click Menu: Shift + F10
Press Shift + F10 to display the Context Menu in the worksheet.
Note: For Mac users, press Function (Fn) + Shift (⇧) + L
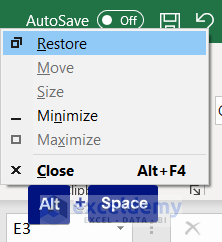
20.8 Display Control Menu: Alt + Space
Press Alt + Space as keyboard shortcuts in Excel to display the Control Menu.
<< Go Back to Learn Excel
Get FREE Advanced Excel Exercises with Solutions!
