In this article, we present 9 smart tips to reduce Excel file size without deleting data.
Why Reducing File Size Is Important in Excel?
In the case of large datasets, Excel can respond very slowly, sometimes even freezing. So, we need to reduce the file size somehow to get rid of this issue. We can reduce file size by deleting data, however this is not always practical or feasible. However there are various other ways to reduce Excel file size.
Method 1 – Removing Unnecessary Rows and Columns to Reduce Excel File Size
In our Excel files, often there are some unnecessary rows and columns that aren’t related to our main dataset, but they increase the file size.
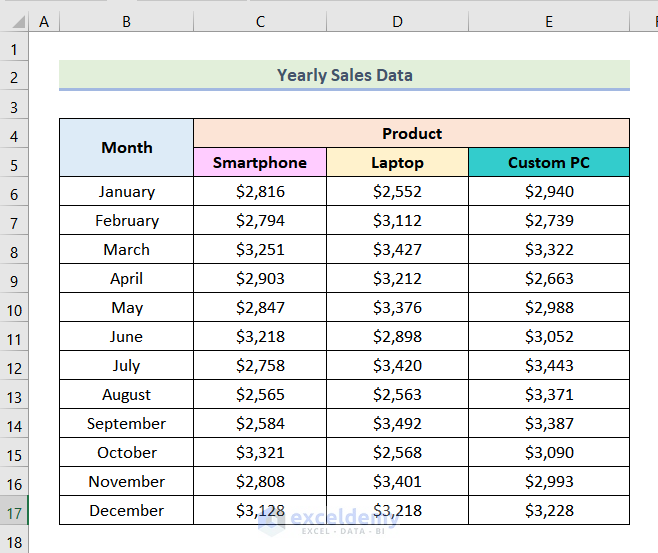
In the following dataset, we have the Yearly Sales Data of a tech store.
By scrolling down and to the right, we can see that there are a lot of data in the worksheet that are not related to our main dataset.
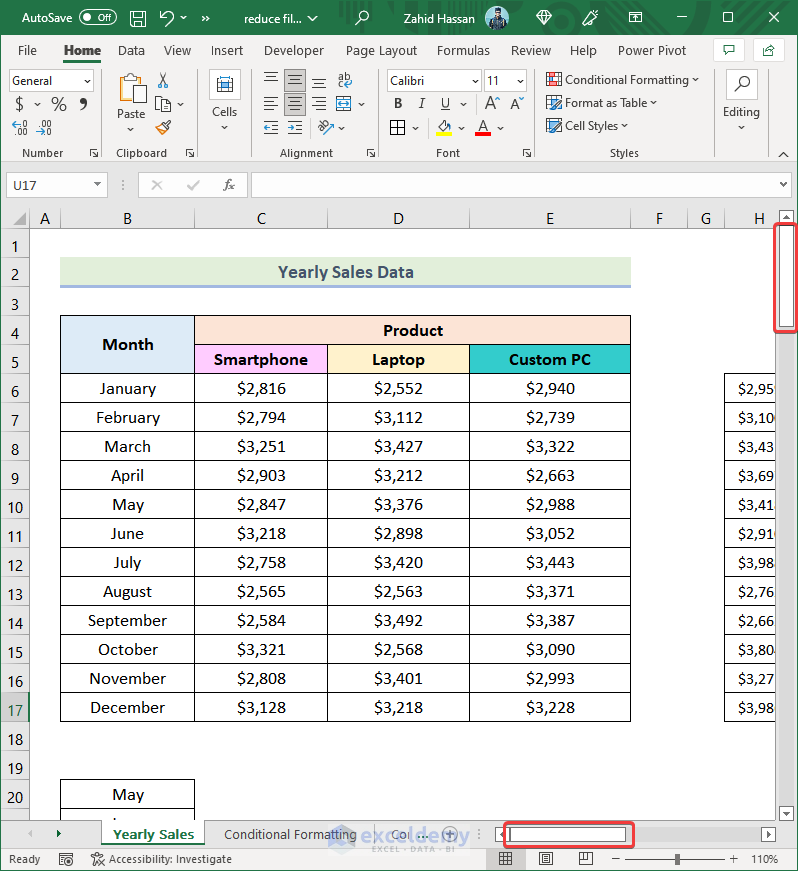
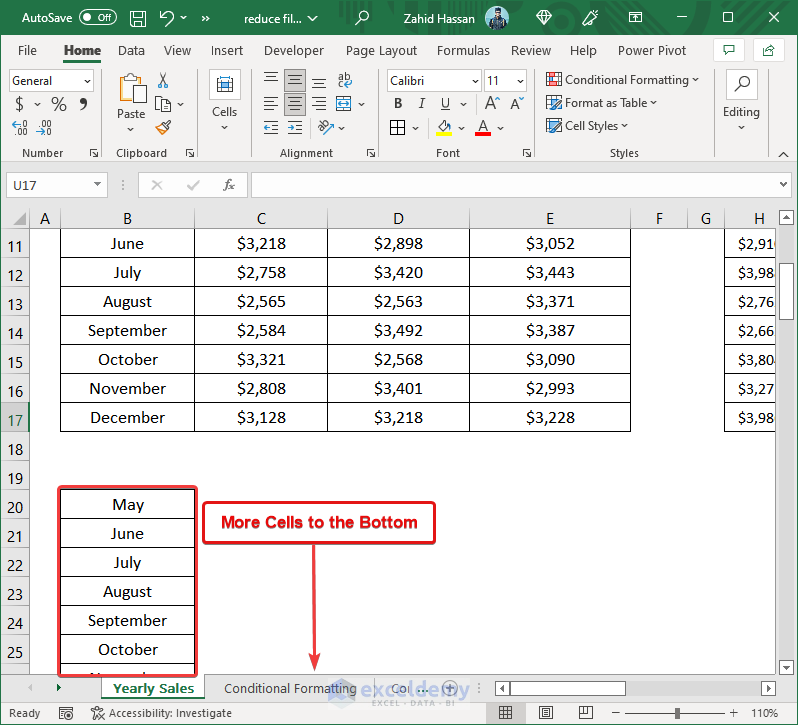
The unnecessary data at the bottom of our dataset is shown in the following image.
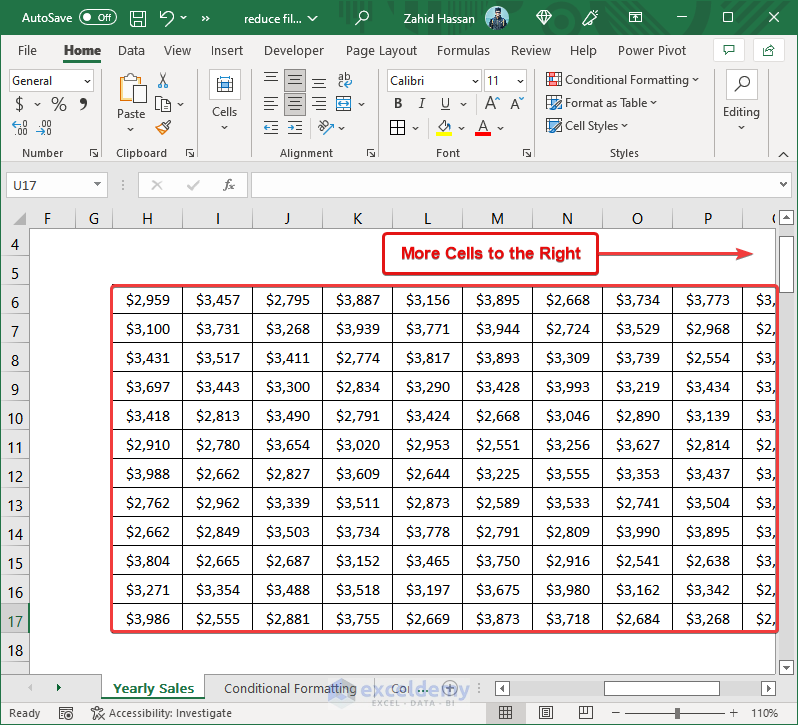
Scrolling to the right reveals even more unneeded data.
To remove these unnecessary rows and columns do the following:.
Step 1 – Removing Unnecessary Rows Below
- Select the first cell of the unnecessary data. In this case, this is cell B20.
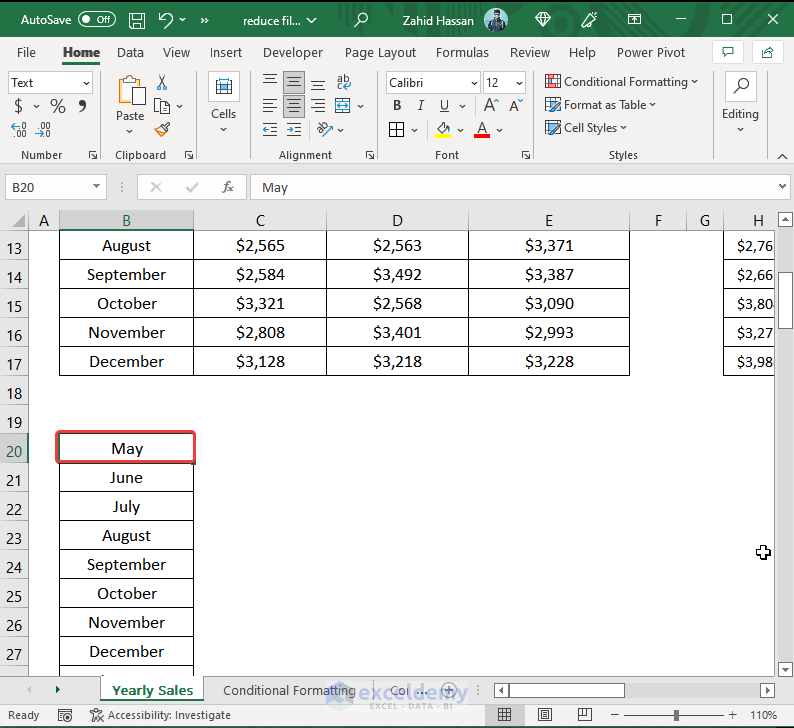
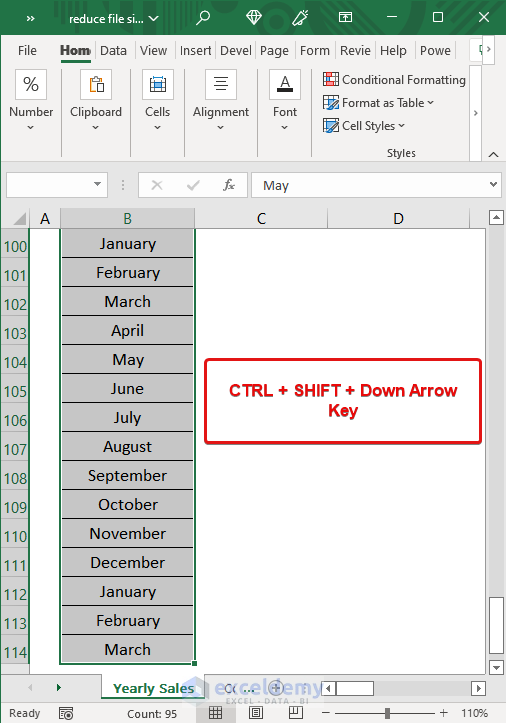
- Use the keyboard shortcut CTRL + SHIFT + Down arrow (↓) to select all the cells down to the last row of the worksheet.
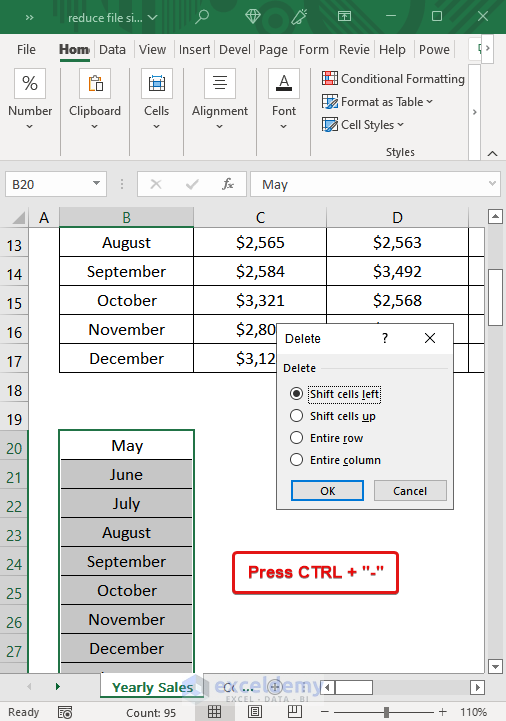
- Press CTRL + “-” (CTRL + Minus) .
The Delete dialog box will open.
- From the dialog box, choose Shift cells up and click on OK.
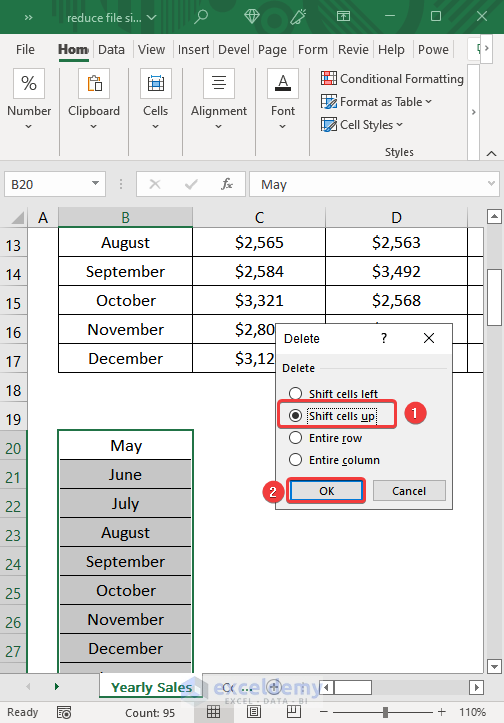
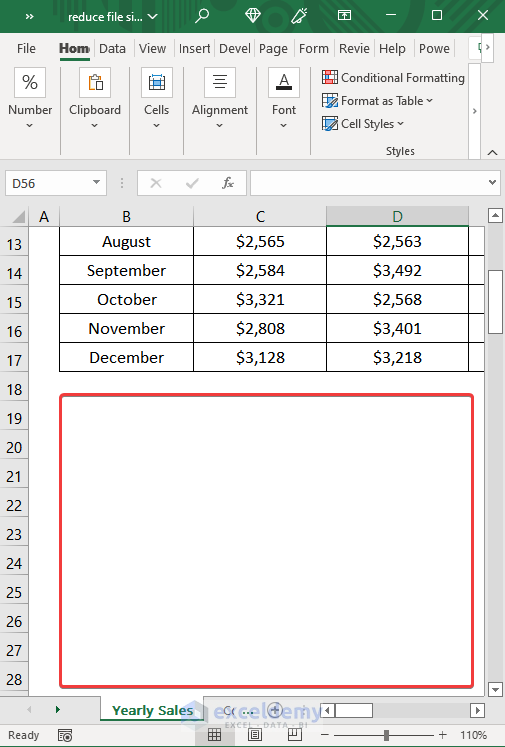
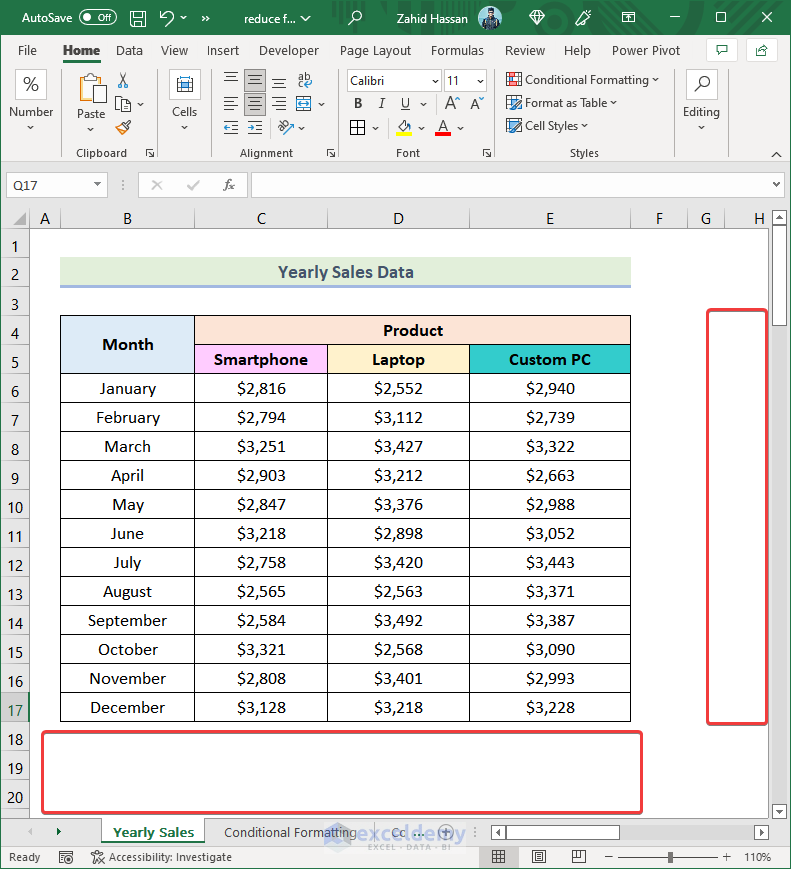
The unnecessary rows below our dataset will be removed, as marked in the following picture.
Step 2 – Removing Unnecessary Columns and Rows to the Right
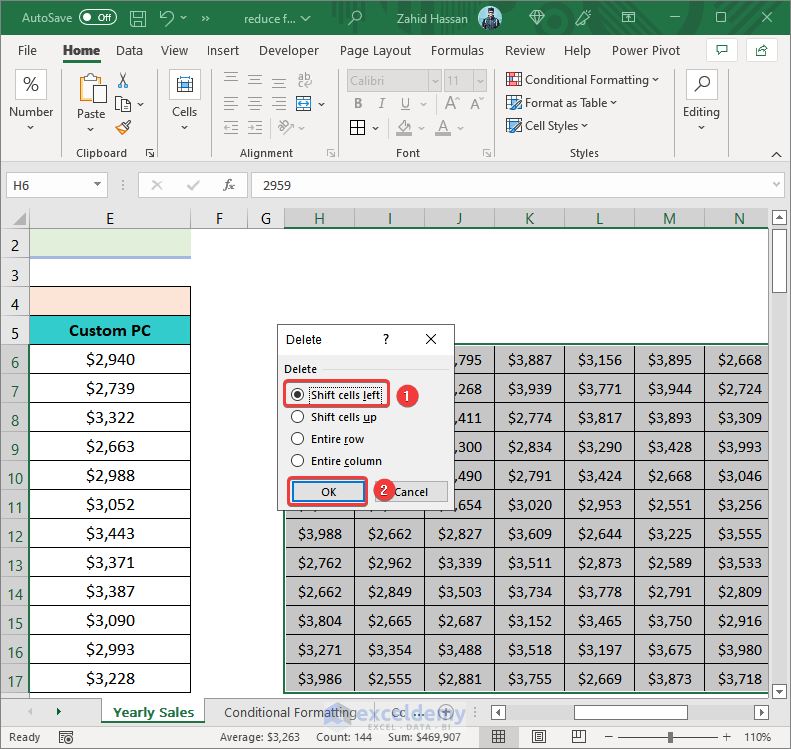
- Again, select the first cell of the unnecessary data to the right of our dataset.
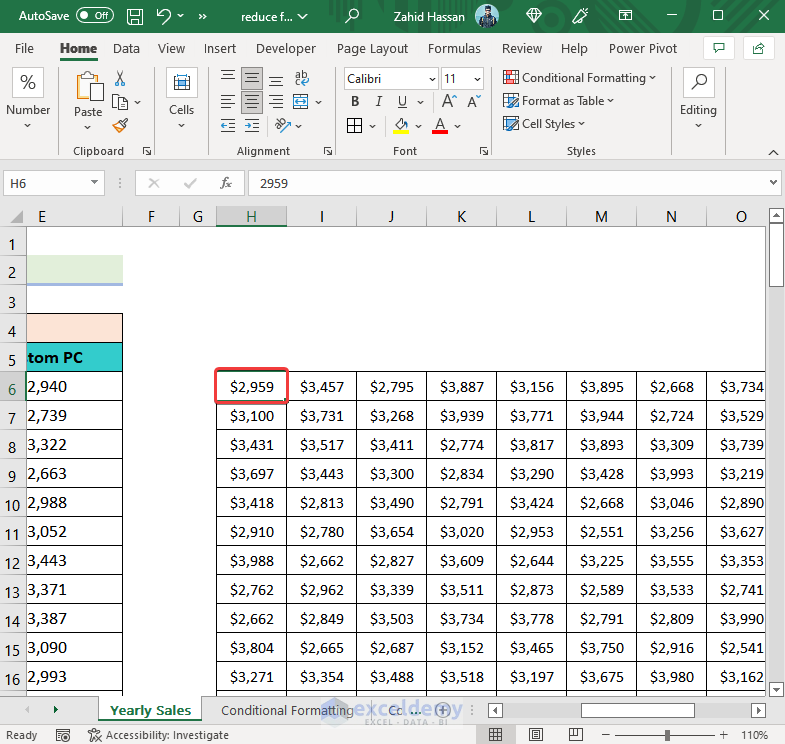
- Use the keyboard shortcut CTRL + SHIFT + Right (→) to select all the extra data up to the last column.
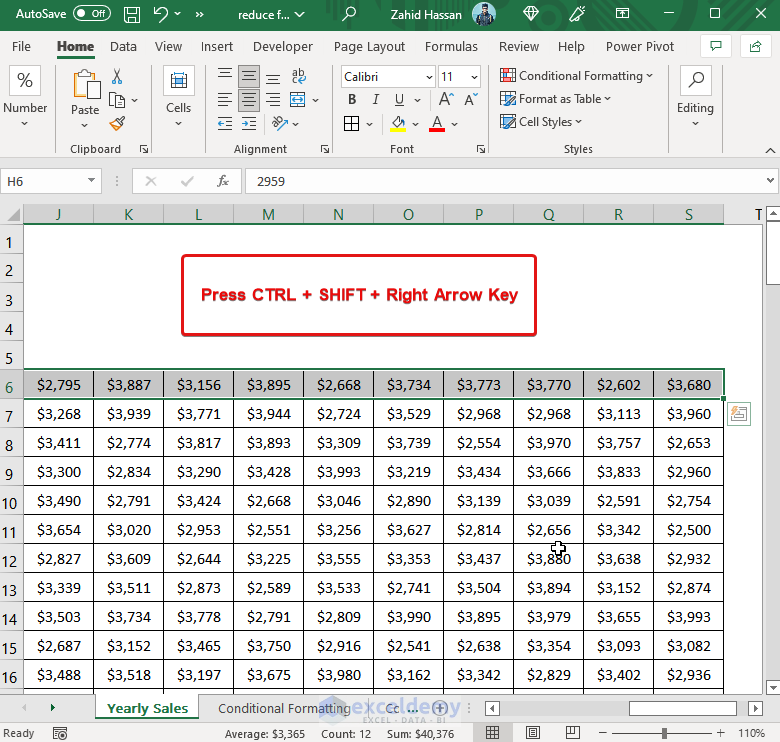
- Press CTRL + SHIFT + Down arrow (↓) to select all the data under the selected column in the previous step.
- Press CTRL + “-”.
The Delete dialog box will open.
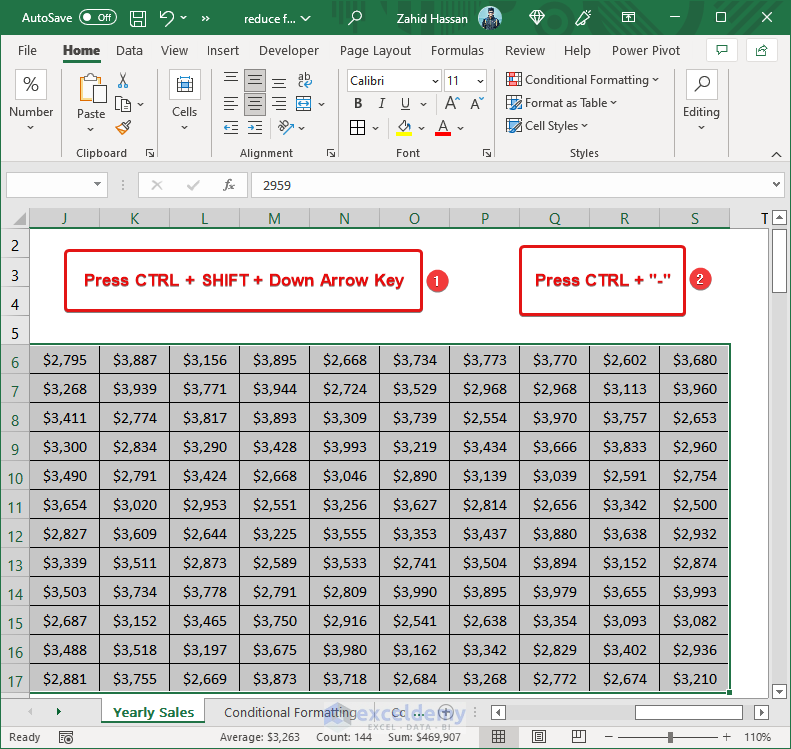
- In the Delete dialog box, select Shift cells left and click OK.
The unnecessary rows and columns are removed from the worksheet.
Read More: How to Reduce Excel File Size by Deleting Blank Rows
Method 2 – Remove Conditional Formatting and Other Formats
The presence of Conditional Formatting also increases the file size of an Excel file. Removing conditional formatting will therefore reduce Excel file size without any data loss.
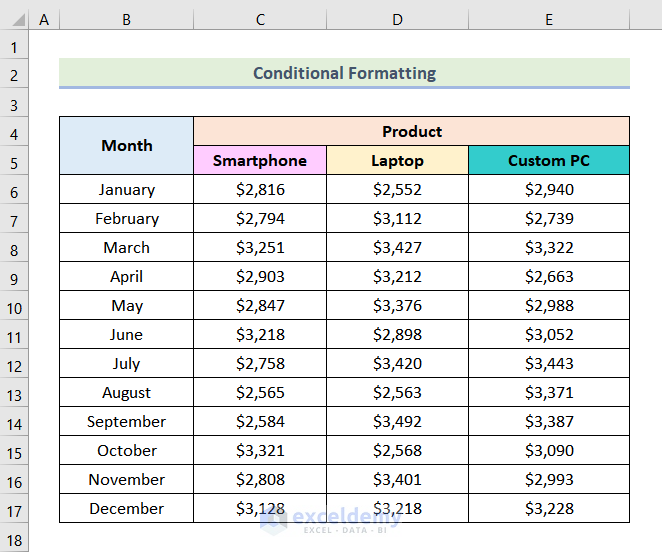
In the following dataset, we have Yearly Sales data of a tech store, in which conditional formatting has been applied.
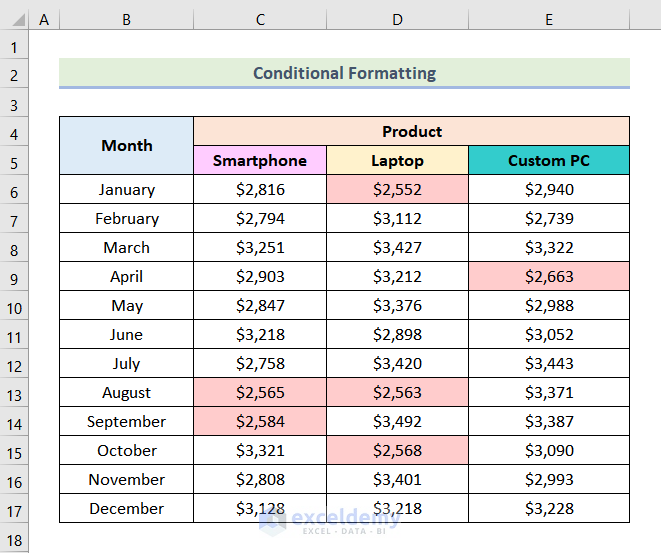
Let’s remove the conditional formatting.
Steps:
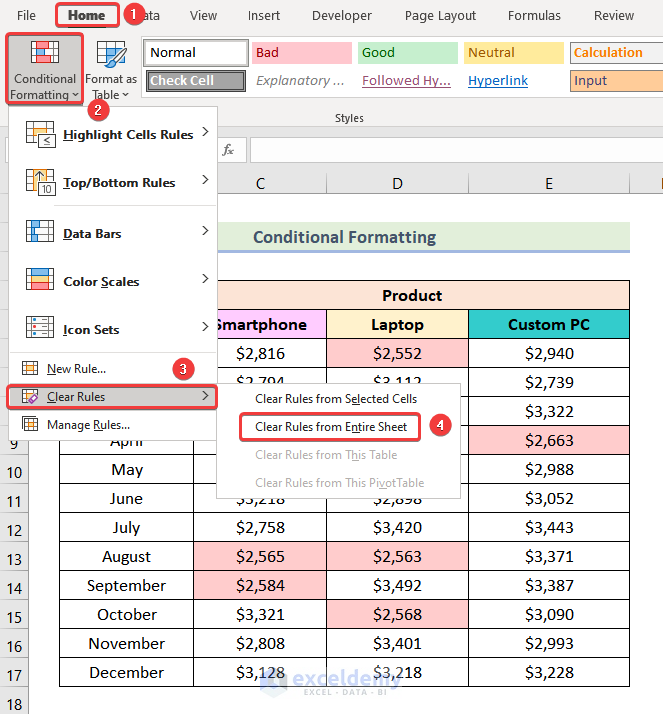
- Go to the Home tab on the Ribbon.
- Click on Conditional Formatting.
- From the drop-down, choose Clear Rules.
- Select Clear Rules from Entire Sheet.
The entire worksheet is cleared of any conditional formatting applied to cells.
Method 3 – Compressing Pictures
Another effective way to reduce Excel file size without deleting data is by compressing any images in the worksheet.
In the following dataset, we have 3 website links and their associated QR Codes as pictures.
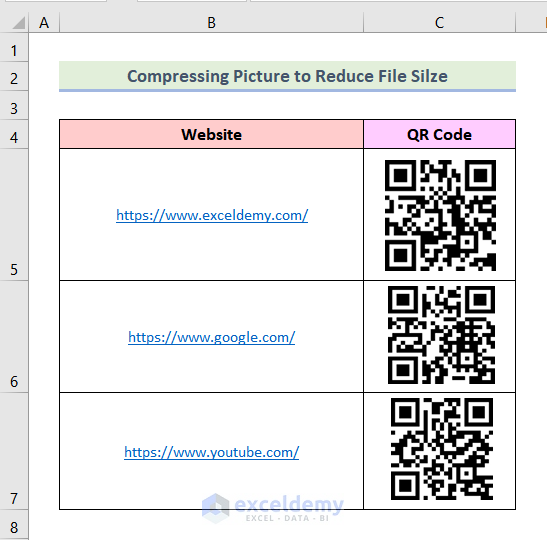
Let’s compress the pictures to reduce the Excel file size.
Steps:
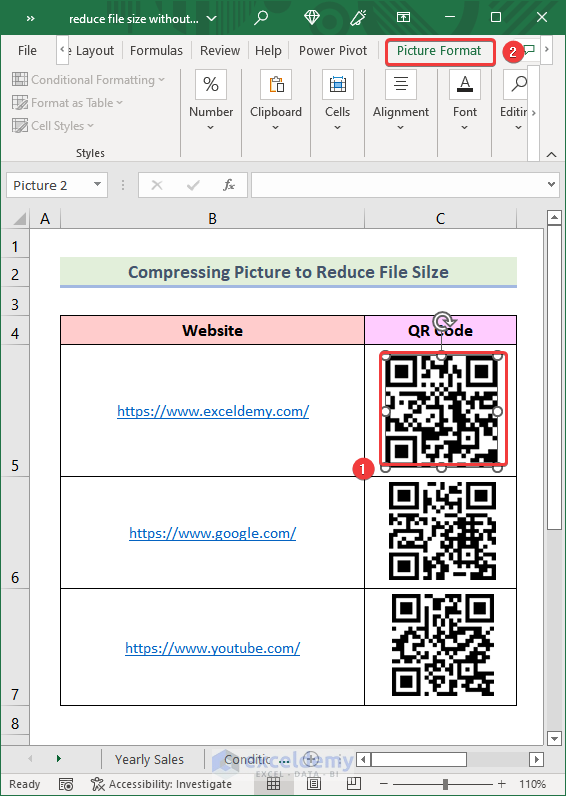
- Click on any picture in the worksheet.
The Picture Format tab becomes available in the Ribbon.
- Click on the Picture Format tab.
- Choose Compress Pictures from the Adjust group.
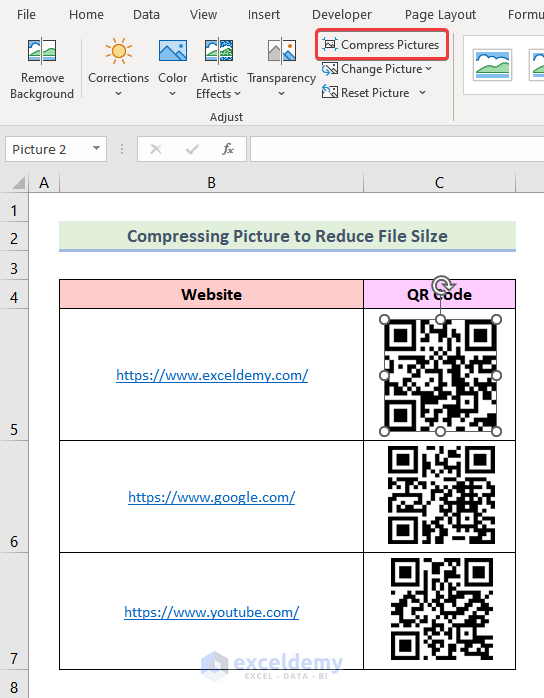
- Choose your preferred Resolution from the dialog box.
- Click OK.
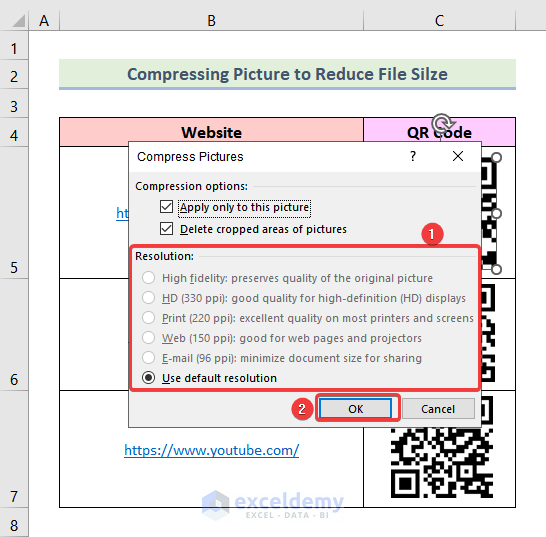
- Follow these same steps to compress the other pictures.
Read More: How to Reduce Excel File Size with Pictures
Method 4 – Removing Complex Formulas
By eliminating complex formulas, we can reduce Excel file size without deleting data.
In the following dataset, we have some names with a comma between the first name and the surname.
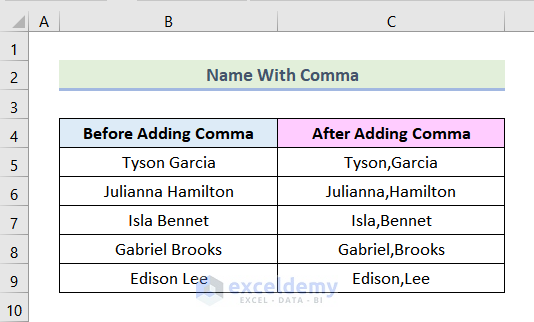
We have used complex nested functions e.g. the Nested IF function to accomplish this in one step. We can perform this operation in multiple simple and easy-to-calculate steps instead.
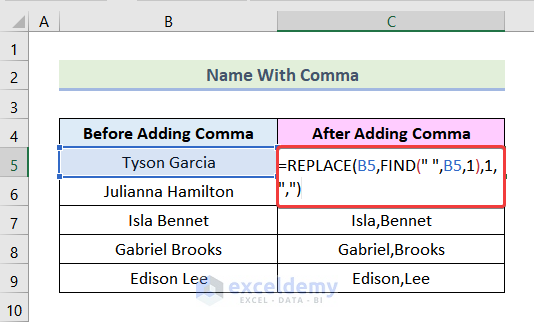
Steps:
- Create 2 columns named Position of Space and Replacing with Comma.
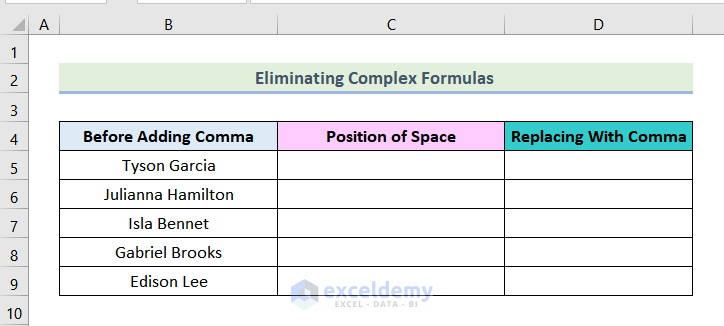
In the Position of the Space column, we will use a formula to find the position of the space in the string starting from the 1st character using the FIND function.
- Insert the following formula in cell C5:
=FIND(" ",B5,1)Here, B5 is the cell in which to search for the space.
- Press ENTER.
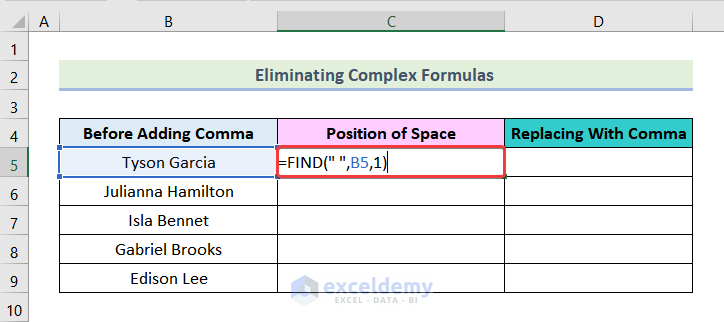
The position of the space for the first string will be returned.
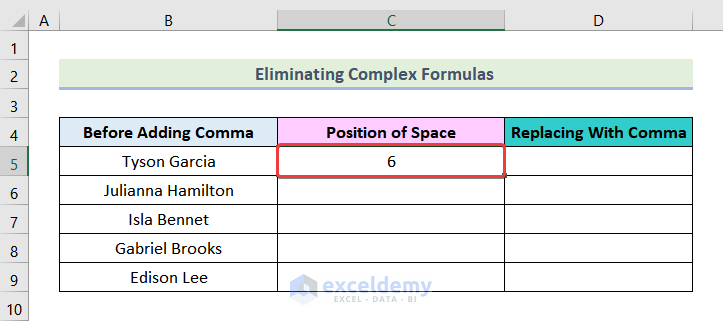
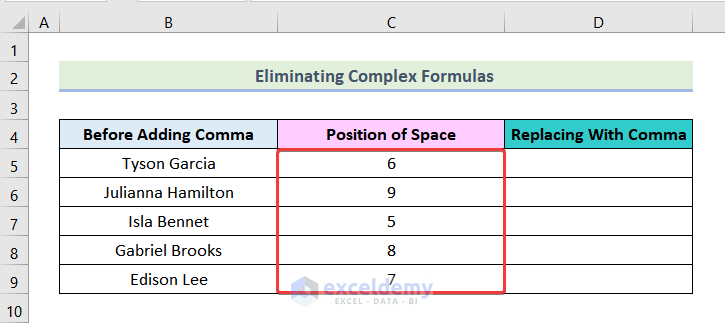
- Use the Fill Handle to AutoFill the formula to the rest of the cells in the column.
In the Replacing With Comma column, we use the REPLACE function to replace the space with a comma.
- Enter the formula below in cell D5:
=REPLACE(B5,C5,1,",")Here, C5 is the starting number of the character that we need to replace.
- Press ENTER.
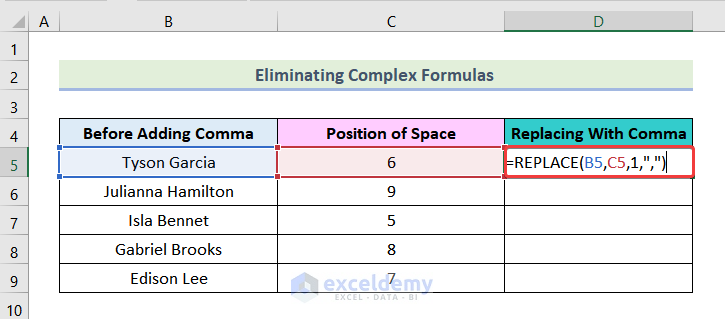
- Obtain the remaining data by using the AutoFill feature.
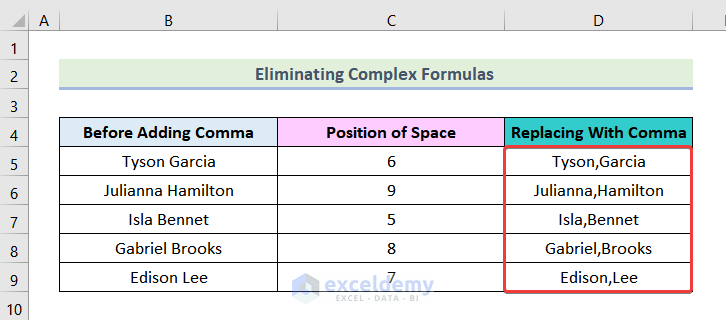
In this way, a complex formula can be split into several simple formulas, with the effect of reducing Excel file size without deleting data.
Note: Needless to say, the use of complex functions is unavoidable in some cases. However where feasible, breaking complex formulas into simpler segments is good practice in Excel.
Read More: How to Compress Excel File to Smaller Size
Method 5 – Optimizing Used Formulas
By optimizing the formulas that we have used in our worksheet, we can reduce the Excel file size without deleting data.
In the following dataset, we have the Random Ticket Serial No of some people.
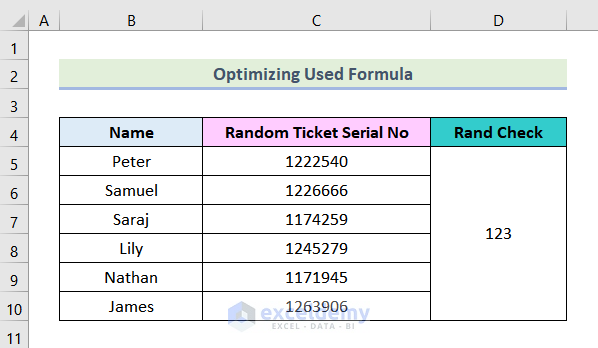
We have generated these numbers using the RANDBETWEEN function, which is a volatile function.
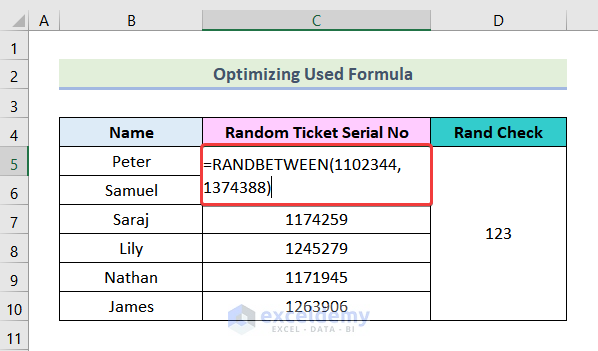
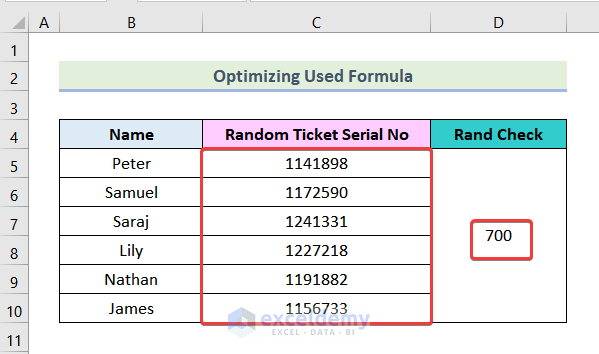
That means these values will be changed whenever we enter anything into any cell of this workbook, which leads to an avoidable increase in computational load. To reduce the file size, we must avoid the use of volatile functions.
Here, we have inserted 700 in the Rand Check column. As a result, all of the numbers in column C are changed.
To avoid the use of the volatile function:
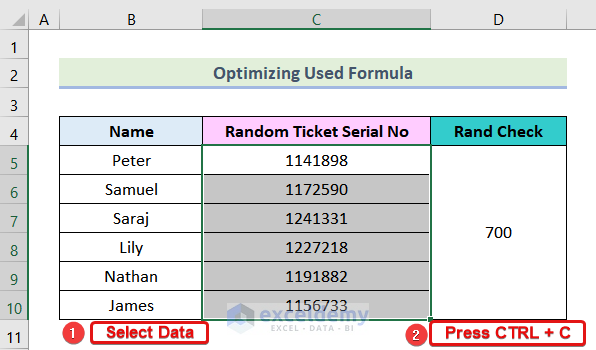
- Select the data that are generated by using the RANDBETWEEN function.
- Press CTRL + C to copy the selected cells.
- Go to the Home tab on the Ribbon.
- Select the Paste option.
- From the drop-down, choose Values.
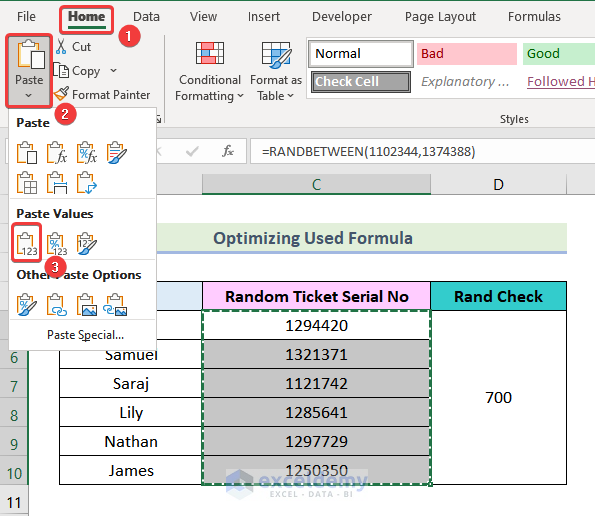
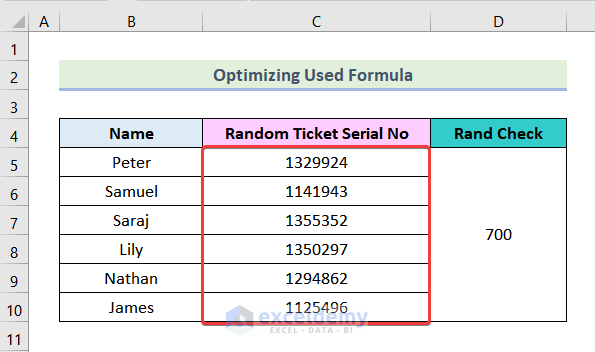
The numbers will be pasted as values in column C.
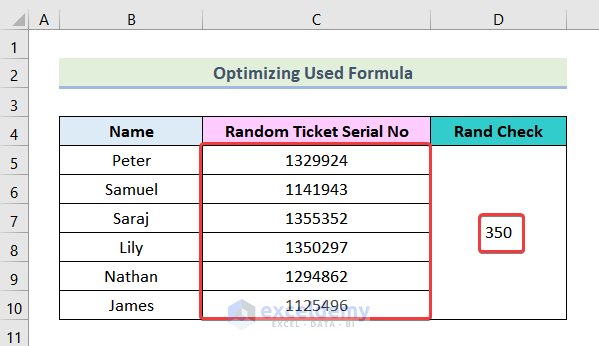
- Now enter a number in the Rand Check column, for example 350.
The numbers remain unchanged.
Method 6 – Avoiding Pivot Tables
Although PivotTables provide many useful options to work with our dataset, they also take up a large space and increase the file size.
In the following dataset, we have the Yearly Sales data of a tech store. We need to find the sum of sales items.
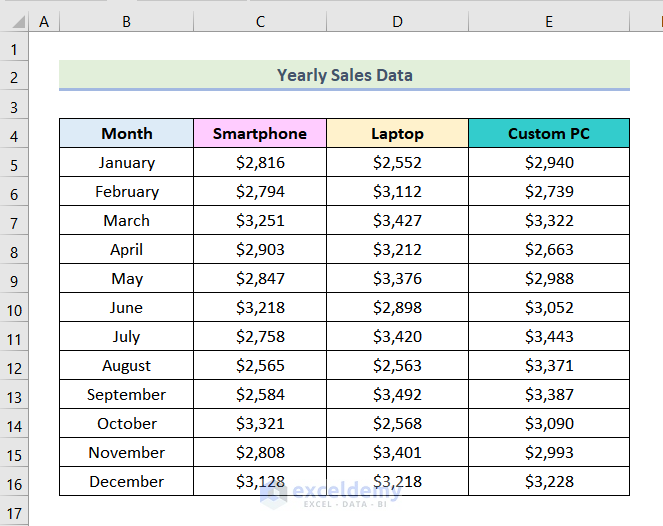
We have used a PivotTable to find the sum of the sales.
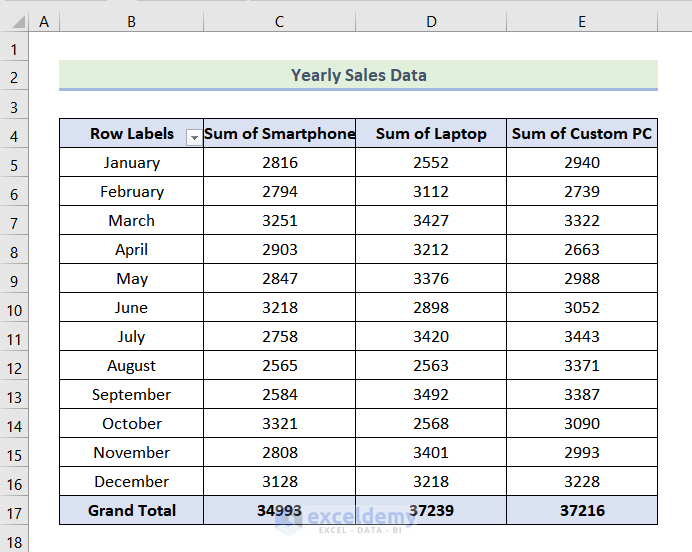
But we can avoid using this PivotTable by using the SUM function instead.
Steps:
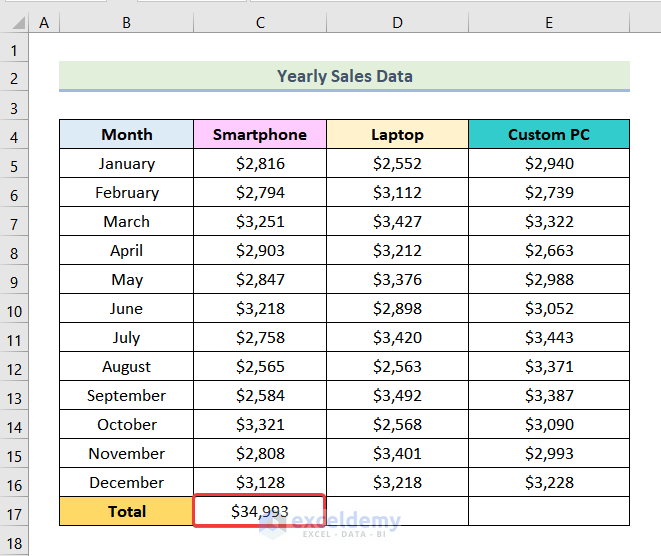
- Create a new row as shown in the following image.
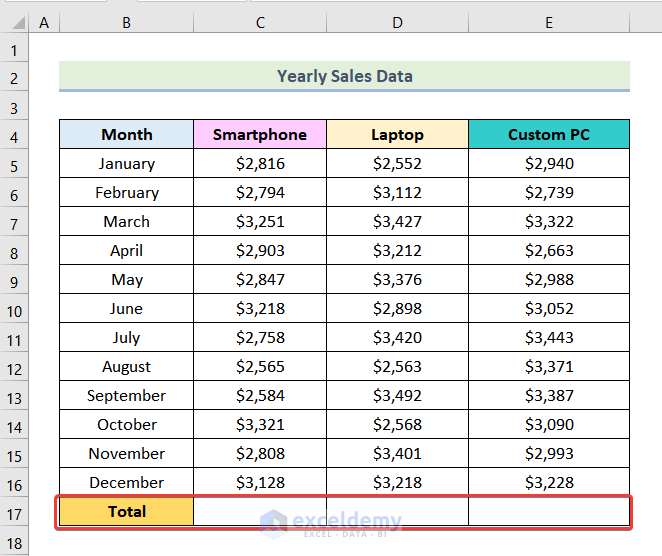
- Enter the following formula in cell C17:
=SUM(C5:C16)Here, C5:C16 represents the range of Sales Data of the Smartphone.
- Press ENTER.
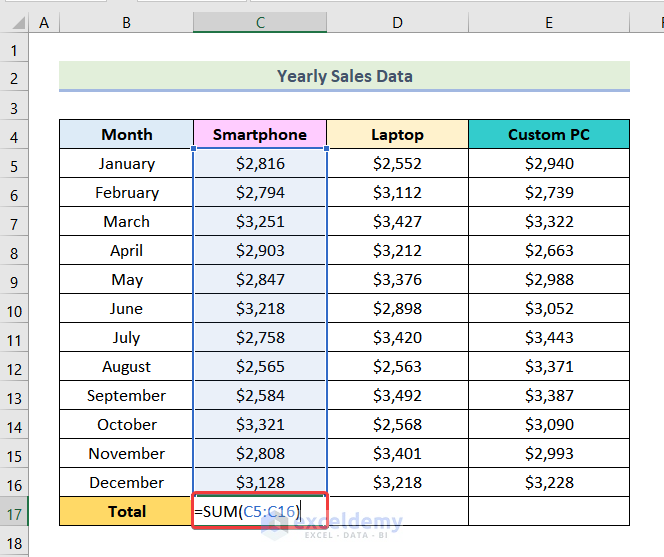
The following output is returned:
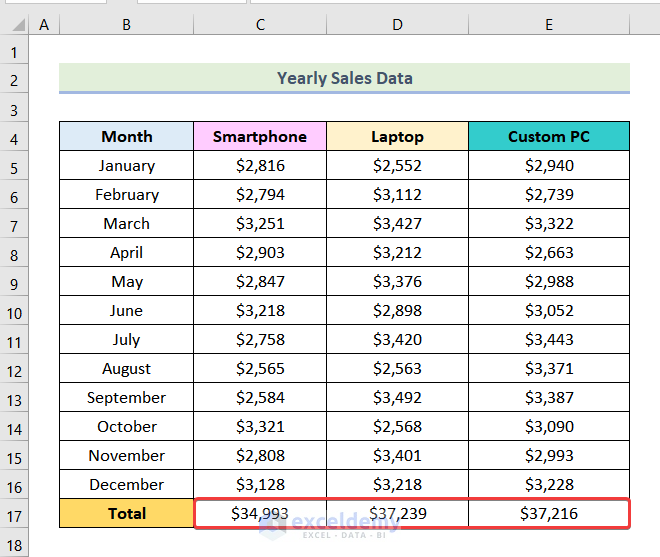
- Drag the Fill Handle to the right to obtain the rest of the sums.
Method 7 – Saving the Workbook in Binary Format (Save As XLSB)
We can reduce Excel file size without deleting data by saving the workbook in a Binary Format Workbook.
Steps:
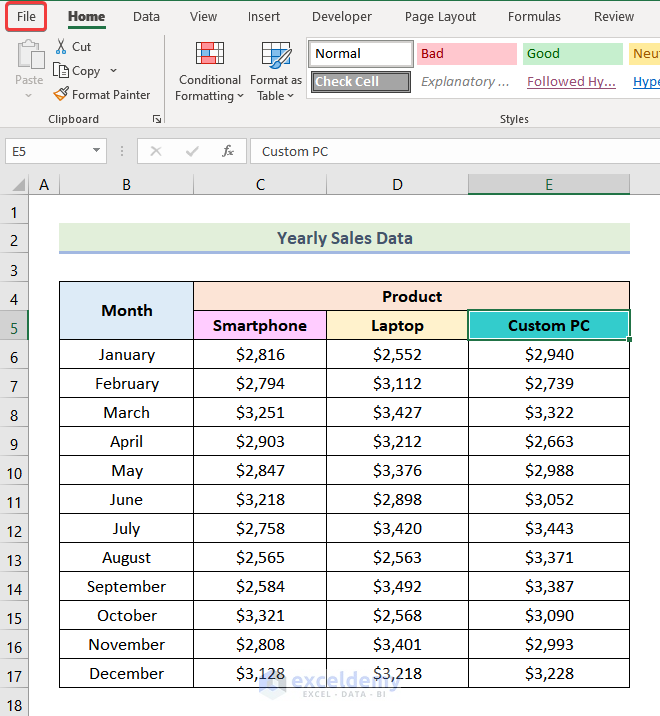
- Go to the File tab on the Ribbon.
- Choose the Save As option.

- Navigate to the folder in which the file will be saved.
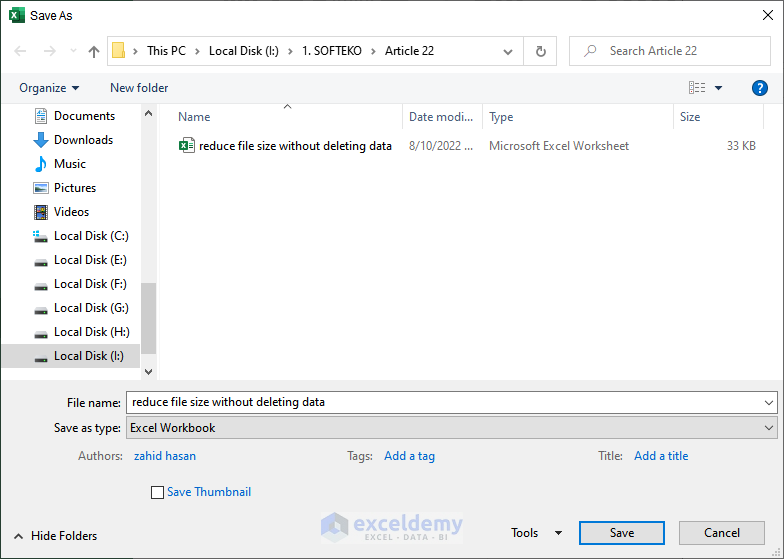
- Click on the marked portion in the following picture.
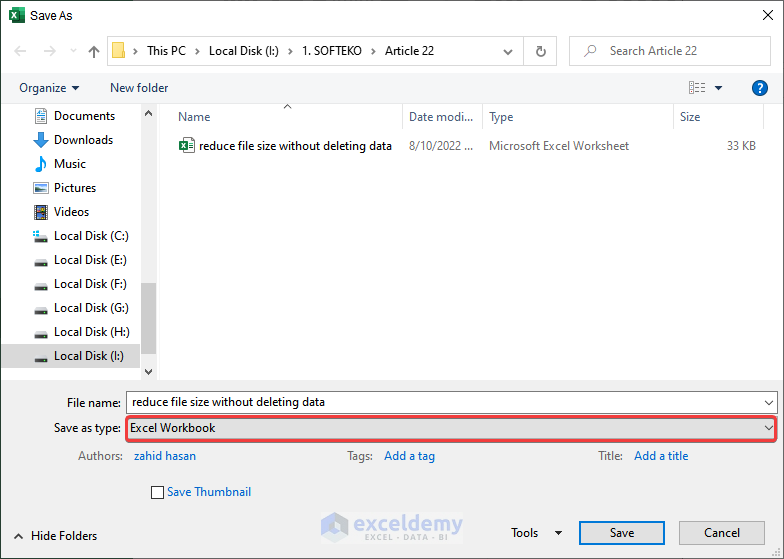
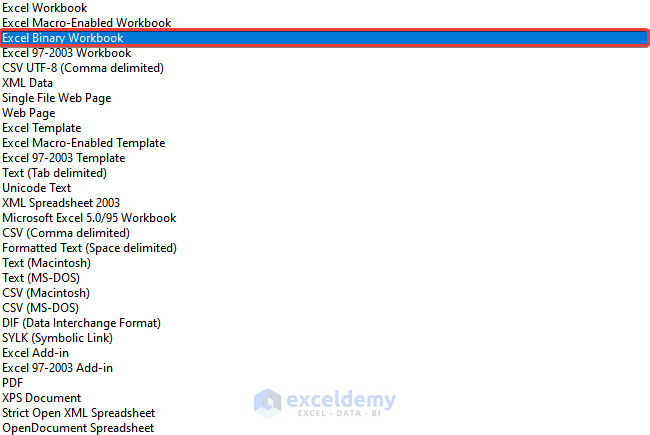
- Choose Excel Binary Workbook from the drop-down.
- Click on Save.
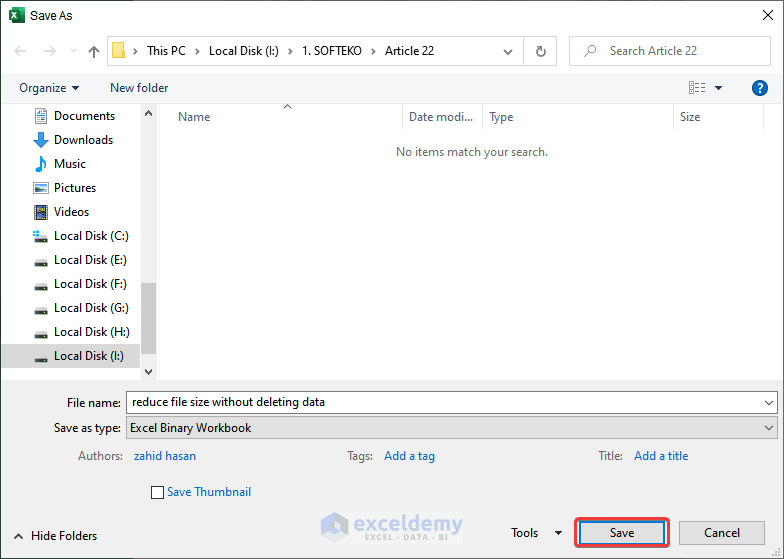
The file size decreases, as shown in the picture below.

Method 8 – Saving as CSV Format
A similar way to reduce Excel file size without deleting data is saving the Excel workbook as a CSV Format Workbook.
Steps:
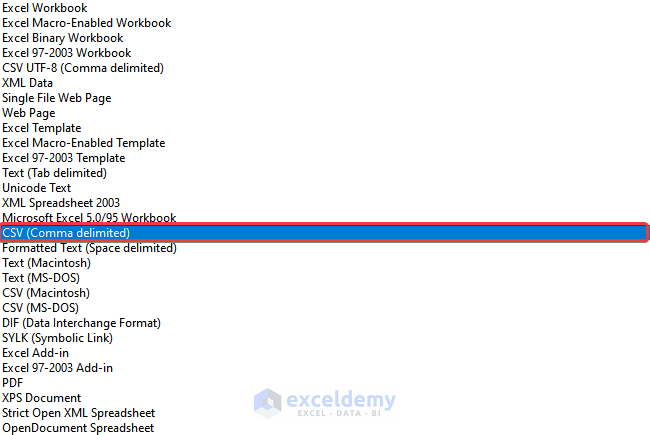
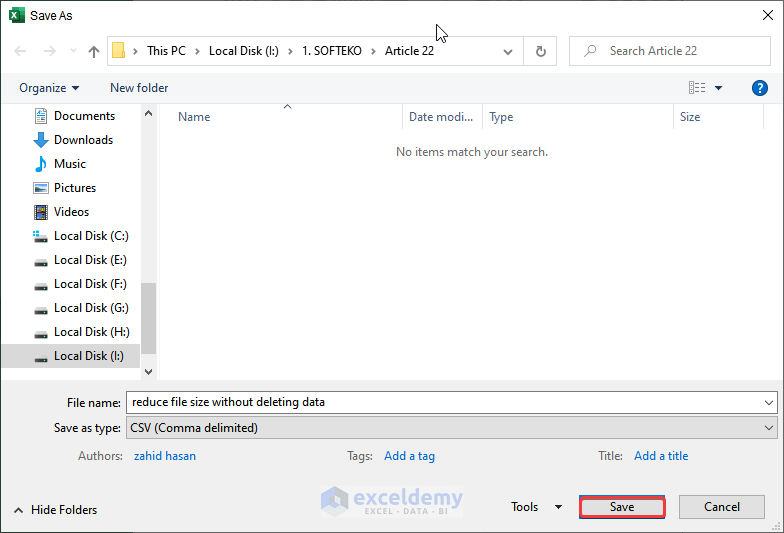
- Follow the steps above to open the Save as type drop-down list.
- Choose CSV (Comma delimited).
- Click on Save.
The file size is reduced to only 1 KB!

In some cases, you might need to convert the CSV file into an Excel file when opening it to avoid any distortion of the data.
Method 9 – Compressing the Excel File
We can also reduce Excel file size by compressing the Excel file.
Steps:
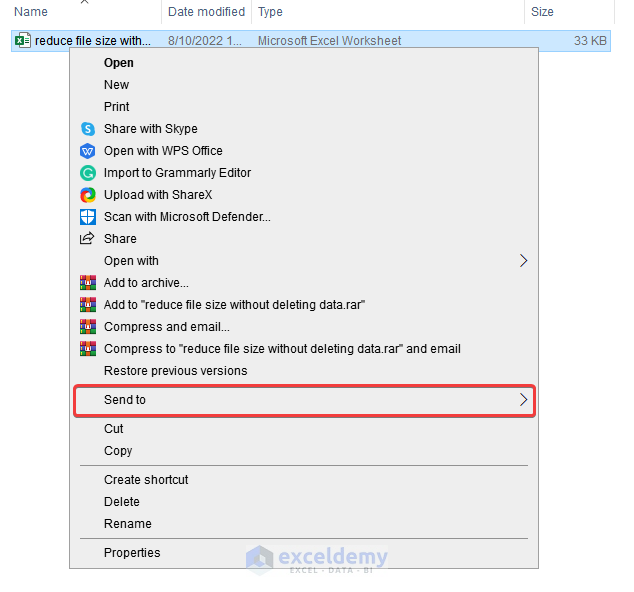
- In the File Explorer, right-click on the Excel file to compress.
- Choose the Send to option from the context menu.
- Select the Compressed (zipped) folder option.
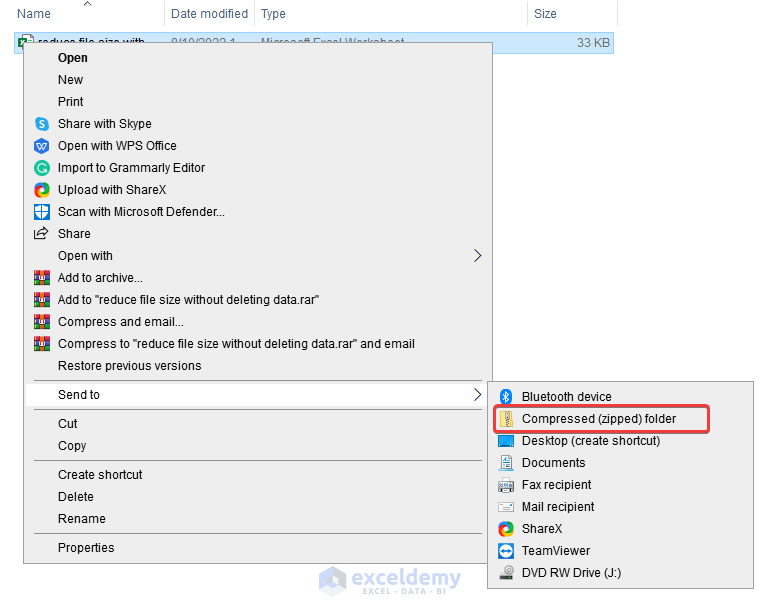
The Excel file will be compressed, with a reduced resultant file size.

Read More: How to Zip an Excel File
Things to Remember
- The percentage of file size reduction depends on the initial size of the workbook. That is, the larger the size of the workbook, the greater the reduction in file size is likely to be
Download Practice Workbook
Related Articles
- How to Determine What Is Causing Large Excel File Size
- How to Compress Excel File for Email
- How to Reduce Excel File Size Without Opening
- [Fixed!] Excel File Too Large for No Reason
- How to Reduce Excel File Size with Macro
- How to Compress Excel File More than 100MB
<< Go Back to Excel Reduce File Size | Excel Files | Learn Excel
Get FREE Advanced Excel Exercises with Solutions!

