There are various ways to display messages for 5 seconds using VBA in Excel. In the video below, we use VBA code to display a MsgBox for five seconds before selecting all cells.
Displaying a Message Box for a Specific Time in VBA
A message can be displayed for a set period of time using the Application.wait method in Excel VBA. This method pauses the VBA code execution for a defined amount of seconds, during which the message is shown. The VBA code continues to function until the set time passes, then the message vanishes. We can also declare a variable called Duration in Excel VBA to set the message box’s duration to a predetermined number of seconds. The message box is made using the PopUp method of the WScript.Shell object.
How to Launch VBA Editor in Excel
VBA code is written in the VBA Editor, which can be accessed via the Developer tab on the ribbon. By default this tab is not enabled. If you don’t see the Developer tab, it will have to be enabled using the Customize Ribbon option from the Excel Options directly.
Steps:
- Right-click on any option of the ribbon.
A wizard will appear.
- Click on Customize the Ribbon.
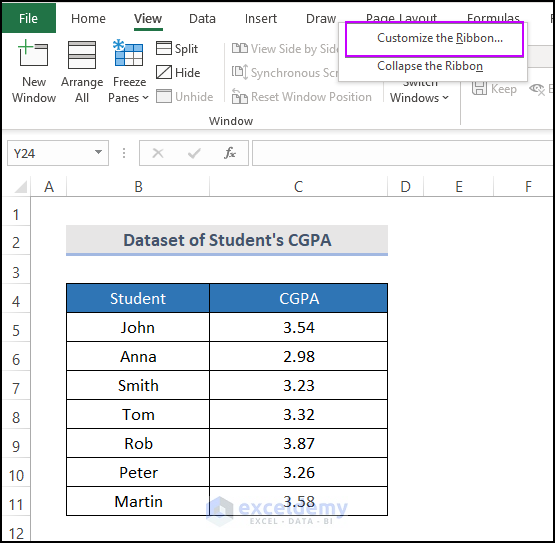
The Customize Ribbon option opens in the Excel Options.
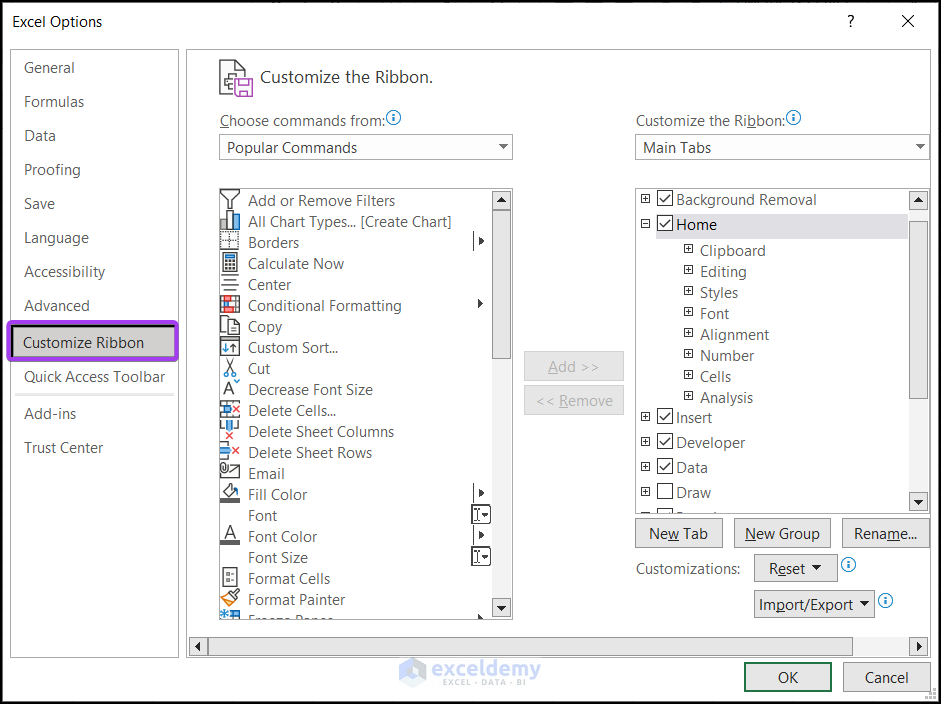
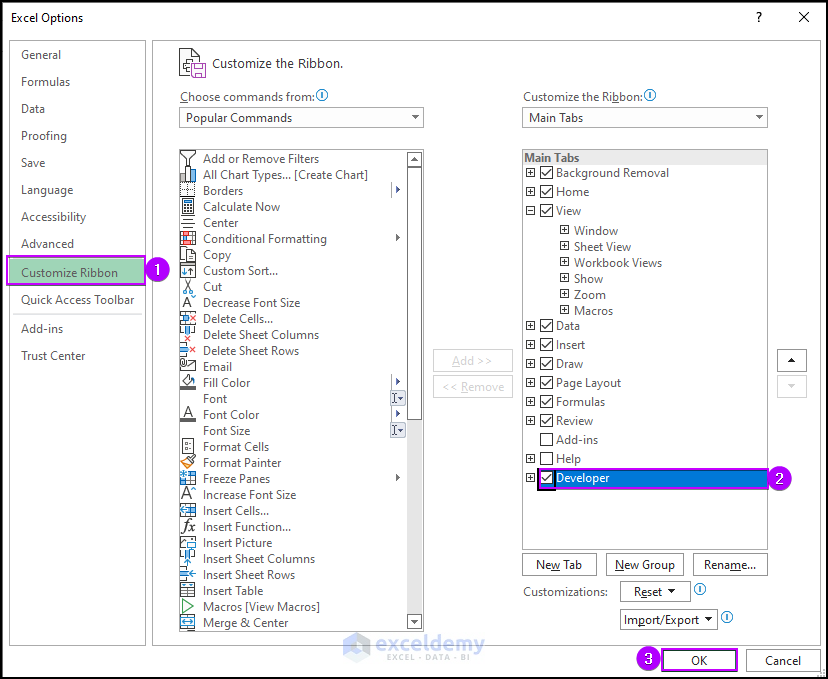
We can import or export any tabs in the ribbon here. We can also hide some tabs if we don’t want them, or unhide them. Let’s enable display of the the Developer tab.
- Go to the Customize Ribbon >> check the Developer box >> select OK.
The Developer tab will appear in the ribbon.
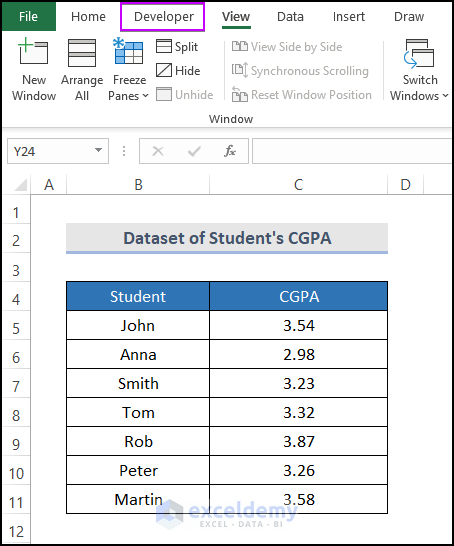
- To open the VBA window in which we write code, go to the Developer tab on your ribbon and select Visual Basic from the Code group.

VBA modules have a .bcf file extension. To insert a module for the code:
- Go to the Insert tab in the VBA editor.
- Click on Module from the drop-down.
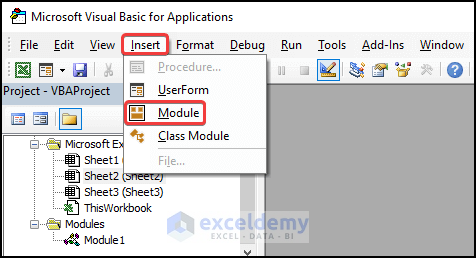
The VBA editor launches.
Excel VBA to Display Message Box for 5 Seconds: 3 Suitable Cases
We will now use three effective but tricky examples to display a message box for 5 seconds using Excel VBA.
We use the Microsoft Office 365 version here, but you can utilize any other version as you prefer.
Example 1 – Display Msgbox for 5 Seconds Before Selecting All Cells
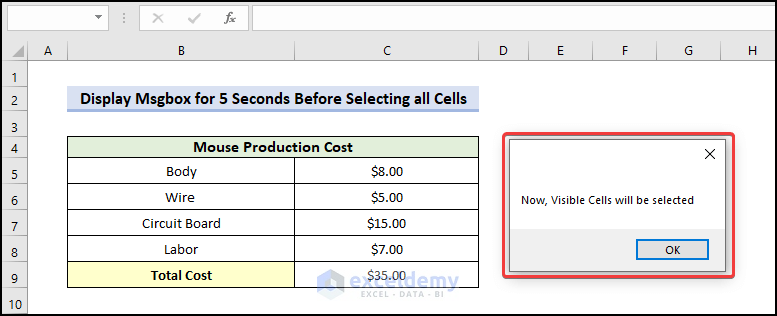
Here, we’ll use an Excel VBA code to select only the visible cells in a dataset that contains mouse production costs. We’ll display a MsgBox for five seconds before selecting the cells. The outcome will resemble the picture shown above.
- Copy the following code and paste it into the Module window:
Sub show_message_5_seconds()
Dim r1ng As Range
Dim Duration As Integer
Dim Message As Variant
Set r1ng = Sheets("Sheet1").UsedRange.Find("Body")
r1ng.CurrentRegion.Select
Duration = 5
Message = CreateObject("WScript.Shell").PopUp("Now, Visible Cells will be selected", Duration, "")
End Sub
- To run the code, press F5 or select the Macro option from the Developer tab.
The result will be as follows, with a MsgBox displaying for 5 seconds before the visible cells are selected.
VBA Code Explanation:
Sub show_message_5_seconds_before_selecting_cells()Provides a name for the sub-procedure of the macro.
 Dim r1ng As Range
Dim Duration As Integer
Dim Message As Variant
Declares the necessary variable for the macro.
Set r1ng = Sheets("Sheet1").UsedRange.Find("Body")
r1ng.CurrentRegion.Select
Returns the range used on the specified worksheet as a range object, and uses the find method to get the specified range.
Duration = 5
Message = CreateObject("WScript.Shell").PopUp("Now, Visible Cells will be selected", Duration, "")
The “PopUp” method of the “WScript.Shell” object is used to display a pop-up message. “Now, Visible Cells will be Selected” is the message that appears in the pop-up, which will remain visible for 5 seconds. The “Message” variable holds the outcome of this method call.
End Sub
Ends the sub-procedure of the macro.
Read More: Excel VBA: Create New Line in MsgBox
Example 2 – Insert Multiple Rows and Display Confirmation Message Box for 5 Seconds
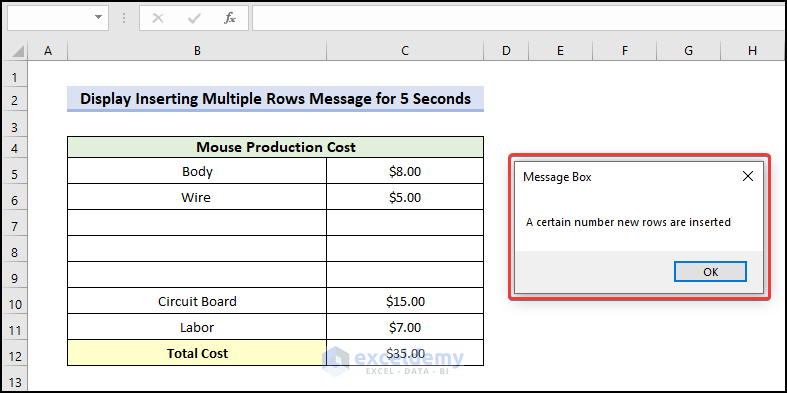
Now we’ll use an Excel VBA code to add multiple rows from the active cell in our Excel dataset. We will also display an “Inserting multiple rows” MsgBox for five seconds. The result will look similar to the image above.
- Copy the following code and paste it into the Module window:
Sub InsertRowsfromUser()
iMsg = InputBox("How Many Rows to Insert? (100 Rows maximum)")
numRows = Int(Val(iMsg))
If numRows > 100 Then
numRows = 100
End If
If numRows = 0 Then
GoTo EndInsertRows
End IfDo
Selection.EntireRow.Insert
iCount = iCount + 1
Loop While iCount < numRows
EndInsertRows:
Dim AskTime As Integer, MsgBox As Object
Set MsgBox = CreateObject("WScript.Shell")
AskTime = 5
Select Case MsgBox.PopUp("A certain number new rows are inserted", AskTime, "Message Box", 0)
Case 1, -1
Exit Sub
End Select
End Sub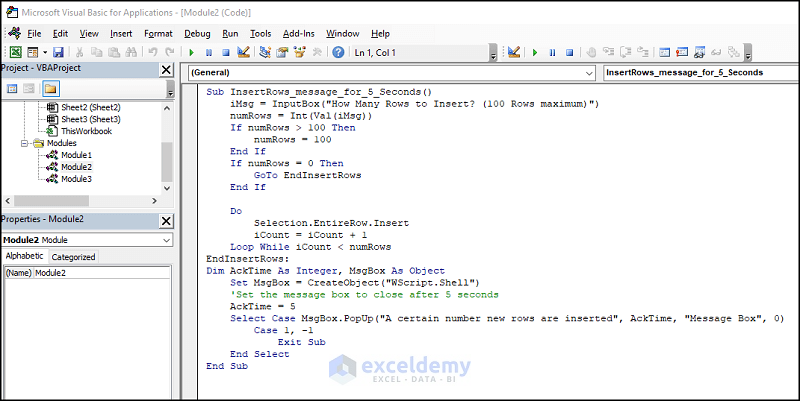
- Run the code by pressing F5 or by choosing the Macro window from the Developer tab.
A message box appears.
- Enter the row number (we want to insert 3 rows, so enter 3) and click OK.
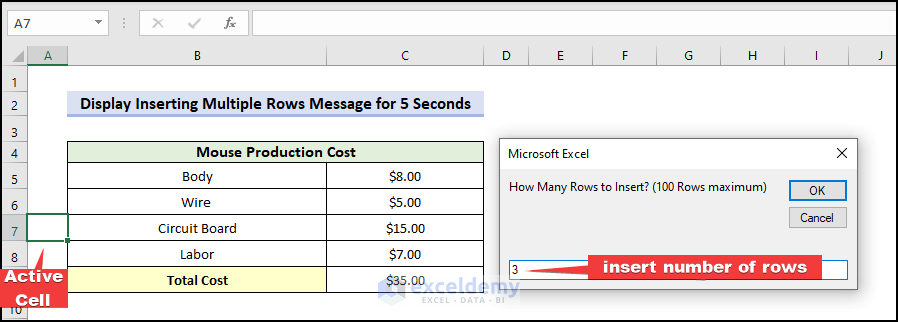
3 new rows are inserted below the active cell in the dataset.
A MsgBox appears stating that a certain number of new rows have been added, and is displayed for five seconds.
VBA Code Explanation:
Sub InsertRows_message_for_5_Seconds()Provides a name for the sub-procedure of the macro.
iMsg = InputBox("How Many Rows to Insert? (100 Rows maximum)")Shows an input box asking the user to enter how many rows they want to insert.
  numRows = Int(Val(iMsg))
Next, it will change the string input to an integer.
If numRows > 100 Then
numRows = 100
End If
If numRows = 0 Then
GoTo EndInsertRows
End If
This If statement restricts the number of rows to insert to 100. If the user enters 0 rows, the IF statement will jump to the EndInsertRows label.
Do
Selection.EntireRow.Insert
iCount = iCount + 1
Loop While iCount < numRows
EndInsertRows:
For each iteration, this loop adds a new row to the worksheet.
Dim AskTime As Integer, MsgBox As Object
Set MsgBox = CreateObject("WScript.Shell")
Next, the above code uses the Windows Scripting Host to construct a message box object.
'Set the message box to close after 5 seconds
AskTime = 5
Select Case MsgBox.PopUp("A certain number new rows are inserted", AskTime, "Message Box", 0)
Case 1, -1
Exit Sub
End Select
End Sub
Shows the message box with the specified text for 5 seconds.
End SubEnds the sub-procedure of the macro.
Read More: Pop Up Excel VBA MsgBox When Cell Meets Criteria
Example 3 – Display Data Type of Selected Cell for 5 Seconds in a Message Box
Here, we’ll use an Excel VBA code to display selected cell data types in our Excel dataset, and display a MsgBox for five seconds. The output will be similar to the image above.
- Copy the following code and paste it into the Module window:
Sub CheckSelectedCellType()
Dim myCell As Range
Set myCell = Selection.Cells(1) ' Get the first selected cell
Duration = 5
' Check the data type of the cell's value
Select Case VarType(myCell.Value)
Case vbInteger
Message = CreateObject("WScript.Shell").PopUp("The selected cell contains an integer.", Duration, "")
Case vbLong
Message = CreateObject("WScript.Shell").PopUp("The selected cell contains a long integer.", Duration, "")
Case vbSingle
Message = CreateObject("WScript.Shell").PopUp("The selected cell contains a single-precision floating-point number.", Duration, "")
Case vbDouble
Message = CreateObject("WScript.Shell").PopUp("The selected cell contains a double-precision floating-point number.", Duration, "")
Case vbDate
Message = CreateObject("WScript.Shell").PopUp("The selected cell contains a date or time value.", Duration, "")
Case vbString
Message = CreateObject("WScript.Shell").PopUp("The selected cell contains a text string.", Duration, "")
Case Else
Message = CreateObject("WScript.Shell").PopUp("The selected cell contains a value of an unknown type.", Duration, "")
End Select
End Sub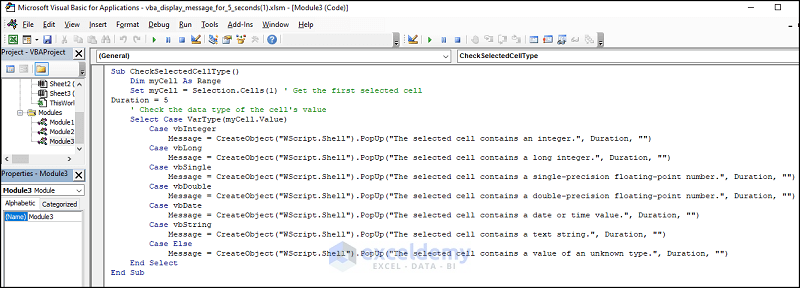
- Press F5 or select the Macro option from the Developer tab to run the code.
Following are the results, with the MsgBox displaying the data type of the chosen cells for five seconds.

VBA Code Explanation:
Sub CheckSelectedCellType()Provides a name for the sub-procedure of the macro.
Dim myCell As RangeDeclares the necessary variables for the macro.
  Set myCell = Selection.Cells(1) ' Get the first selected cell
Duration = 5
Select Case VarType(myCell.Value)
Case vbInteger
Message = CreateObject("WScript.Shell").PopUp("The selected cell contains an integer.", Duration, "")
Case vbLong
Message = CreateObject("WScript.Shell").PopUp("The selected cell contains a long integer.", Duration, "")
Case vbSingle
Message = CreateObject("WScript.Shell").PopUp("The selected cell contains a single-precision floating-point number.", Duration, "")
Case vbDouble
Message = CreateObject("WScript.Shell").PopUp("The selected cell contains a double-precision floating-point number.", Duration, "")
Case vbDate
Message = CreateObject("WScript.Shell").PopUp("The selected cell contains a date or time value.", Duration, "")
Case vbString
Message = CreateObject("WScript.Shell").PopUp("The selected cell contains a text string.", Duration, "")
Case Else
Message = CreateObject("WScript.Shell").PopUp("The selected cell contains a value of an unknown type.", Duration, "")
End Select
In order to determine the value’s data type, these lines employ a Select Case statement. Based on the data type, a message box is shown using the WScript.Shell object’s PopUp method.
End SubEnds the sub-procedure of the macro.
Read More: Excel VBA Code to Click OK on Message Box Automatically
How to Create a VBA Message Box That Automatically Disappears in Excel
This example demonstrates how to instantly close a message box after a predetermined amount of time. The message box appears for a specified number of seconds before automatically closing.
Sum Messagebox_disappear
Dim Duration As Integer, MsgBox As Object
Set MsgBox = CreateObject("WScript.Shell")
Duration = 2
Select Case MsgBox.PopUp("Message box will disappear automatically", Duration, "Message Box", 0)
Case 1, -1
Exit Sub
End Select
End Sub
Using the Duration variable, this code causes the message box to vanish. If we set the Duration variable to 2, the message box will automatically close after 2 seconds of the display. The result will look similar to the image below.
Read More: VBA MsgBox That Will Automatically Disappear in Excel
How to Disable Message Box in Excel VBA
To disable message boxes, the following code should be put at the start of your subroutine:
Application.DisplayAlerts = FalseThis code will disable Excel’s default behavior of showing alert messages for specific actions, like deleting a worksheet or overwriting data.
If you need to re-enable the message boxes again, use the following code:
Application.DisplayAlerts = TrueThings to Remember
If the Duration variable is removed, the user has to click on an Option, such as a Yes MsgBox, to remove the MsgBox.
Frequently Asked Questions (FAQ)
- How do I display a message for a specific time in Excel VBA?
The PopUp method of the WScript.Shell object allows you to display a message in Excel VBA for a predetermined period of time. The PopUp method automatically closes a message box after it has been displayed for a predetermined amount of time. For example:
Duration = 10
Message = CreateObject("WScript.Shell").PopUp("Give your message here", Duration, "Title")- Can I customize the message box style and icon?
Yes. In the code below, we use a combination of constants (vbYesNo, vbQuestion, and vbDefaultButton2) to show a dialog box with a Yes button, a No button, and a Question mark icon. The default button (vbDefaultButton2) will be the second button (No button).
Sub GetResult()
Main_Config = vbYesNo + vbQuestion + vbDefaultButton2
Result = MsgBox("Do you Want to see the monthly report?", Main_Config)
If Result = vbYes Then MsgBox "You are currently viewing the Report", vbInformation
If Result = vbNo Then Exit Sub
End Sub
After executing the code, a MsgBox with a question mark is displayed. Click Yes to proceed. In the next step, another Information icon is displayed on the prompt. Click OK to close the MsgBox.
- Can I run the macro automatically when the workbook opens?
Yes. To automatically run a macro when the workbook opens, double-click on the “ThisWorkbook” object to open the code module for the workbook, and save the following code:
Private Sub Workbook_Open()
MsgBox "Welcome to New Workbook!", vbInformation, "Workbook is Opened"
End Sub
In this case, when the workbook is opened, the macro shows a welcome message.
Download Practice Workbook
Related Articles
- Excel VBA MsgBox Examples
- Excel VBA: Develop and Use a Yes No Message Box
- How to Show Range Address with MsgBox in Excel VBA


Hello.
Very interesting. Gave me new and better ideas for using MsgBox.
Thank you.
Cheers
Hello Alphonse,
You are most welcome Your appreciation means a lot to us.
Regards
ExcelDemy