Microsoft Word uses the default OLE DB Database Files conversion when it fetches labels from Excel files. The typical reasons behind Word Mail Merge not working with Excel include:
- Microsoft Word, Microsoft Office, or Microsoft 365 are corrupted.
- Checked or unchecked status for the Confirm file format conversion on open option.
- The user has multiple email addresses assigned to their profile.
Word Mail Merge Not Working with Excel: 4 Suitable Solutions
Solution 1 – Modifying or Repairing Office
- Type Apps and Features in the Taskbar’s Search bar.

- In the Apps & Features window, find the Microsoft Word, Microsoft Office, or Microsoft 365 application.
- Click on it.
- Choose Modify or Uninstall.
- If you uninstalled the app, reinstall it.
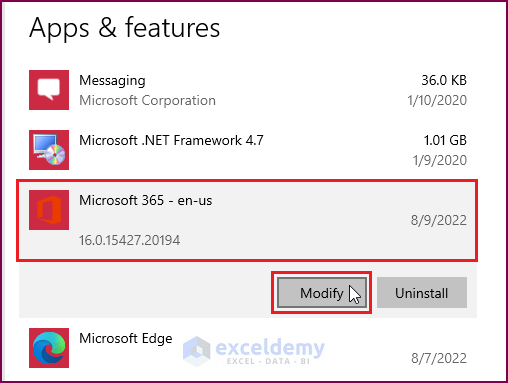
⧭ Tips: Modifying an application to repair it may not work. Therefore, users may need to reinstall the application.
Solution 2 – Using Word Advanced Options
As we mentioned earlier, Microsoft Word uses OLE DB Database Files conversion as its default. The option may result in reformatting fetched data when using Microsoft Word Mail Merge with Excel.
- Open Microsoft Word.
- Go to File > Options > Advanced > General.
- Check whether the Confirm file format conversion on open option is checked.
- Click on OK.
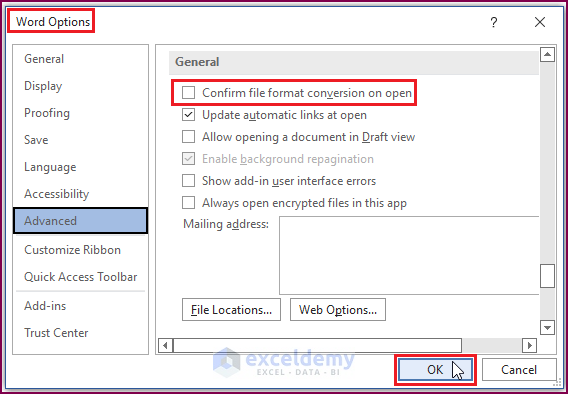
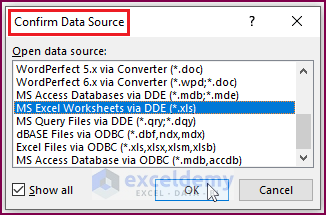
- If the Confirm file format conversion on open option is unchecked, Word will automatically fetch the files from Excel. Otherwise, Word shows the Open data source options as depicted below.
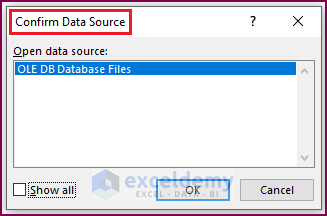
⧭ Tips: To avoid the Word Mail Merge not fetching Excel files issue, uncheck the Confirm file format conversion on open option. Also, users can restrict multiple prompt windows by unchecking the option.
Read More: How to Mail Merge from Excel to Word Envelopes
Solution 3 – Selecting Dynamic Data Exchange
Word fetches information using OLE DB Database Files. However, checking the Confirm file format conversion on open option offers selecting multiple Open data source options. Selecting MS Excel Worksheets via DDE (*xls) restores the cell formats of Excel files in Word and may enable Word to handle the issue.
- Open Word.
- Go to File > Options > Advanced > General.
- Check Confirm file format conversion on open.
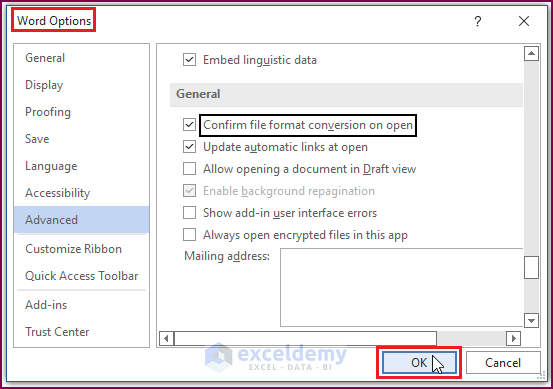
- Click OK.
- Go to Mailings and choose Select Recipients.
- Click on Use an Existing List.

- Choose an Excel file. The Confirm Data Source dialog box opens up.
- Tick Show all to display all the available options.
- Select MS Excel Worksheets via DDE (*xls) to maintain the file format in Excel.
Solution 4 – Removing Multiple Email Addresses from the Emailing Profile
- Maintain a single email address associated with your Office profile.
Read More: Macro to Populate a Mail Merge Document from Excel
Related Articles
- Mail Merge in Excel without Word
- How to Insert Merge Fields in Word from Excel
- How to Mail Merge Pictures from Excel to Word
<< Go Back To Mail Merge Excel | Learn Excel
Get FREE Advanced Excel Exercises with Solutions!

